

Good Eyeshadow Blending Brush: Best Options for Every Eye Shape
A good eyeshadow blending brush is not necessarily the biggest, fluffiest, or softest brush in your collection. The right brush depends on what you want it to do: diffuse a transition shade, blend a crease, define the outer corner, soften a lower lash line, or work precisely around a small or hooded lid. A brush can be beautifully made and still feel difficult to use if its size, density, taper, or bristle length does not match your eye space.
This guide takes a decision-first approach. Instead of simply naming popular brushes, it explains how brush anatomy affects performance and then matches different brush types to powder and cream formulas, eye shapes, and blending goals. That makes it easier to choose one versatile brush—or a small collection—without buying tools you will rarely use.
The Best Eyeshadow Blending Brushes at a Glance
If you want a quick answer, start with the task rather than the brand. A medium fluffy brush is generally the most forgiving choice for everyday transition shades, while a tapered or dome brush offers more crease control. Small pencil and detail brushes become more useful as your available eyelid space gets smaller or your makeup becomes more precise.
Quick Picks by Blending Goal
- Best for seamless crease blending: A medium fluffy or softly tapered blending brush with flexible, low-to-medium-density bristles.
- Best for outer-corner definition: A compact tapered, dome, or pencil blending brush that can place pigment before diffusing the edge.
- Best for hooded eyes: A smaller tapered or dome brush that keeps color controlled instead of spreading it across the brow area.
- Best for small eyes: A compact blending brush with shorter bristles and a narrower head.
- Best for beginners: A medium-sized fluffy or softly tapered brush that blends gradually and reduces the chance of harsh edges.
- Best for professional-level precision: A combination of compact tapered, pencil, and small-detail brushes for controlled placement and finishing.
Comparison Matrix: Which Brush Type Fits Your Goal?
- Fluffy: Broad diffusion; best for transition shades and soft powder looks; forgiving precision; works especially well on larger visible lid areas.
- Tapered: Controlled crease placement with diffused edges; versatile for everyday and detailed looks; suitable for many eye shapes.
- Dome: Balanced placement and blending; useful when you want more control than a fluffy brush without the concentration of a pencil brush.
- Pencil: Concentrated detail work; excellent for lower lash lines, outer corners, and tight creases.
- Small-detail: Maximum control for small lids, hooded eyes, intricate transitions, and professional-style precision.
How We Evaluated Each Brush
A practical blending-brush evaluation should look beyond softness. The important criteria include bristle density, bristle length, taper, flexibility, head size, pigment pickup, diffusion, precision, fallout control, formula compatibility, and wash durability. The ferrule also matters because a wider or narrower ferrule can influence the profile of the brush head and therefore how easily it fits into the crease.
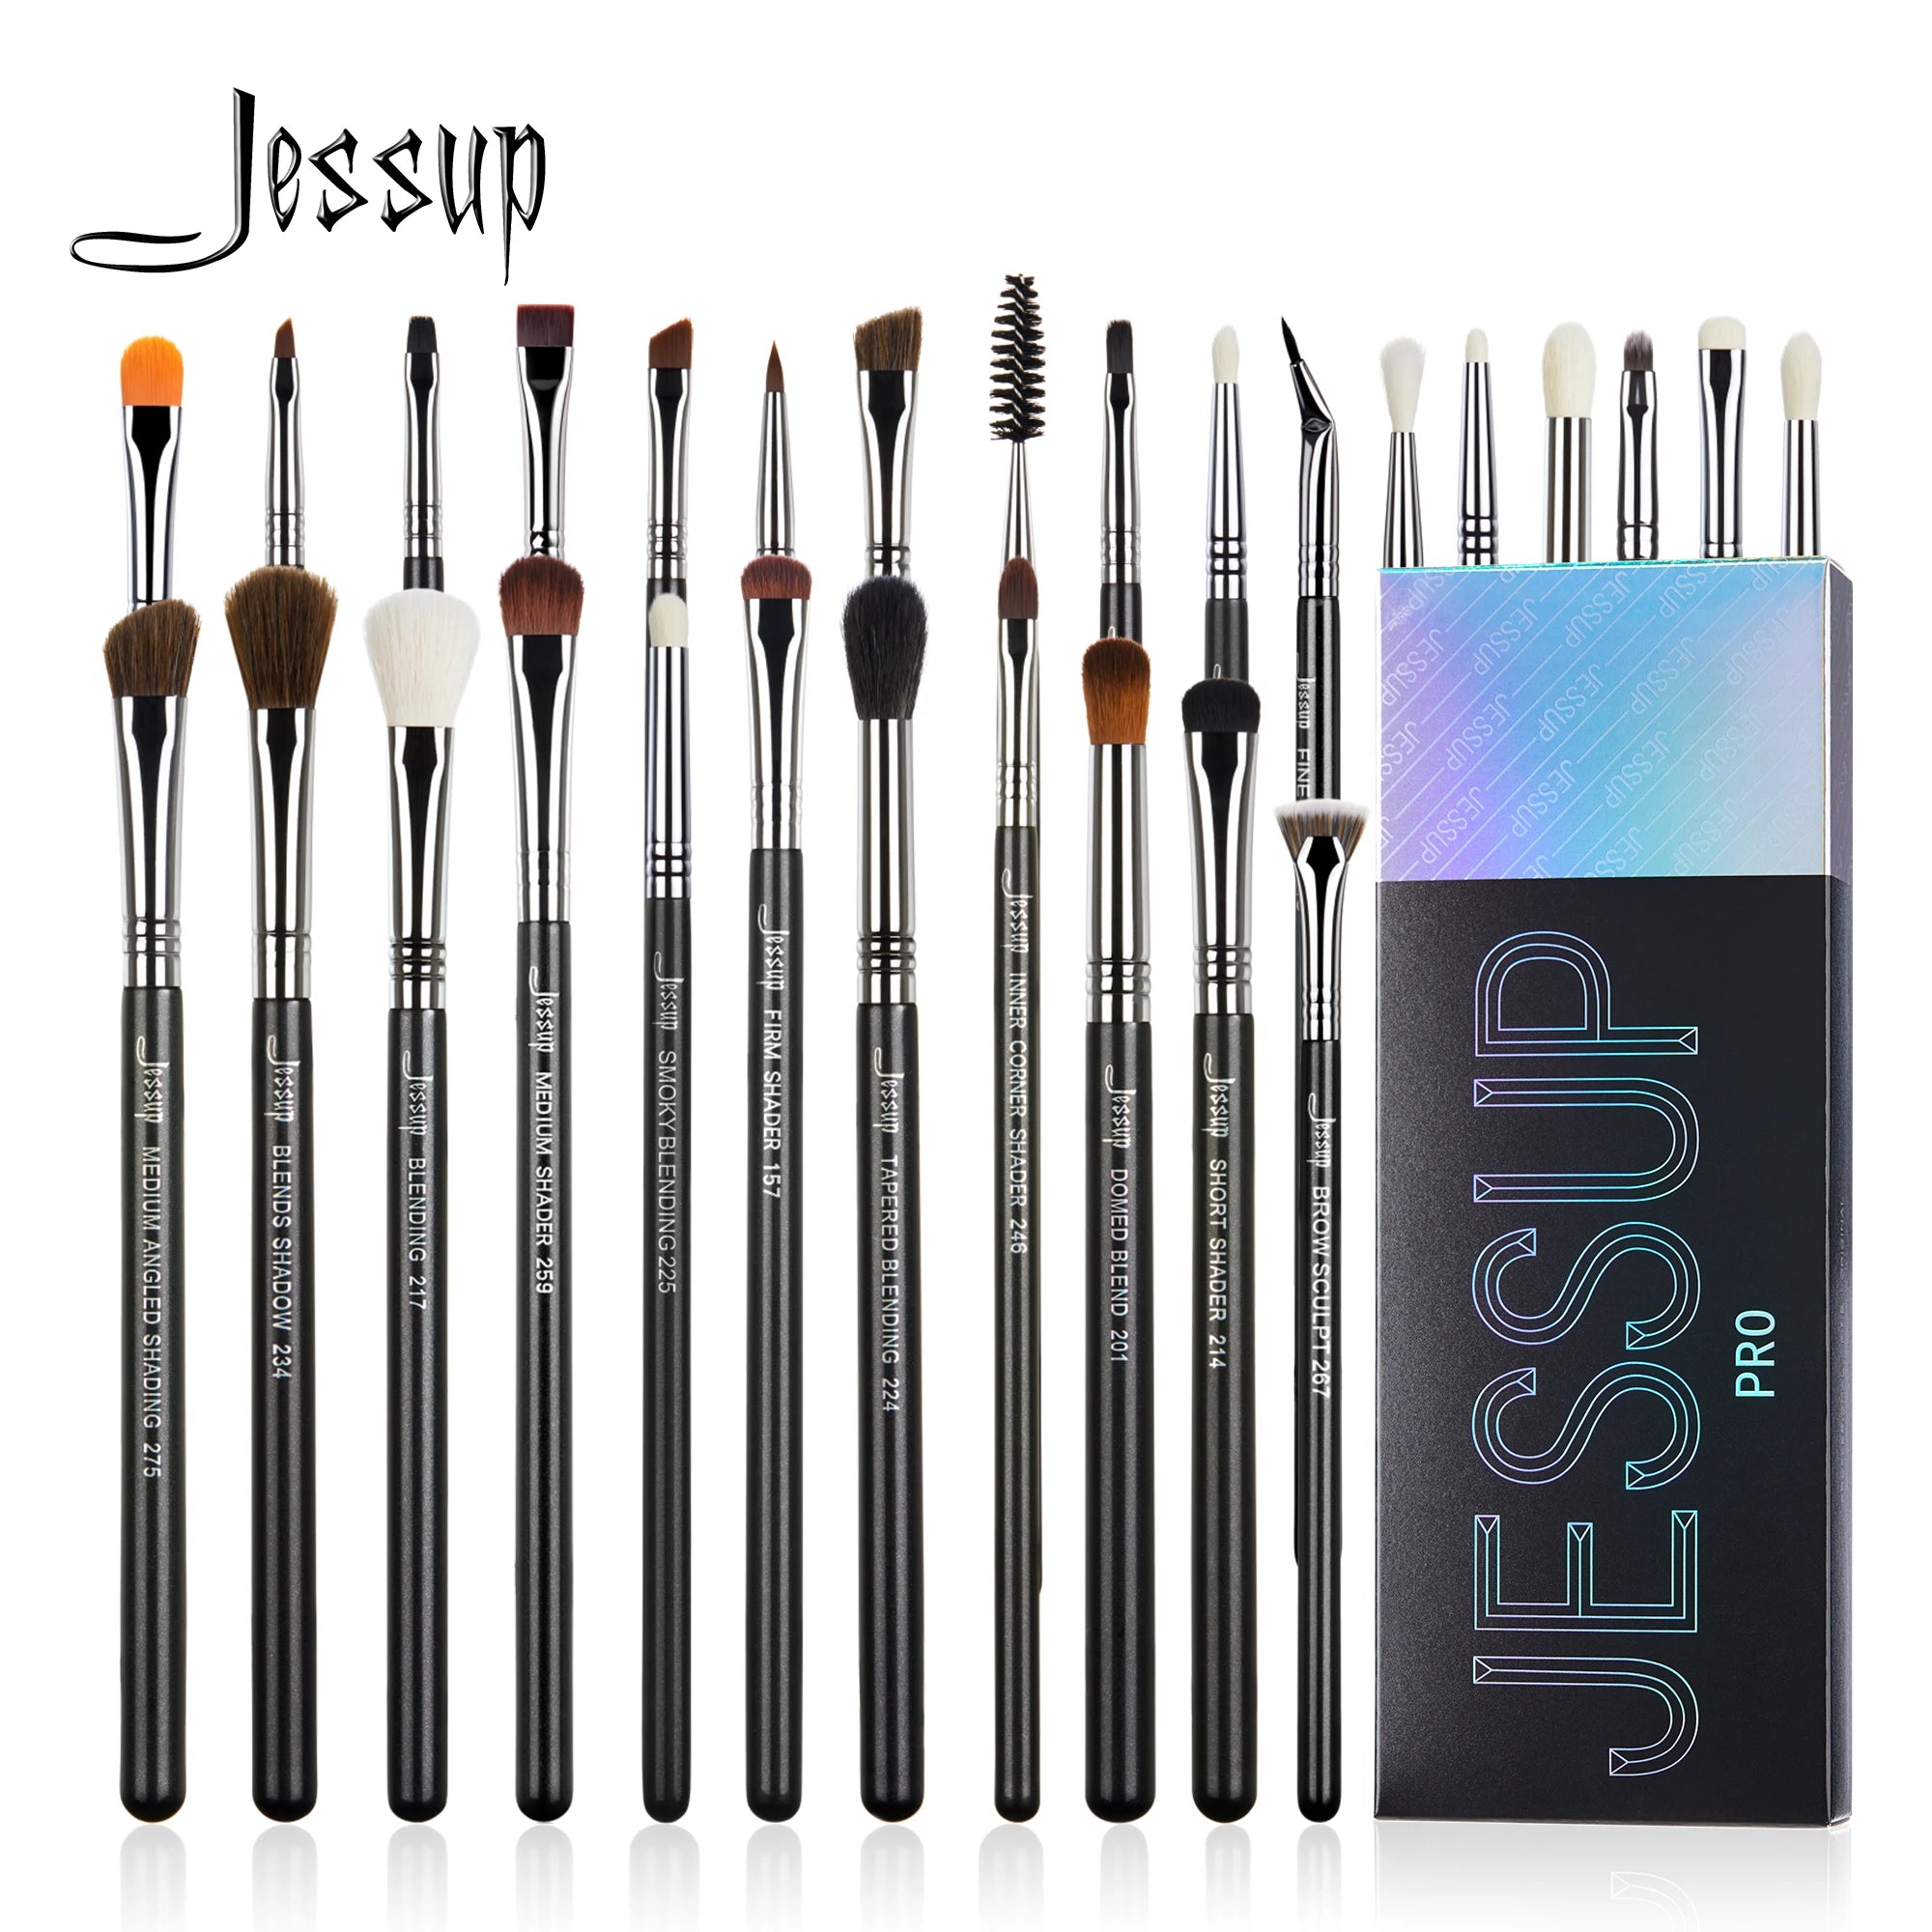
For shoppers building a complete eye kit, a versatile set can also make more sense than purchasing one brush at a time. The 28pcs Eye Makeup Brushes Set, for example, includes multiple eye-focused brush shapes for blending, shading, lining, and definition. Its synthetic fibers and wooden handles make it a practical option for someone who wants several tools for different stages of an eye look.
If you are specifically shopping for beauty tools rather than health devices, you can also browse the broader Skin and Beauty Care Devices collection for related beauty equipment.
What Makes a Good Eyeshadow Blending Brush?
A good blending brush should let you move pigment without creating obvious edges, muddying neighboring colors, or requiring excessive pressure. The ideal balance is enough softness and flexibility to diffuse color, combined with enough structure to maintain control.
Brush Density: Fluffy vs. Firm
Fluffy brushes have more space between their fibers and generally distribute pigment over a wider area. They are excellent for transition shades and softening edges because they deposit less concentrated color with each pass. That makes them particularly forgiving for beginners.
Denser brushes place more pigment in a smaller area. They are useful when you need to deepen a crease or outer corner without allowing color to spread too far. The trade-off is that dense brushes require lighter pressure and more deliberate movement to avoid creating a harsh patch.
Bristle Length and Taper
Longer bristles typically create more movement and broader diffusion. Shorter bristles tend to provide greater control. A tapered head combines these characteristics by narrowing toward the tip while retaining a broader base.
That is why a tapered blending brush can be unusually versatile. You can use the tip to place color into the crease and then use the side of the brush to soften the surrounding edge.
Brush Size and Eyelid Space
Brush size should match the area you are actually blending. A large fluffy brush may look luxurious but can overwhelm a small lid, especially when the visible crease area is narrow. Too much brush head can move pigment into the brow bone or make two neighboring shades blend together.
Conversely, using a tiny detail brush across a large lid can make blending unnecessarily slow. The goal is not to find the smallest brush possible; it is to find the largest brush that still gives you control over your specific eye area.
Natural vs. Synthetic Makeup Brush Fibers
Synthetic makeup brush fibers are commonly made from manufactured fibers designed to provide consistent texture and shape. They can be easy to clean and are useful across many modern formulas, particularly when a controlled application is desired.
Natural makeup brush fibers have traditionally been valued for their ability to pick up and diffuse powder products. However, the performance of a brush depends heavily on fiber construction, density, cut, and finish—not simply whether the fibers are natural or synthetic.
For a versatile eye brush collection, synthetic fibers can be a practical choice because they can work across multiple techniques and are generally straightforward to maintain. Always judge the individual brush rather than assuming fiber type alone determines quality.
Choose Your Blending Brush by Shape
Fluffy Blending Brush
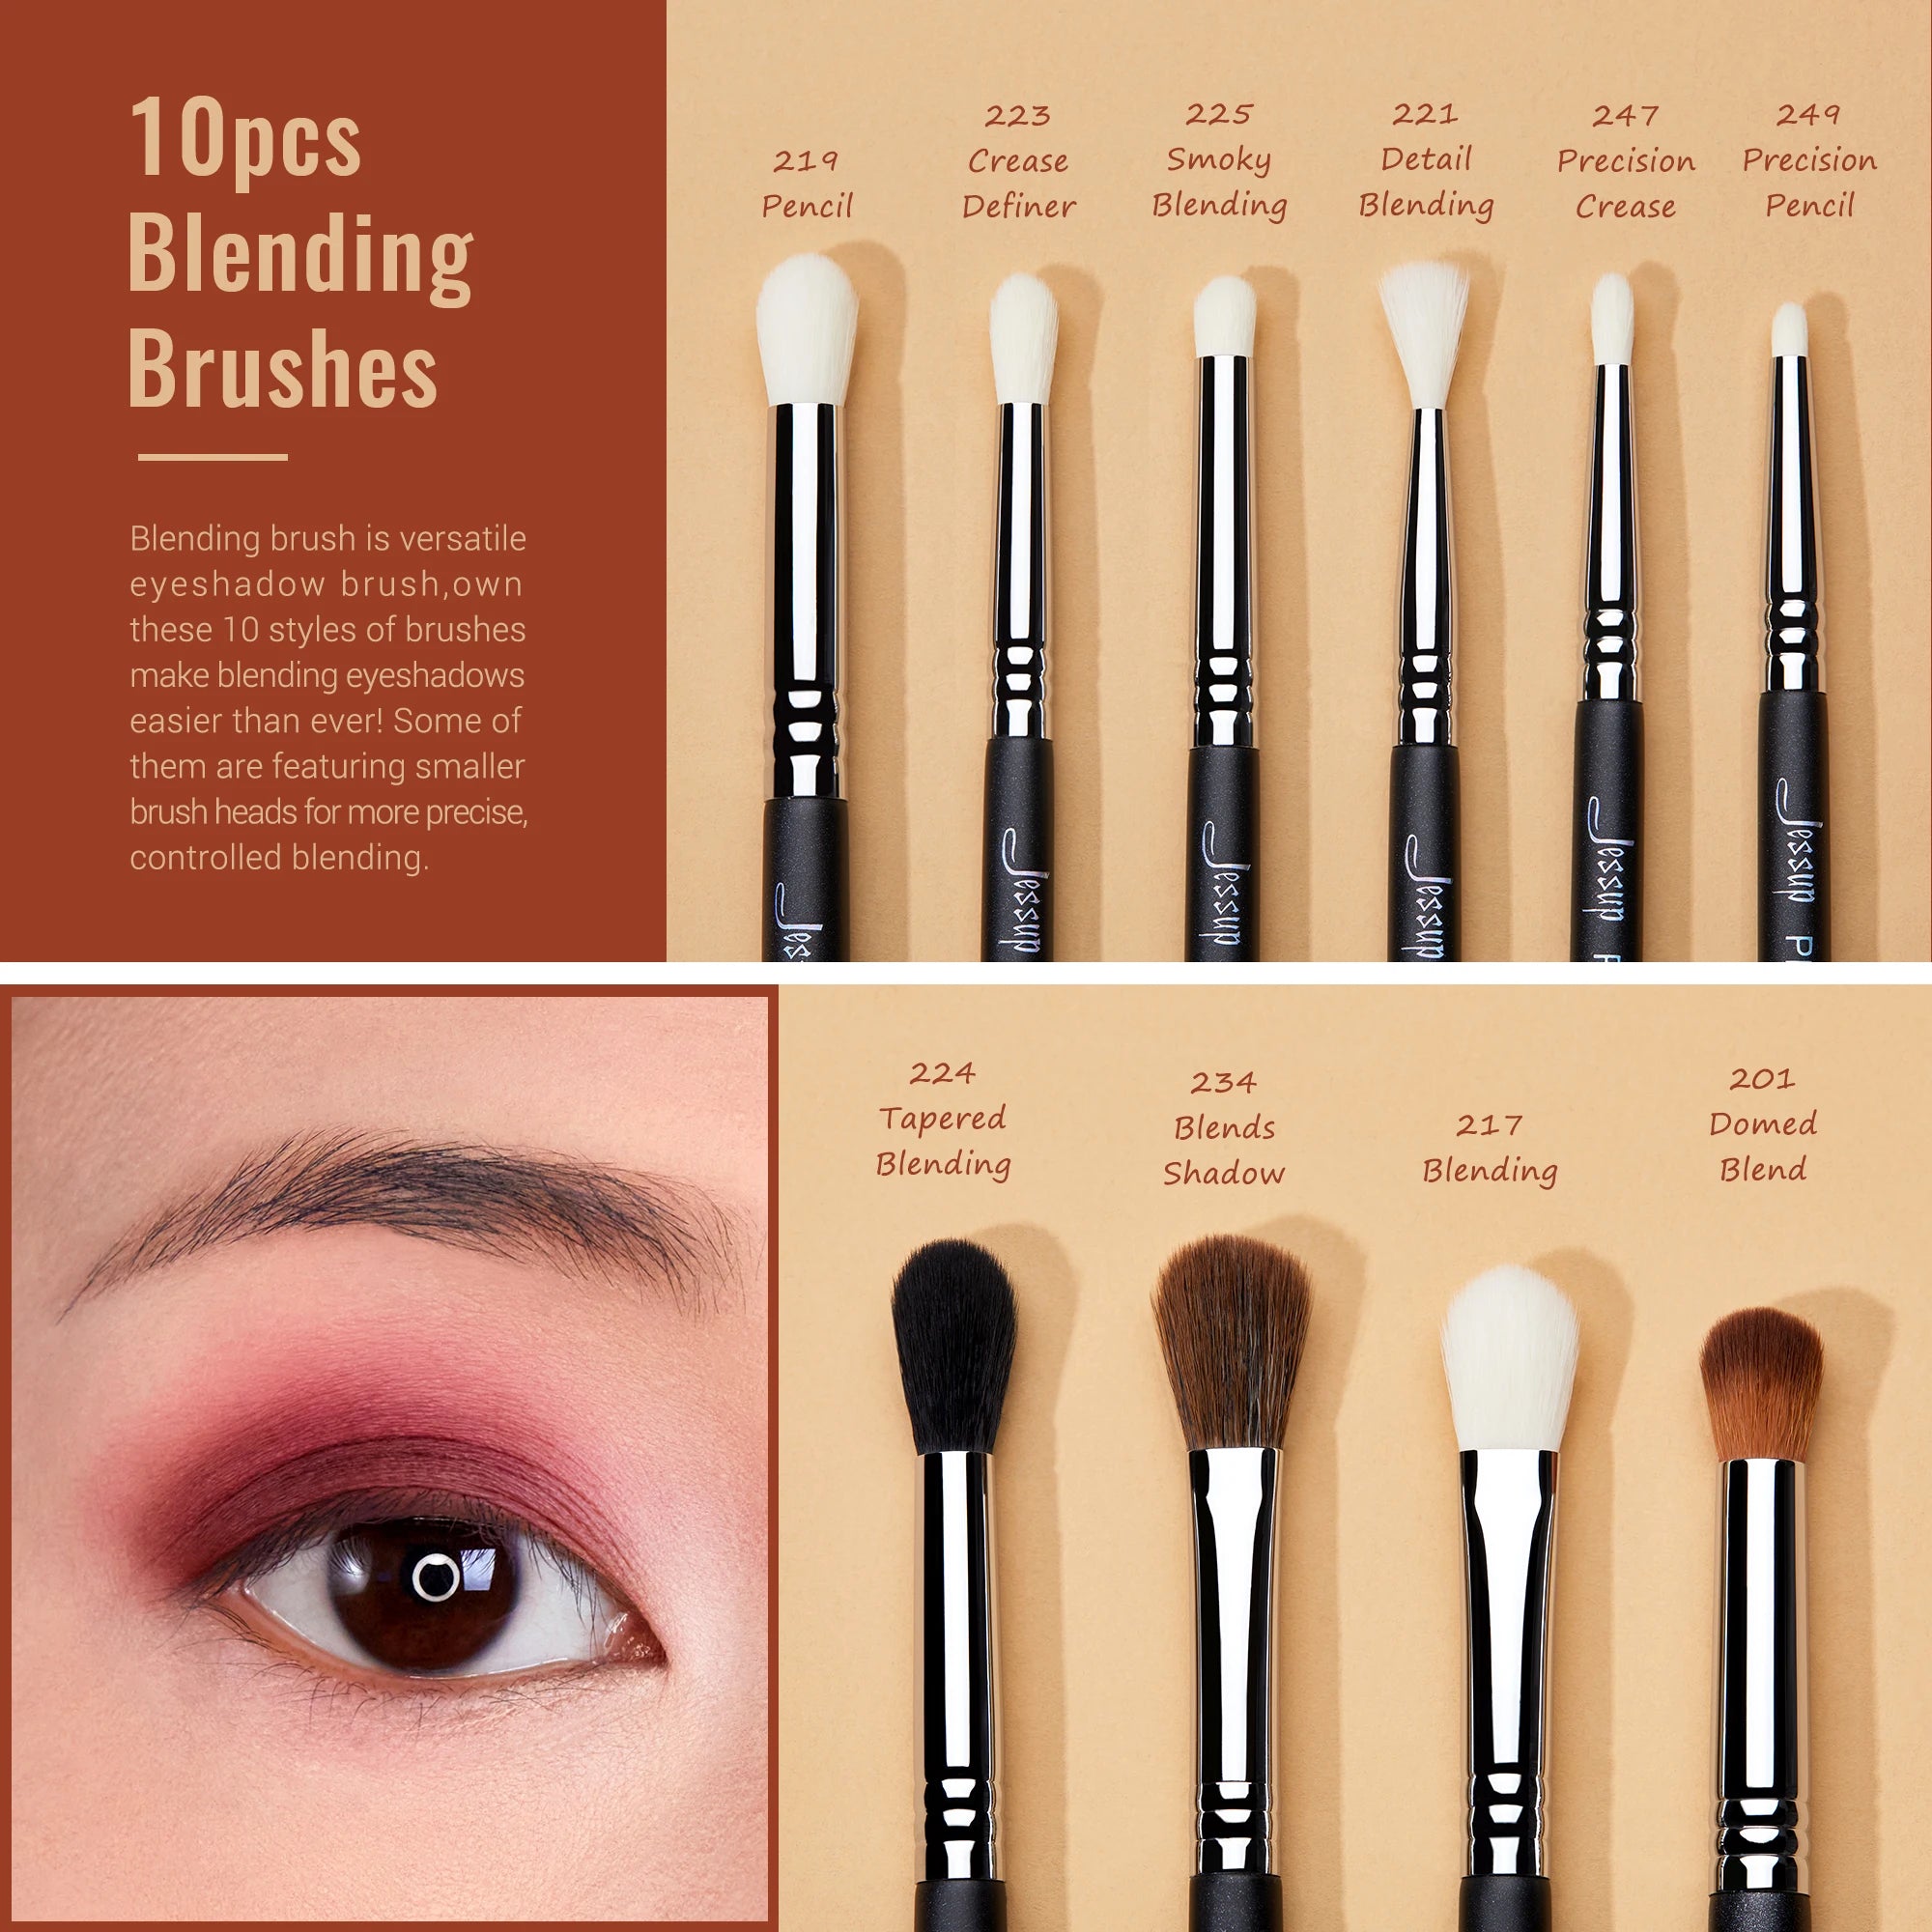
A fluffy blending brush is the classic choice for diffusing powder eyeshadow. Its loose structure spreads color gradually, making it useful for transition shades, broad crease work, and softening the border between two colors.
Best for: soft everyday makeup, transition shades, broad diffusion, and beginners.
Limitation: It can lack precision when working on very small lids or when you need concentrated outer-corner color.
Tapered Blending Brush
A tapered blending brush is one of the most useful all-purpose shapes because its narrower tip can reach the crease while its wider body blends the surrounding pigment. It is a strong choice when you want both placement and diffusion from the same tool.
Best for: crease blending, controlled transitions, everyday looks, and users who want one versatile brush.
Limitation: An extremely tapered brush can deposit more pigment than expected if pressed firmly.
Dome Blending Brush
A dome blending brush has a rounded head that gives it a predictable contact point. It can be useful for controlled crease work and for blending concentrated color without the broad sweep of a large fluffy brush.
Best for: defined crease work, controlled diffusion, and medium-sized visible lid areas.
Pencil Blending Brush
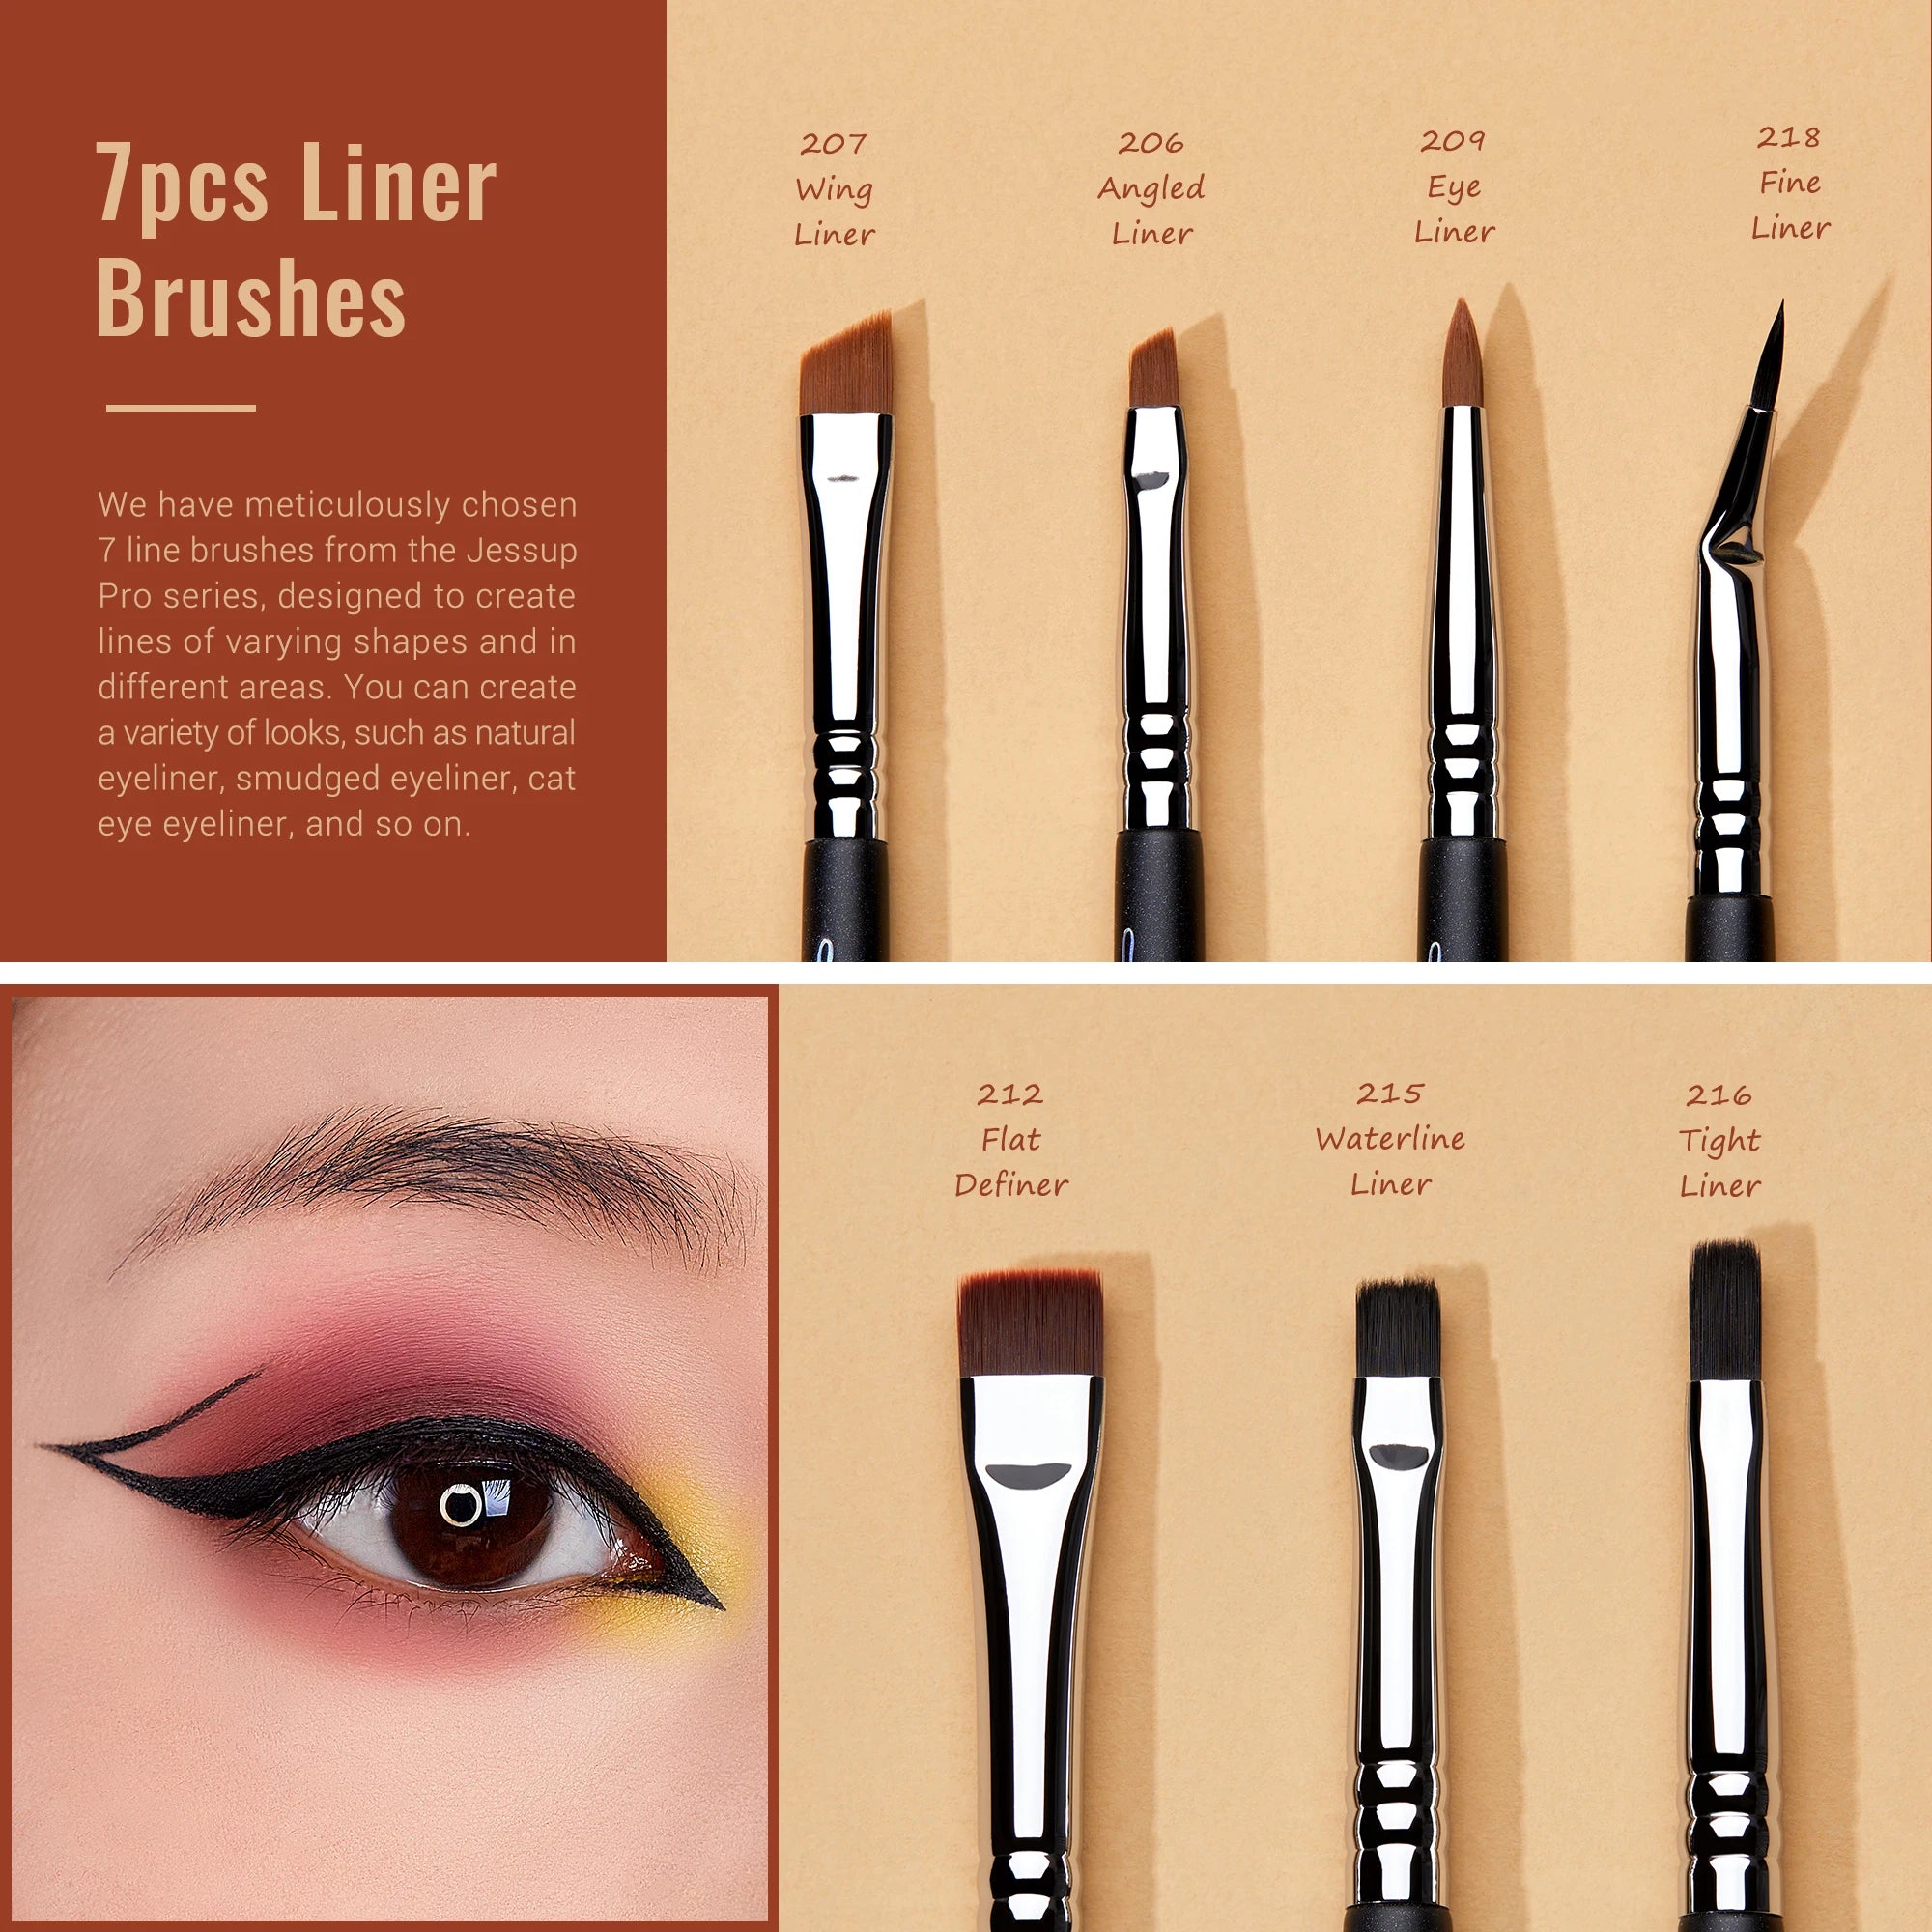
A pencil blending brush has a narrow, pointed or rounded tip designed for small areas. It is particularly useful beneath the lower lash line, around the outer corner, and in tight creases where a full-size blending brush would be too broad.
Best for: lower-lash-line blending, smoky outer corners, tight creases, and concentrated color.
Small-Detail Blending Brush
A small-detail blending brush is the specialist option. It gives you the control required when a few millimeters of brush movement can change the placement of the entire look.
Best for: small eyes, hooded lids, intricate eye looks, precise transitions, and professional-level detailing.
Match the Brush to Your Eyeshadow Formula
Best Brushes for Powder Eyeshadow
Powder eyeshadow generally benefits from brushes that can pick up pigment and then distribute it gradually. A fluffy brush is excellent for low-intensity diffusion, while a tapered or dome brush gives you more concentrated placement.
For highly pigmented powder shadows, avoid assuming that a denser brush is automatically better. Dense bristles can pick up and deposit more product, so a light touch is important. When fallout is a concern, tap off excess pigment before bringing the brush to the eye.
Best Brushes for Cream Eyeshadow
Cream formulas usually benefit from controlled brush movement rather than extremely loose diffusion. Synthetic fibers can be particularly convenient because they are easy to clean after working with a cream product.
A moderately dense, rounded, or tapered brush can blend the edges of cream eyeshadow without requiring repeated dragging. Work in thin layers rather than attempting to blend a thick deposit all at once.
Can One Brush Work for Powder and Cream?
Yes, one brush can work with both, but cleaning becomes more important. Cream residue can remain between fibers and interfere with subsequent powder application. If you regularly switch formulas, a small collection of brushes is more convenient because it reduces cross-contamination of textures and preserves predictable performance.
Best Eyeshadow Blending Brush for Every Eye Shape
Eye-shape recommendations should be treated as practical starting points, not rigid rules. The key variable is how much visible lid and crease space you have and where you want the color to appear.
Best for Hooded Eyes
Hooded eyes often benefit from a compact tapered or dome-shaped brush. A large fluffy brush can spread transition color too far above the natural crease. A smaller head lets you place pigment slightly above the fold when desired while maintaining a controlled edge.
Use a light touch and blend with the tip or upper edge of the brush rather than repeatedly sweeping the entire brush head across the lid.
Best for Small Eyes
Small eyes generally benefit from proportionally smaller brushes. A compact blending head can fit into the crease without overwhelming the available space. Pencil and small-detail brushes are especially helpful for the outer corner and lower lash line.
Best for Deep-Set Eyes
Deep-set eyes can benefit from a tapered shape that reaches the crease while retaining enough flexibility to blend outward. A brush that is too broad may make it difficult to place color precisely where the eye structure naturally recedes.
Best for Monolids
Monolids can work well with compact, controlled brushes because visible lid space varies considerably from person to person. A small tapered or dome brush lets you build color gradually and position it according to the look you want rather than relying on a predefined crease.
Best for Mature Eyes
For mature eyes, prioritize soft, flexible fibers and use minimal pressure. A brush that feels scratchy or requires force can make application uncomfortable and may emphasize texture. A smaller fluffy or softly tapered brush can provide controlled diffusion without aggressive sweeping.
Best Eyeshadow Blending Brushes by Use Case
Best for Seamless Crease Blending
Choose a medium fluffy or softly tapered brush. It should have enough flexibility to spread the transition shade while retaining enough structure to keep the color in the crease. If your eye area is small, size down rather than increasing pressure.
Pros: forgiving, versatile, easy to diffuse, excellent for transition shades.
Cons: less precise for concentrated outer-corner work.
Best for Outer-Corner Definition
A compact tapered, dome, or pencil brush is more appropriate. First place the deeper shade exactly where you want it, then use short circular movements to soften the perimeter.
Pros: precise pigment placement, controlled depth, useful for smoky looks.
Cons: can create a harsh spot if overloaded with pigment.
Best for Beginners
A medium fluffy or softly tapered brush is usually the easiest starting point because it gives you room to correct mistakes. The brush should not be so large that it covers your entire eyelid, but it should have enough flexibility to blend without leaving sharp edges.
Pros: forgiving, versatile, easy to learn with.
Cons: may not replace a detail brush for advanced looks.
Best for Professional-Level Precision
Precision is better achieved with several complementary shapes than with one supposedly universal brush. A professional-style kit should ideally include a medium blending brush, compact tapered brush, pencil brush, and small-detail brush.
Pros: maximum control, better layering, supports detailed techniques.
Cons: requires more tools and more cleaning.
Best for Soft, Diffused Makeup
Choose a low-to-medium-density fluffy brush with flexible bristles. Use less product and allow the brush to do the diffusion rather than pressing harder to force the pigment into place.
Pros: soft edges, gradual color, natural-looking transitions.
Cons: slower for concentrated pigment placement.
For readers who want all of these brush functions in one organized collection, the 28-piece professional eye makeup brush set is designed around blending, shading, lining, and definition. It uses soft synthetic fibers and includes multiple brush shapes, making it more appropriate for someone who wants flexibility rather than a single-purpose blending tool.
How to Choose the Right Blending Brush in 30 Seconds
Step 1: Identify Your Main Blending Task
Decide whether you need broad diffusion, crease blending, outer-corner definition, or detail work. Broad diffusion points toward fluffy; crease work points toward tapered or dome; detail work points toward pencil or small-detail shapes.
Step 2: Measure Your Eyelid Space
Consider the visible area available for blending. If your lid or crease is compact, choose a smaller brush. If you have more space, a medium or larger brush can speed up application.
Step 3: Match Density to the Desired Finish
Choose lower density for soft diffusion and greater density for concentrated pigment placement. If you are uncertain, medium density is generally the most versatile starting point.
Step 4: Match the Brush to Your Formula
For powder, prioritize the balance between pigment pickup and diffusion. For cream, consider controlled density and easy-to-clean synthetic fibers.
Step 5: Choose One Brush or Build a Small Set
If you create simple everyday looks, one versatile tapered or fluffy brush may be enough. If you regularly use multiple shades, smoky techniques, lower-lash-line work, or detailed outer-corner looks, several specialized brushes will provide better control.
How to Use an Eyeshadow Blending Brush for a Seamless Finish
Load Less Product Than You Think
Start with a small amount of eyeshadow and build gradually. Overloading a blending brush makes it harder to distinguish placement from diffusion and can turn separate shades into a muddy mixture.
Place Color Before Diffusing the Edge
For controlled makeup, place the color where you want the highest concentration first. Then soften the perimeter with the brush's outer bristles. This is especially useful for the outer corner, where applying a deep shade and immediately sweeping it broadly can erase definition.
Use Small Circular and Windshield-Wiper Motions
Small circular movements can soften a localized edge, while windshield-wiper motions are useful for moving transition shades through the crease. Use the motion that matches the area rather than relying on one technique for the entire eye.
Use a Clean Brush for Final Diffusion
A clean, dry blending brush can soften the final edges without introducing more pigment. This is one of the easiest ways to prevent an eye look from becoming darker and heavier every time you blend.
How to Clean and Maintain an Eyeshadow Blending Brush
How Often Should You Wash Blending Brushes?
Wash frequently used eye brushes regularly rather than waiting until they visibly look dirty. Brushes used with cream or other emollient formulas generally need more frequent cleaning than brushes used only with dry powder. If multiple people use the same brushes, cleaning between users is particularly important.
How to Wash Without Damaging the Bristles
- Wet the bristles with lukewarm water while keeping excessive water away from the ferrule and handle joint.
- Apply a gentle brush cleanser and work it through the fibers without aggressively twisting them.
- Rinse until the water runs clear.
- Gently press out excess water rather than wringing the brush.
- Reshape the brush head and lay it flat or position it so water does not collect inside the ferrule.
- Allow it to air-dry completely before storing or using it again.
Signs Your Blending Brush Needs Replacing
Replace a brush when persistent shedding, distorted bristles, rough fibers, a loose ferrule, damaged handle construction, or consistently poor blending performance remains after cleaning. A brush that has permanently lost its intended shape may no longer distribute pigment predictably.
Good maintenance is also part of getting value from a complete brush collection. If you are building a broader beauty routine, the Beauty & Self-Care Blog provides additional beauty-care content, while the Eye Care Blog covers other eye-related topics.
Which Eyeshadow Blending Brush Should You Buy?
The best purchase depends on the result you want rather than a universal ranking. If you want one brush for everyday makeup, choose a medium fluffy or softly tapered brush. If your priority is precision, add a compact tapered, dome, or pencil brush. If you have hooded or small eyes, prioritize a smaller head that fits your available lid space.
Best Overall for Everyday Blending
Choose a medium fluffy or tapered blending brush. It offers the most useful balance of diffusion, control, and versatility for transition shades and everyday crease work.
Best for Precision
Choose a compact tapered, dome, or pencil brush. These shapes keep pigment concentrated and make it easier to refine the outer corner, crease, or lower lash line.
Best for Hooded and Small Eyes
Choose a compact blending brush. Smaller bristle heads reduce accidental over-blending and give you more control around limited visible lid space.
Best Beginner Choice
Choose a medium, softly fluffy or tapered brush. It is forgiving enough for learning pressure and blending technique while remaining useful after you become more experienced.
For someone who wants a broader toolkit rather than one blending brush, the 28pcs Eye Makeup Brushes Set offers multiple eye makeup brush types in one collection. Its synthetic fibers are designed for blending, shading, lining, and defining, so it can be a practical route for beginners who want room to experiment as well as experienced makeup users who prefer multiple specialized tools.
Ready to choose? Start with your primary blending goal, match the brush head to your eyelid space, then select the density and fiber type that fit your eyeshadow formula. That approach is more reliable than buying the brush with the most impressive-looking description.
Frequently Asked Questions
What is the best brush for blending eyeshadow?
For most everyday looks, a medium fluffy or softly tapered eyeshadow blending brush is the most versatile choice. A fluffy brush provides broader diffusion, while a tapered brush gives more control in the crease. Smaller pencil and detail brushes are better when precision matters.
How do I choose a good eyeshadow blending brush?
Match the brush to four factors: your blending task, eyelid space, desired density, and eyeshadow formula. Choose fluffy for broad diffusion, tapered or dome for controlled crease work, and pencil or small-detail shapes for precise areas. Smaller eyes generally benefit from smaller brush heads.
What is the difference between a fluffy and tapered blending brush?
A fluffy blending brush distributes pigment broadly and softly, making it useful for transition shades and diffused edges. A tapered blending brush has a narrower tip that concentrates pigment more effectively while the wider portion can still diffuse the surrounding color.
What eyeshadow blending brush is best for hooded or small eyes?
A compact tapered, dome, or small-detail brush is usually easier to control on hooded or small eyes. A large fluffy brush may cover too much area and spread pigment beyond the intended crease or lid space.
Can you use the same blending brush for powder and cream eyeshadow?
Yes, but clean it thoroughly between formulas. Synthetic brushes can be particularly convenient for cream products because they are easy to clean. If you frequently switch between powder and cream, separate brushes can make application more predictable and reduce leftover product in the fibers.
Final Takeaway
A good eyeshadow blending brush is the one that matches the result you want, your available eyelid space, your eyeshadow formula, and the level of control you need. A medium fluffy or tapered brush is the strongest starting point for most people, while compact tapered, dome, pencil, and detail brushes solve more specialized problems.
Instead of asking which blending brush is universally best, ask a more useful question: which brush gives me the right balance of diffusion and control for my eyes? Once you answer that, choosing between brush shapes, densities, sizes, and fibers becomes considerably easier.
Pillar Article: Good Affordable Brush Set: Best Picks for Eye Makeup













