
12 Hip Opening Yoga Stretches for Tight Hips: Beginner-Friendly Guide
Stiff hips after long hours of sitting, exercise, or limited daily movement can make everyday activities and traditional yoga poses feel uncomfortable. The right hip opening yoga stretches can help improve mobility, develop flexibility, and make movement feel more controlled.
These 12 hip opening yoga stretches target four key areas: hip flexors, outer hips, glutes, and inner thighs. Whether you are a beginner or an experienced yoga practitioner, you can adapt each pose to your current flexibility level. You will also learn how to follow a practical 15-minute home routine, avoid common stretching mistakes, and explore optional supported aerial hammock stretches.
Table of Contents
- What Are Hip Opening Yoga Stretches?
- 12 Best Hip Opening Yoga Stretches for Tight Hips
- Quick Comparison: Which Hip Opening Stretch Should You Choose?
- How to Do a 15-Minute Hip Opening Yoga Routine at Home
- How Often Should You Do Hip Opening Yoga Stretches?
- Hip Opening Yoga Safety: Common Mistakes and How to Avoid Them
- Optional: Aerial Hammock Stretching for Supported Hip Flexibility
- Conclusion
What Are Hip Opening Yoga Stretches?
Hip opening yoga stretches are controlled movements and sustained yoga positions designed to work the muscles surrounding the hip joint. They commonly target the hip flexors, glutes, outer hip muscles, deep hip rotators, and inner thighs.
These exercises combine active mobility, comfortable joint movement, and static stretching. Practicing them consistently can help you develop a more comfortable range of motion for walking, squatting, exercising, and performing everyday movements.
Hip Mobility vs. Hip Flexibility: What's the Difference?
Although people often use these terms interchangeably, hip mobility and hip flexibility describe different abilities.
- Hip mobility: Your ability to actively move your hip joint through a controlled range of motion using muscular strength and coordination.
- Hip flexibility: The ability of muscles and surrounding soft tissues to lengthen comfortably during a stretch.
For example, lifting your knee toward your chest without using your hands demonstrates active hip mobility. Pulling your knee closer with your hands demonstrates a greater degree of passive flexibility.
Both qualities contribute to comfortable movement. Developing flexibility without sufficient control may not translate into better movement, so a balanced routine should include gentle mobility exercises and sustained stretches.
Which Muscles Do Hip Opening Stretches Target?
The hip joint is surrounded by several muscle groups that work together to control movement and stability.
- Iliopsoas: A major hip flexor that helps lift the thigh toward the torso.
- Rectus femoris: A quadriceps muscle that contributes to hip flexion and knee extension.
- Gluteus maximus: The largest gluteal muscle, responsible for hip extension and external rotation.
- Gluteus medius: Helps stabilize the pelvis and move the leg away from the body's midline.
- Piriformis: A deep gluteal muscle involved in hip rotation.
- Hip adductors: Inner-thigh muscles that bring the legs toward the body's midline.
- Tensor fasciae latae (TFL): A muscle at the outer front of the hip that contributes to hip flexion, abduction, and stabilization.
Different yoga positions emphasize different combinations of these muscles. This is why a balanced hip-opening routine should include front-hip, outer-hip, glute, and inner-thigh movements rather than repeatedly performing one stretch.
What Causes Hips to Feel Tight?
Several everyday factors can contribute to a sensation of restricted hip movement:
- Prolonged sitting with limited changes in position.
- Repetitive exercise patterns that emphasize certain movements.
- Limited physical activity and insufficient movement variety.
- Muscle stiffness following unfamiliar or demanding exercise.
- Individual differences in anatomy, joint structure, and natural range of motion.
Importantly, feeling tight does not necessarily mean a muscle is physically shortened. Joint structure, movement habits, muscle sensitivity, and other individual factors can also influence how a position feels.
12 Best Hip Opening Yoga Stretches for Tight Hips
The following poses are organized by the primary hip region they emphasize. Start with beginner-friendly movements and use the recommended modifications whenever necessary. A comfortable stretch should feel controlled rather than painful.
Group 1: Hip Flexor Stretches
These positions focus on the front of the hips, particularly the iliopsoas and rectus femoris. They are useful additions to routines for people who spend extended periods sitting.
1. Low Lunge (Anjaneyasana)
Difficulty: Beginner
Target area: Hip flexors and iliopsoas
Recommended hold: 20–30 seconds per side
The Low Lunge is one of the most accessible hip opening yoga stretches for beginners. It gently lengthens the front of the hip while allowing you to control pelvic positioning.
How to perform it:
- Begin in a kneeling position with your hands on the mat.
- Step your right foot forward and place it between your hands.
- Keep your left knee resting on the floor.
- Position your front knee approximately over your ankle.
- Gently shift your hips forward while keeping your torso upright.
- Hold the position, then switch sides.
Breathing: Inhale to lengthen your spine and exhale as you gently shift your hips forward.
Common mistake: Allowing the lower back to arch excessively or pushing the front knee too far forward.
Beginner modification: Place a folded blanket beneath your back knee and use yoga blocks under your hands for additional support.
2. Crescent Lunge
Difficulty: Beginner to intermediate
Target area: Hip flexors, quadriceps, and front hip muscles
Recommended hold: 20–30 seconds per side
Crescent Lunge develops balance while stretching the front of the back hip. It also challenges your core and leg muscles to maintain a stable position.
How to perform it:
- Start in a standing position and step one foot backward.
- Bend the front knee while keeping the back leg extended.
- Lift your torso and reach your arms overhead if comfortable.
- Keep your hips facing forward without forcing them into alignment.
- Maintain a gentle stretch through the front of the back hip.
- Return to standing and repeat on the opposite side.
Breathing: Inhale to lift your chest and exhale to maintain a controlled lunge.
Common mistake: Overarching the lower back or losing balance while reaching upward.
Beginner modification: Lower the back knee to the floor and keep your hands on your hips.
3. Half Frog Pose
Difficulty: Intermediate
Target area: Hip flexors, quadriceps, and front thigh
Recommended hold: 20–30 seconds per side
Half Frog is a more focused front-thigh stretch that also involves hip positioning. It can be useful for people who want to explore additional flexibility beyond basic lunges.
How to perform it:
- Lie on your stomach with both legs extended.
- Bend one knee and gently bring the heel toward your body.
- Reach back to hold your ankle if comfortable.
- Keep your pelvis grounded and avoid twisting your lower back.
- Maintain a gentle stretch without pulling the heel forcefully.
- Release slowly and repeat on the other side.
Breathing: Breathe slowly and naturally while maintaining a comfortable position.
Common mistake: Pulling the foot too close or lifting the pelvis excessively.
Beginner modification: Use a yoga strap around the foot or substitute a gentle side-lying quadriceps stretch.
Group 2: Outer Hip and Hip Abductor Stretches
The outer hip region includes the gluteus medius and tensor fasciae latae. These muscles contribute to pelvic stability and control of leg movement.
4. Figure-Four Stretch
Difficulty: Beginner
Target area: Outer hips, gluteus medius, and piriformis region
Recommended hold: 30–45 seconds per side
The Figure-Four Stretch is particularly accessible because it can be performed while lying on your back. It provides a comfortable way to explore external hip rotation without requiring deep kneeling positions.
How to perform it:
- Lie on your back with both knees bent and feet on the floor.
- Place your right ankle across your left thigh, just above the knee.
- Keep your right foot gently flexed.
- For a deeper variation, lift your left foot and hold behind the left thigh.
- Bring the supporting leg gently toward your torso.
- Hold, release, and switch sides.
Breathing: Exhale as the supporting thigh moves gently toward your torso.
Common mistake: Pulling the legs aggressively or allowing the crossed knee to experience uncomfortable pressure.
Beginner modification: Keep the supporting foot on the floor and maintain the crossed-leg position.
5. Thread the Needle Pose
Difficulty: Beginner
Target area: Outer hips and deep gluteal muscles
Recommended hold: 30 seconds per side
Thread the Needle combines gentle hip rotation with a supported floor position. It is a useful alternative for people who find traditional Pigeon Pose uncomfortable.
How to perform it:
- Start on your hands and knees.
- Slide your right arm underneath your left arm.
- Lower your right shoulder toward the mat.
- Allow your torso to rotate gently while keeping your hips stable.
- Rest your head on a comfortable support if necessary.
- Return to the starting position and repeat on the other side.
Breathing: Inhale to lengthen your spine and exhale as you relax into the supported position.
Common mistake: Forcing the shoulder or allowing the hips to twist excessively.
Beginner modification: Place a cushion beneath your shoulder or keep your upper body more upright.
6. Modified Gomukhasana (Cow Face Legs)
Difficulty: Intermediate
Target area: Outer hips, hip abductors, and gluteal region
Recommended hold: 20–30 seconds per side
Cow Face Legs involves stacking the knees while sitting, creating a stretch through the outer hip and gluteal region. The full position requires considerable hip mobility, so a modified version is often more appropriate.
How to perform it:
- Sit upright with your legs extended.
- Bend both knees and bring them toward the center.
- Position one knee above the other only as far as comfortable.
- Place both sitting bones on the floor or a folded blanket.
- Keep your spine upright and relax your shoulders.
- Hold, release, and switch which leg is on top.
Breathing: Maintain an upright spine and breathe evenly.
Common mistake: Pulling the knees together or forcing the legs into a stacked position.
Beginner modification: Sit on a folded blanket and arrange your legs in a comfortable staggered position instead of stacking them.
Group 3: Glute and Deep Hip Rotator Stretches
These poses emphasize the gluteus maximus and deep external rotators, including the piriformis. Controlled hip rotation helps you explore these positions without forcing the joint.
7. Pigeon Pose (Eka Pada Rajakapotasana Variation)
Difficulty: Intermediate
Target area: Gluteus maximus, piriformis region, and outer hip
Recommended hold: 20–30 seconds per side
Pigeon Pose is a well-known yoga position for stretching the gluteal region. However, it can place considerable demands on hip mobility, so proper modifications are important.
How to perform it:
- Begin on your hands and knees.
- Bring your right knee forward toward your right wrist.
- Move your right foot toward the opposite side as comfortable.
- Extend your left leg behind you.
- Keep your hips supported and avoid forcing the front leg into a particular angle.
- Remain upright or gently lean forward if comfortable.
- Repeat on the other side.
Breathing: Inhale to lengthen your spine and exhale as you relax forward within your comfortable range.
Common mistake: Trying to make the front shin parallel to the front edge of the mat regardless of individual hip mobility.
Beginner modification: Replace Pigeon Pose with the reclined Figure-Four Stretch.
8. Happy Baby Pose (Ananda Balasana)
Difficulty: Beginner
Target area: Glutes, inner hips, and deep hip rotators
Recommended hold: 30–45 seconds
Happy Baby is a gentle supine yoga pose that combines hip flexion and external rotation. It allows you to adjust the position of each leg independently.
How to perform it:
- Lie on your back with your knees bent toward your chest.
- Reach for the outside edges of your feet.
- Open your knees slightly wider than your torso.
- Bring your knees toward your armpits without forcing them.
- Keep your lower back comfortably supported.
- Hold while breathing slowly.
Breathing: Breathe deeply while allowing the knees to move gently outward.
Common mistake: Pulling the feet down aggressively or lifting the shoulders from the floor.
Beginner modification: Hold behind your thighs or use a yoga strap around your feet.
9. Supine Spinal Twist
Difficulty: Beginner
Target area: Gluteal region and outer hip muscles
Recommended hold: 20–30 seconds per side
This lying twist provides gentle rotation through the torso and hips. It is a useful finishing movement after more focused hip-opening exercises.
How to perform it:
- Lie on your back with both knees bent.
- Extend your arms outward in a comfortable position.
- Bring both knees gently toward your chest.
- Allow your knees to move toward the right side.
- Keep both shoulders relaxed against the floor as much as comfortable.
- Return to the center and repeat on the left side.
Breathing: Inhale to prepare and exhale as your knees move gently toward the floor.
Common mistake: Forcing the knees toward the ground or twisting beyond a comfortable range.
Beginner modification: Place a pillow or bolster underneath your knees.
Group 4: Inner Thigh and Hip Adductor Stretches
The inner thigh muscles, known as the hip adductors, help bring the legs toward the body's midline. The following poses introduce progressively wider leg positions without requiring maximum flexibility.
10. Butterfly Pose (Baddha Konasana)
Difficulty: Beginner
Target area: Hip adductors and inner thighs
Recommended hold: 30–45 seconds
Butterfly Pose is one of the easiest hip opening yoga stretches to incorporate into a daily home routine.
How to perform it:
- Sit upright with your legs extended.
- Bend both knees and bring the soles of your feet together.
- Allow your knees to move outward naturally.
- Hold your feet or ankles gently.
- Lengthen your spine and relax your shoulders.
- Remain upright or hinge slightly forward from your hips.
Breathing: Inhale to lengthen your spine and exhale while allowing your knees to relax naturally.
Common mistake: Pushing the knees down with your hands or rounding the back excessively.
Beginner modification: Place cushions or yoga blocks beneath both knees and sit on a folded blanket.
11. Wide-Legged Seated Forward Fold (Upavistha Konasana)
Difficulty: Beginner to intermediate
Target area: Hip adductors and inner thighs
Recommended hold: 20–30 seconds
This seated stretch uses a wide-leg position to lengthen the inner thighs. You do not need to spread your legs widely to benefit from the movement.
How to perform it:
- Sit with your legs extended in front of you.
- Open your legs into a comfortable V shape.
- Keep your kneecaps facing upward.
- Place your hands on the floor in front of your body.
- Inhale to lengthen your spine.
- Exhale and hinge forward slightly from your hips.
- Return upright slowly.
Breathing: Inhale to lengthen your torso and exhale into a small forward hinge.
Common mistake: Rounding the lower back to reach farther forward or separating the legs beyond a comfortable range.
Beginner modification: Reduce the distance between your legs and place your hands on yoga blocks.
12. Frog Pose (Mandukasana Variation)
Difficulty: Intermediate
Target area: Hip adductors and inner thighs
Recommended hold: 20–30 seconds
Frog Pose is a deeper inner-thigh stretch that uses a wide-knee position. Because it places greater demands on the hips and knees, beginners should use a supported variation.
How to perform it:
- Begin on your hands and knees.
- Slowly move your knees outward.
- Keep your knees bent and your lower legs aligned comfortably.
- Support your upper body with your forearms or hands.
- Move your hips backward only as far as comfortable.
- Maintain the position without forcing your knees outward.
- Return slowly to the starting position.
Breathing: Use slow, relaxed breathing throughout the position.
Common mistake: Allowing the knees to experience excessive pressure or trying to achieve an extremely wide position.
Beginner modification: Practice a supported wide-knee Child's Pose with cushions beneath your torso and knees.
Quick Comparison: Which Hip Opening Stretch Should You Choose?
Use this comparison to select poses according to your target muscle group, experience level, and current flexibility. Beginners can start with the reclined and supported options before exploring more demanding positions.
| Yoga Pose | Target Muscle Group | Difficulty | Recommended Hold Time | Beginner Modification |
| Low Lunge | Hip flexors and iliopsoas | Beginner | 20–30 seconds per side | Blanket under back knee |
| Crescent Lunge | Hip flexors and quadriceps | Beginner–Intermediate | 20–30 seconds per side | Lower back knee |
| Half Frog | Hip flexors and quadriceps | Intermediate | 20–30 seconds per side | Side-lying quadriceps stretch |
| Figure-Four | Outer hips and piriformis region | Beginner | 30–45 seconds per side | Keep supporting foot grounded |
| Thread the Needle | Outer hips and deep glutes | Beginner | 30 seconds per side | Use cushions for support |
| Modified Cow Face Legs | Hip abductors and outer hips | Intermediate | 20–30 seconds per side | Sit on folded blanket |
| Pigeon Pose | Glutes and deep rotators | Intermediate | 20–30 seconds per side | Reclined Figure-Four |
| Happy Baby | Glutes and inner hips | Beginner | 30–45 seconds | Hold behind thighs |
| Supine Spinal Twist | Gluteal and outer hip muscles | Beginner | 20–30 seconds per side | Support knees with pillow |
| Butterfly Pose | Hip adductors | Beginner | 30–45 seconds | Support knees with blocks |
| Wide-Legged Seated Forward Fold | Hip adductors and inner thighs | Beginner–Intermediate | 20–30 seconds | Reduce leg separation |
| Frog Pose | Hip adductors and inner thighs | Intermediate | 20–30 seconds | Supported wide-knee Child's Pose |
How to Do a 15-Minute Hip Opening Yoga Routine at Home
You do not need to perform all 12 poses in one session. A shorter, structured routine can help you practice consistently while gradually introducing different hip movements.
This beginner-friendly sequence moves from gentle warm-up exercises to controlled mobility, sustained stretches, and relaxation.
Step 1: Warm Up Your Hips (2 Minutes)
Start with gentle movements to prepare your muscles and joints before deeper stretching.
- Cat-Cow: 45 seconds. Alternate between gently arching and rounding your spine.
- Hip circles: 45 seconds. Perform controlled circles while standing or sitting.
- Easy marching in place: 30 seconds. Lift your knees gently without rushing.
Step 2: Improve Hip Mobility (4 Minutes)
Use controlled, moderate-range movements before holding deeper positions.
- Low Lunge: 1 minute, alternating sides.
- Crescent Lunge or Modified Lunge: 1 minute.
- Figure-Four Stretch: 1 minute, alternating sides.
- Thread the Needle: 1 minute, alternating sides.
Step 3: Deepen Hip Flexibility (6 Minutes)
Move into comfortable static stretches. Prioritize even breathing and controlled positioning rather than trying to achieve maximum depth.
- Butterfly Pose: 1 minute.
- Happy Baby: 1 minute.
- Reclined Pigeon or Figure-Four: 2 minutes, alternating sides.
- Supported Wide-Legged Forward Fold: 1 minute.
- Supine Spinal Twist: 1 minute, alternating sides.
Step 4: Relax and Reset (3 Minutes)
Finish by allowing your body to return to a relaxed position.
- Supported Supine Rest: 2 minutes. Lie comfortably on your back with a cushion beneath your knees if needed.
- Slow diaphragmatic breathing: 1 minute. Breathe gently through your nose, allowing your abdomen to expand naturally.
How to Adjust the Routine for Your Flexibility Level
Your routine should reflect your current movement ability rather than an idealized yoga position.
- For beginners: Shorten holds, use blankets and blocks, and replace uncomfortable kneeling positions with reclined alternatives.
- For intermediate practitioners: Focus on smoother transitions, controlled movement, and consistent breathing.
- For limited mobility: Prioritize seated and lying-down stretches, avoiding positions that require excessive knee or hip rotation.
Consistency is more important than intensity. Begin with movements you can perform comfortably and gradually adjust the duration as your body becomes accustomed to the routine.
If you are building a more varied home exercise space, you can also explore lifestyle and home fitness accessories for additional workout options.
How Often Should You Do Hip Opening Yoga Stretches?
For most healthy beginners, a practical starting point is 10–15 minutes of comfortable hip mobility and stretching three to four days per week. You can incorporate gentle mobility movements more frequently if they feel comfortable.
A Beginner-Friendly Weekly Stretching Schedule
- Monday: Complete the 15-minute hip-opening routine.
- Tuesday: Practice 5 minutes of gentle hip circles and mobility movements.
- Wednesday: Rest or perform light movement.
- Thursday: Repeat the 15-minute routine.
- Friday: Practice gentle Figure-Four and Butterfly stretches.
- Saturday: Repeat selected poses according to your comfort.
- Sunday: Rest or enjoy gentle walking.
This is a flexible example rather than a mandatory schedule. Adjust the frequency and intensity according to your activity level and how your body responds.
How Long Does It Take to Improve Hip Flexibility?
There is no universal timeline for improving hip flexibility. Progress depends on your starting mobility, consistency, training history, anatomy, and the type of stretching you practice.
Some people notice that certain movements feel more comfortable after a few sessions. Longer-term improvements in usable range of motion generally require repeated practice over time.
Avoid treating temporary changes immediately after stretching as proof of permanent flexibility improvements. Focus on gradual, repeatable progress instead.
How to Track Your Hip Mobility Progress
Simple observations can help you understand whether your practice is becoming more comfortable.
- Notice whether everyday movements feel easier.
- Monitor how comfortably you enter and leave each pose.
- Observe whether you can maintain better control during hip movements.
- Record your practice frequency and how each session feels.
- Compare your movement quality over time rather than chasing deeper positions.
The goal is to develop comfortable movement and control, not to achieve a particular body shape or match another person's flexibility.
Hip Opening Yoga Safety: Common Mistakes and How to Avoid Them
Hip stretches should feel controlled and comfortable. Going too deep too quickly can place unnecessary pressure on the muscles, joints, and surrounding tissues.
5 Common Hip Stretching Mistakes
- Forcing the knees downward: Pushing the knees toward the floor in Butterfly Pose can create unnecessary pressure. Let them move naturally.
- Overstretching: Moving beyond your comfortable range does not guarantee better flexibility. Reduce the range whenever necessary.
- Rounding the lower back: Maintain a comfortable spinal position, especially during seated forward folds.
- Holding your breath: Use slow, natural breathing rather than tensing your body during difficult positions.
- Comparing flexibility: Different hip structures and movement histories mean that not everyone will perform a pose in the same way.
How to Protect Your Knees During Hip Opening Yoga
Some hip stretches involve kneeling, external rotation, or wide-leg positions that can place pressure on the knees.
To make these movements more comfortable:
- Place a folded blanket beneath your knees during kneeling poses.
- Reduce your range of motion if you feel pressure around the knee joint.
- Use reclined Figure-Four instead of traditional Pigeon Pose.
- Avoid twisting the knee to achieve a deeper hip stretch.
- Use cushions or yoga blocks to support your body.
Remember that a hip stretch should not require you to tolerate uncomfortable knee pressure.
How to Stretch Safely With Limited Hip Mobility
You can practice hip opening yoga stretches without being able to perform advanced positions. Simple props make many exercises easier to adapt.
- Yoga blocks: Raise your hands during lunges and provide support during forward folds.
- Folded blankets: Cushion your knees and elevate your sitting position.
- Cushions: Support your hips, torso, or knees during seated and reclined stretches.
- Yoga straps: Help you reach your feet without pulling your body excessively.
- Stable chairs: Provide balance support during gentle standing hip mobility exercises.
If floor-based positions are uncomfortable, prioritize seated, standing, and reclined alternatives.
When Should You Stop a Hip Stretch?
A mild pulling sensation in the muscles can be a normal part of stretching. However, sharp pain, pinching inside the hip joint, numbness, tingling, instability, or worsening discomfort are reasons to stop the movement.
Do not attempt to stretch through pain or force a joint into a position that feels restricted. If symptoms persist, occur repeatedly, or are associated with an existing hip or knee condition, consult an appropriately qualified healthcare professional before continuing.
Optional: Aerial Hammock Stretching for Supported Hip Flexibility
Traditional floor-based yoga is sufficient for developing hip mobility and flexibility. However, aerial hammock stretching offers another way to explore supported body positioning and movement variety.
An aerial yoga hammock uses suspended fabric to provide assistance during selected exercises. Depending on the setup and movement, it can offer balance support and help practitioners explore different stretching positions.
It is an optional training approach, not a requirement for improving hip mobility.
What Is Aerial Hammock Stretching?
Aerial hammock stretching uses fabric suspended from an appropriately installed support system. The fabric can help stabilize the body during selected movements and provide assistance when transitioning between positions.
Unlike traditional floor yoga, aerial practice introduces additional equipment considerations, including suspension height, attachment hardware, structural support, and fall clearance.
Support from a hammock does not eliminate joint-loading or fall risks. Beginners should learn basic techniques under qualified supervision before attempting suspended movements.
3 Beginner-Friendly Supported Hip Opening Positions
These ground-assisted variations are intended for gentle balance assistance. Keep both feet on the floor and avoid suspending your body weight while learning the movements.
1. Supported Low Lunge
Stand in a comfortable split stance with both feet grounded. Hold a securely installed hammock lightly for balance assistance while bending the front knee slightly. Maintain a comfortable stretch through the front of the back hip. Avoid pulling forcefully on the fabric.
2. Supported Figure-Four Variation
Stand beside the hammock and hold it for balance. If comfortable, place one ankle across the opposite thigh in a shallow Figure-Four position. Keep your supporting foot grounded and avoid leaning heavily into the fabric.
3. Supported Standing Hip Opener
Stand upright while holding the hammock for light balance assistance. Gently move one leg outward or rotate the hip through a comfortable range. Keep your pelvis controlled and avoid forcing the knee into an extreme position.
Explore an Aerial Yoga Hammock for Supported Practice
For readers who want to explore supported aerial stretching, an appropriately selected hammock can introduce more variety into a home yoga setup.
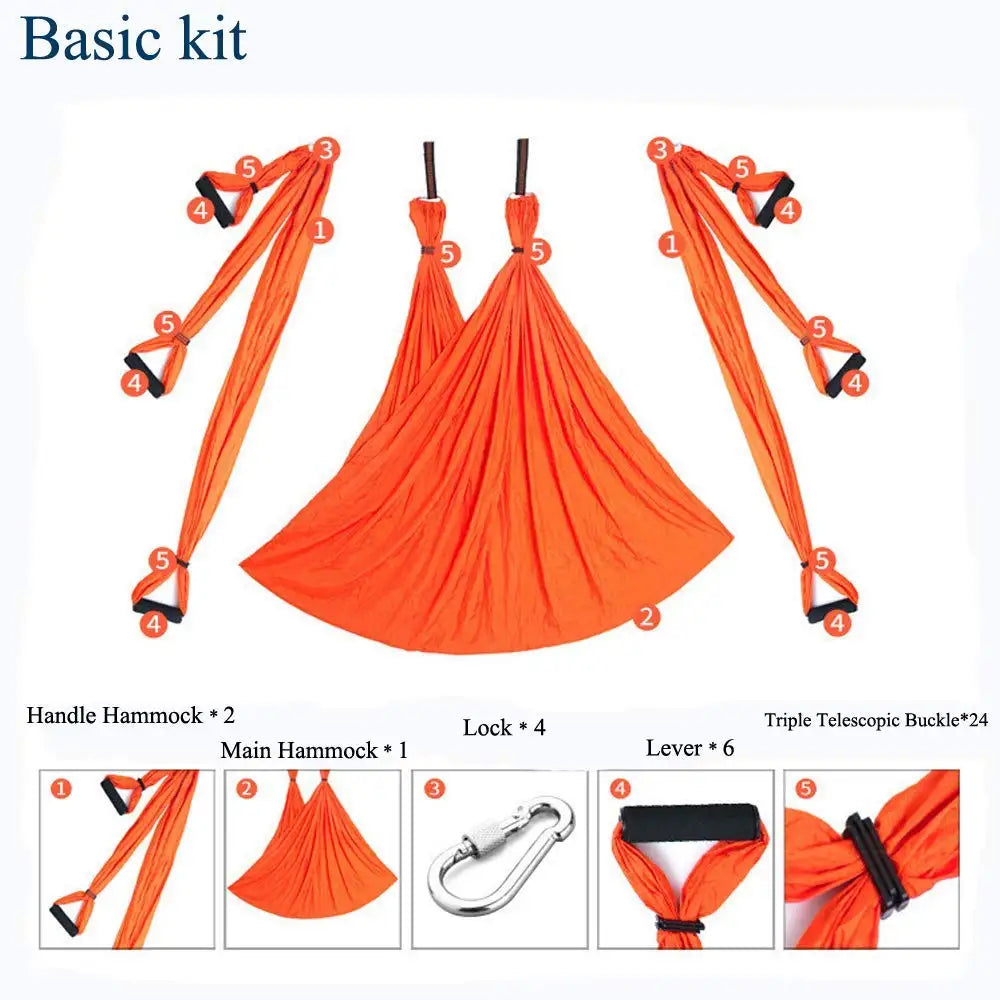
The Aerial Yoga Hammock – 200KG Heavy-Duty Support Swing is made from non-elastic 210T parachute nylon and has a stated load capacity of up to 200 kg (440 lbs). Its main hammock measures 250 × 150 cm, and the set includes handles in three lengths: 30 cm, 85 cm, and 135 cm.
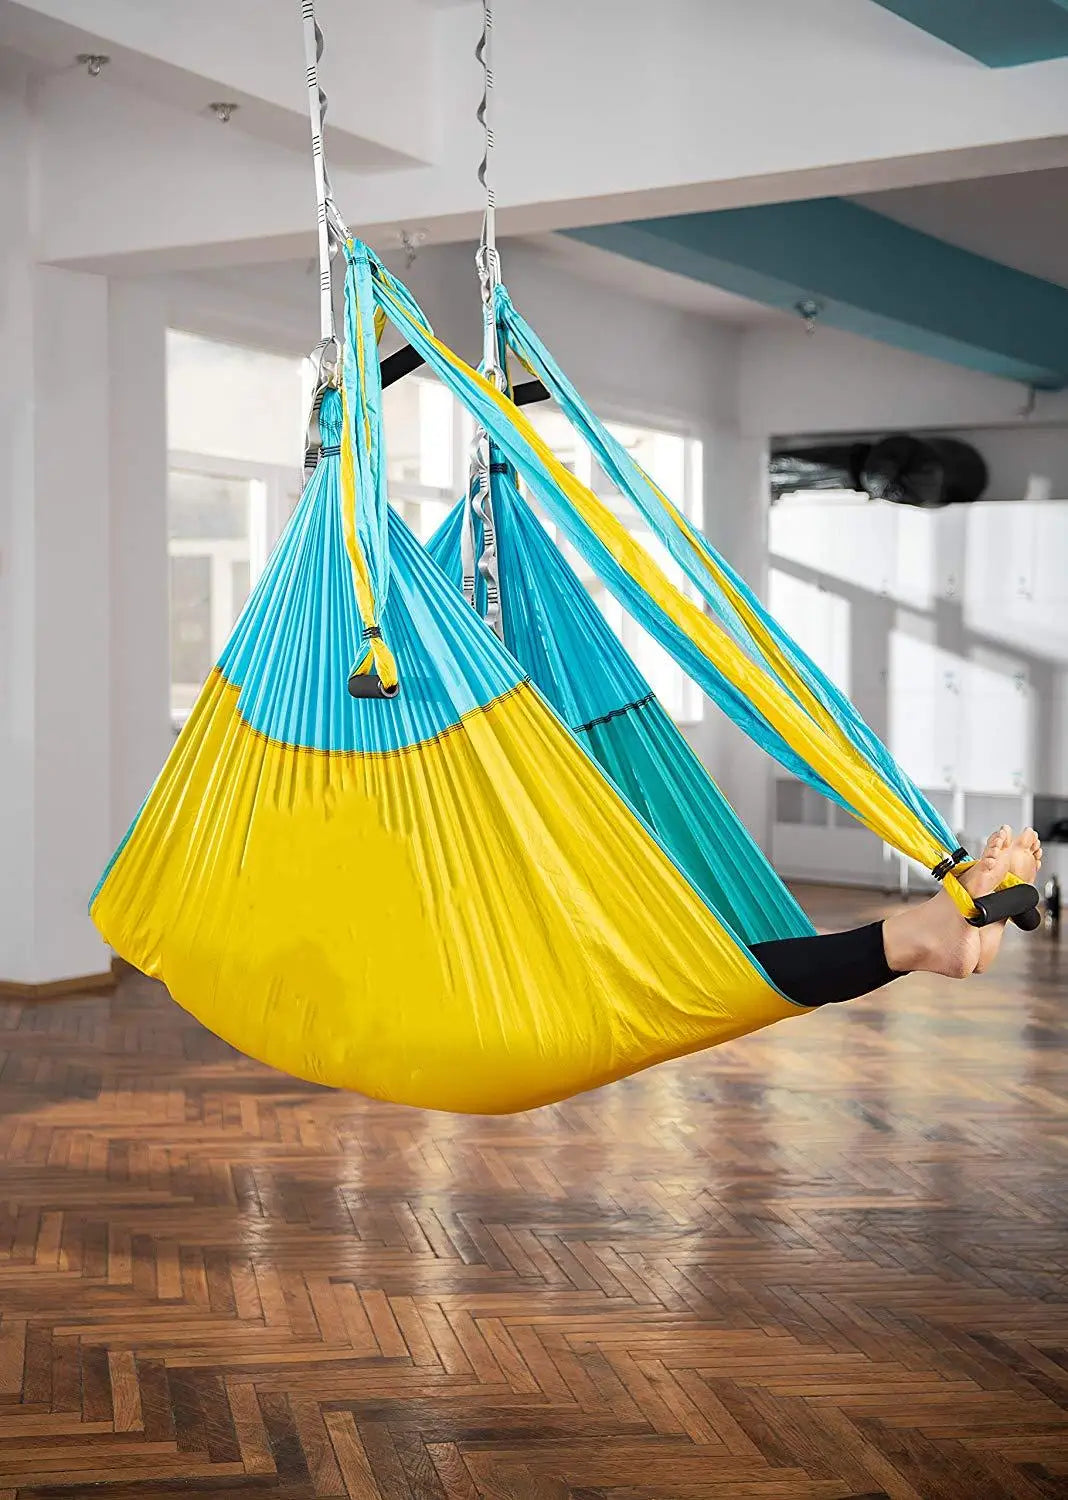
The lightweight set weighs approximately 1.2 kg and includes four metal buckles, telescopic buckles, handles, and a carry bag. The fabric is designed to provide firm rather than elastic support.
Explore the aerial yoga hammock and its equipment specifications if you are considering adding supported aerial movements to your home practice.
Aerial Yoga Hammock Equipment and Installation Safety
Correct installation is essential before using any suspended aerial yoga equipment. A hammock's stated fabric load capacity does not automatically establish the safe working capacity of the complete installation.
Consider the following precautions:
- Check structural support: Use an appropriate structural mounting point capable of supporting the intended dynamic loading.
- Use compatible mounting hardware: Select manufacturer-approved attachment equipment and extension components.
- Arrange professional installation: Have a qualified professional assess and install the mounting system when necessary.
- Inspect equipment: Check the fabric, stitching, handles, buckles, connectors, and attachment points before every session.
- Maintain clearance: Ensure adequate space around and beneath the hammock to reduce collision and fall hazards.
- Learn progressively: Begin with ground-assisted positions and receive appropriate instruction before attempting inversions or fully suspended exercises.
The hammock described above does not include extension straps or ceiling hanging trays. These must be purchased separately. Verify compatibility and installation requirements before purchasing additional components.
Never attach aerial equipment to improvised ceiling hooks, unverified furniture, or mounting points that have not been assessed for the intended loads. A stated 200 kg product capacity is not a guarantee that an entire home suspension system is safe for every user or movement.
Conventional Yoga vs. Aerial Hammock Stretching
Both approaches can add variety to a flexibility routine, but they have different equipment and learning requirements.
| Consideration | Conventional Floor Yoga | Aerial Hammock Stretching |
| Equipment | Mat and optional blocks or straps | Hammock and properly installed suspension system |
| Accessibility | Many beginner-friendly positions | Requires equipment familiarity |
| Balance support | Floor provides a stable base | Fabric can provide assistance during selected positions |
| Movement control | Primarily controlled through floor-based positions | Requires additional control of fabric and body positioning |
| Learning curve | Generally accessible to beginners | Additional instruction and setup knowledge recommended |
| Best starting point | General hip mobility and flexibility | Exploring supported aerial movement |
If your primary goal is to improve hip mobility, conventional yoga remains a practical starting point. Aerial hammock practice is an optional way to explore additional movement possibilities once you understand the relevant equipment and safety requirements.
Conclusion
The best hip opening yoga stretches are the ones you can perform consistently with comfortable positioning and controlled movement. By working through the hip flexors, outer hips, glutes, and inner thighs, you can develop a more balanced approach to everyday mobility and flexibility.
Start with accessible positions such as Low Lunge, Figure-Four, Butterfly Pose, and Happy Baby. Gradually introduce more challenging movements as your control and comfort improve. The 15-minute routine provides a realistic starting point without requiring an advanced yoga background.
Remember that flexibility is individual. Avoid forcing deep stretches, protect your knees, breathe naturally, and prioritize movement quality over how far you can reach.
If you want to add more variety to your home practice, you can explore lifestyle accessories or consider supported aerial movements with appropriately installed equipment. The right setup should complement your routine rather than replace the fundamentals of safe, consistent practice.
Build your comfortable home yoga routine one session at a time, and let gradual progress guide your next step.
Pillar Article: Aerial Fitness Equipment: Complete Comparison & Buying Guide for Home Training