
Anti Gravity Yoga Explained: 10 Beginner Poses, Benefits and Safety Tips
Imagine practicing yoga while supported by a soft fabric hammock, exploring new stretches and movements without relying entirely on the floor. That is the appeal of anti gravity yoga. But what exactly is it, is it suitable for beginners, and how can you practice safely?
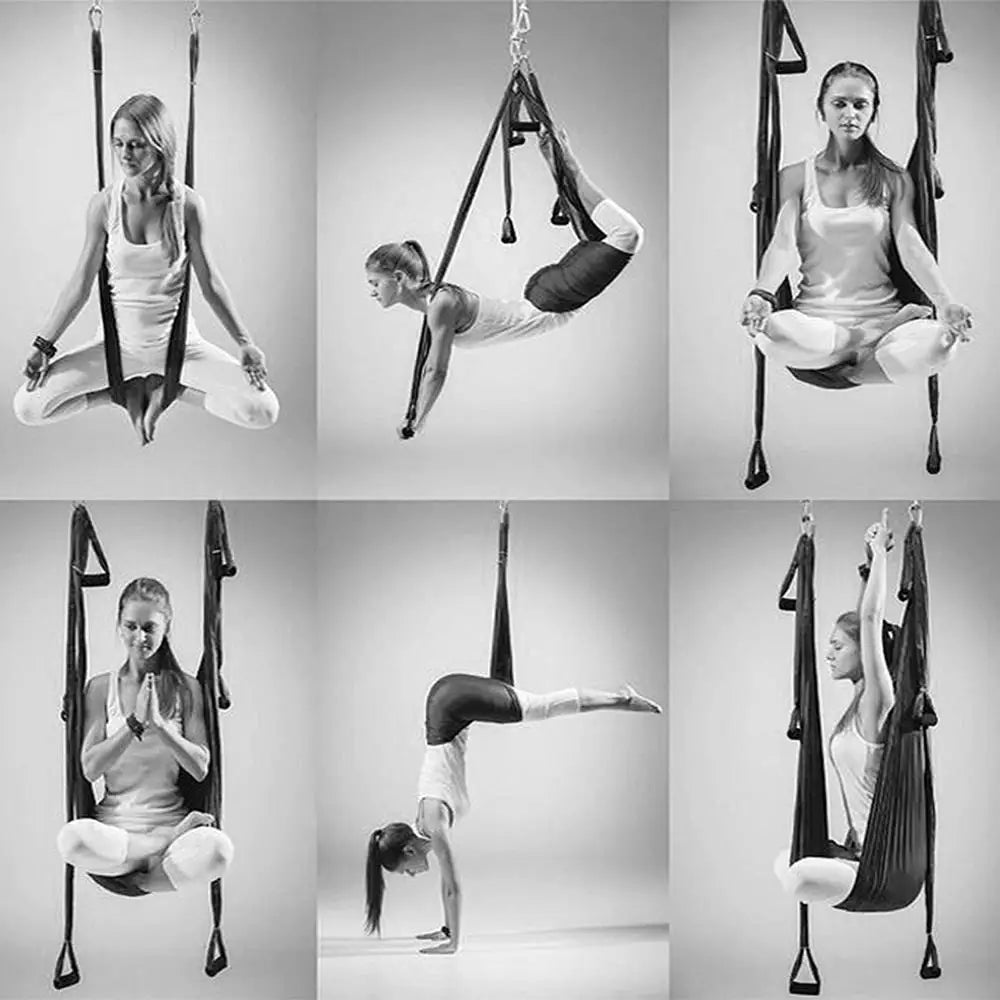
Anti gravity yoga uses a suspended fabric hammock to support body weight during modified yoga poses, stretching, balance exercises, and selected inversions. Although commonly associated with aerial yoga, the term AntiGravity® also refers to a specific trademarked fitness method. Understanding this distinction helps beginners choose the right class, equipment, and learning approach.
This beginner-friendly guide explains how anti gravity yoga works, introduces 10 accessible poses, covers hammock equipment and essential techniques, and provides a practical 25-minute beginner routine. Most importantly, it explains how to progress gradually without rushing into unsupported movements or inversions.
What Is Anti Gravity Yoga? Understanding the Basics
Anti Gravity Yoga Definition: How Does It Work?
Anti gravity yoga is a form of hammock-supported movement in which practitioners use suspended fabric to assist traditional yoga positions, stretching, balance exercises, and selected inverted movements. The hammock provides an additional support point, allowing participants to explore different body positions while developing coordination, mobility, and muscular engagement.
Unlike conventional yoga, where the floor supports most of the body, aerial yoga introduces a movable fabric support system. Depending on the exercise, practitioners may keep both feet on the floor, partially transfer their weight into the hammock, or become fully suspended under qualified instruction.
The level of suspension varies considerably. Beginners generally start with standing movements and supported stretches before attempting more demanding positions.
AntiGravity® Fitness vs. Generic Aerial Yoga
One important distinction is that AntiGravity® is a trademark associated with a particular fitness method developed by Christopher Harrison. Generic aerial yoga is a broader category of hammock-based movement practices offered by different studios and instructors.
Although both approaches may incorporate suspended movement, stretching, and inversions, their teaching structures, equipment arrangements, and exercise sequences are not necessarily identical.
- AntiGravity® Fitness: A branded method with its own approach to movement, instruction, and instructor training.
- Generic aerial yoga: A broader practice combining yoga-inspired movements with fabric hammock support.
- Hammock fitness: A general term that can include suspension-based strength, flexibility, and conditioning exercises.
Not every aerial yoga instructor is certified in the AntiGravity® method. If you specifically want that branded experience, verify the instructor's relevant training rather than assuming every aerial yoga class follows the same curriculum.
Origins and Development of Anti Gravity Yoga
Modern aerial fitness developed through the combination of traditional movement disciplines, circus-inspired aerial techniques, dance, and contemporary fitness instruction.
Christopher Harrison developed the AntiGravity® Fitness method, bringing suspended movement into a structured fitness environment. Meanwhile, other instructors and studios developed their own approaches to aerial yoga, incorporating familiar yoga positions with fabric-supported exercises.
Today, aerial yoga is practiced in dedicated studios, fitness centers, and some appropriately equipped home environments. Its popularity reflects interest in alternative ways to explore flexibility, balance, and movement variety.
How Is Anti Gravity Yoga Different From Regular Yoga?
The most obvious difference is the support system. Traditional yoga relies primarily on a mat and the floor, whereas aerial yoga introduces a fabric hammock that changes how practitioners distribute body weight.
The hammock can assist certain stretches and provide additional balance challenges. However, it also introduces equipment requirements, installation considerations, and skills that beginners must learn before attempting suspended exercises.
For a more detailed comparison, see the dedicated section on aerial yoga versus traditional mat yoga below.
Understanding the Aerial Yoga Hammock and Equipment
What Is an Aerial Yoga Hammock Made Of?
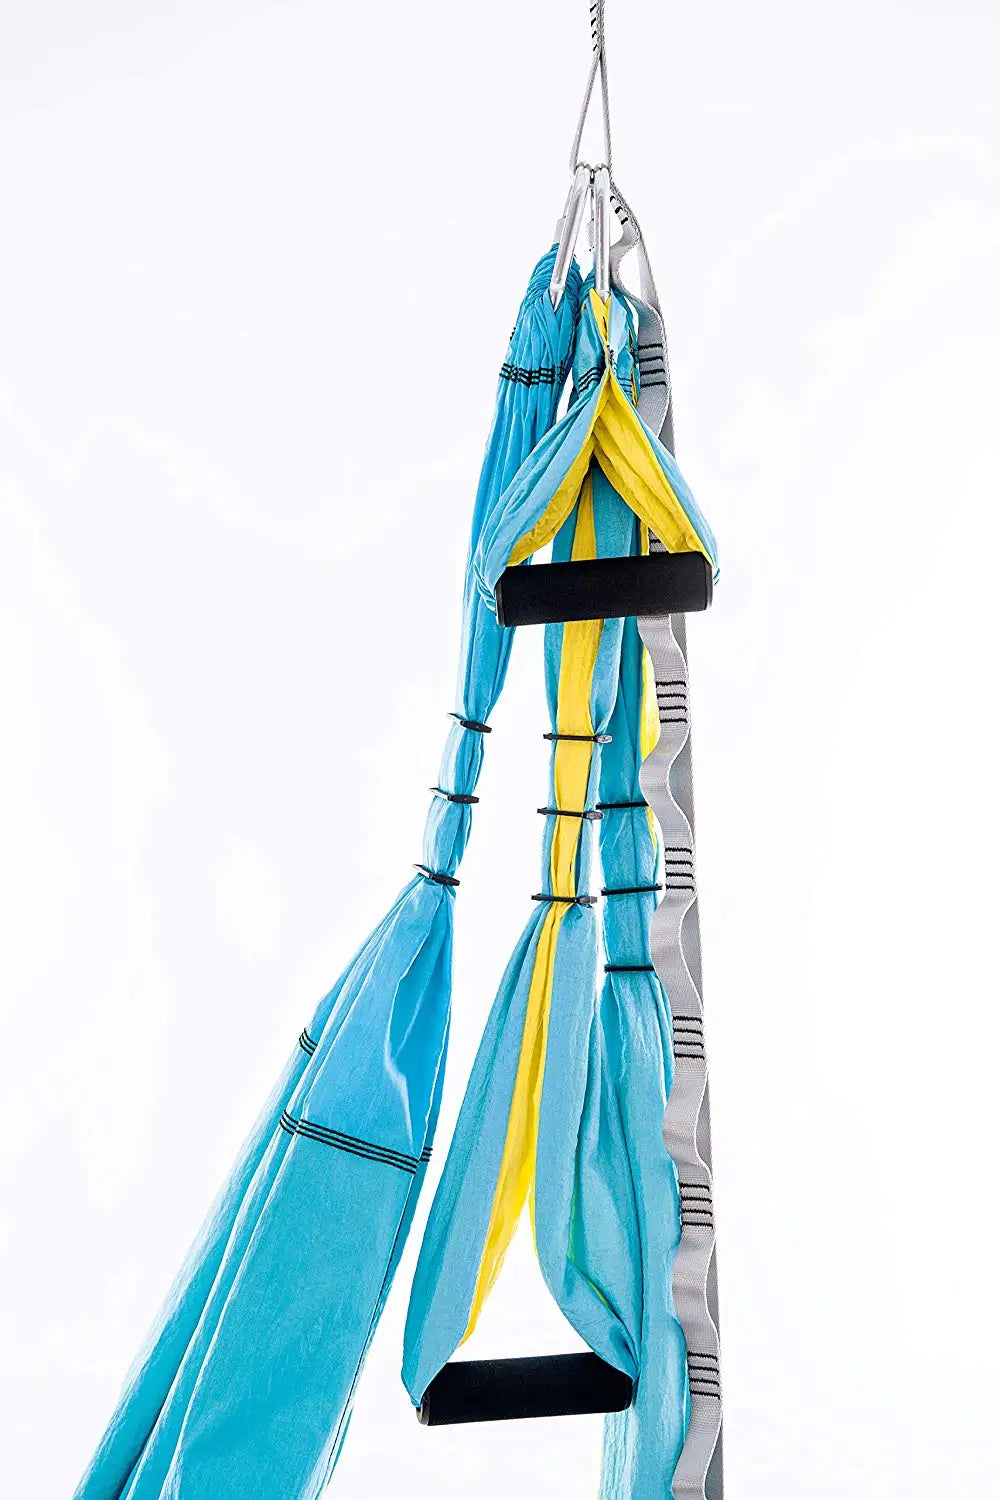
An aerial yoga hammock is a wide piece of suspension fabric connected to an appropriate overhead support system. Its material, width, construction, and stretch characteristics influence how it feels and performs during exercise.
Common hammock designs use nylon or specialized aerial fabrics. Some provide noticeable stretch, while others use non-elastic construction for a firmer support experience.
For example, a non-elastic parachute nylon hammock offers a different sensation from an elastic aerial silk. Neither construction should automatically be considered suitable for every aerial discipline. Always follow the manufacturer's intended-use instructions.
One available option is the Aerial Yoga Hammock – 200KG Heavy-Duty Support Swing. Its listed specifications include:
- Material: 210T non-elastic parachute nylon.
- Main hammock dimensions: 250 × 150 cm.
- Handle lengths: 30 cm, 85 cm, and 135 cm.
- Stated load capacity: Up to 200 kg (440 lbs).
- Approximate weight: 1.2 kg (2.65 lbs).
- Model: YGYB04SET.
- Package: Hammock, handles, four metal buckles, telescopic buckles, and carry bag.
Its non-elastic fabric provides a firmer feel than stretch-based aerial fabrics. The stated 200 kg capacity is a product specification, not a guarantee that any ceiling, anchor, connector, or assembled installation can safely support that amount. The entire suspension system must be independently suitable for the intended activity.
Carabiners, Connectors, and Ceiling Anchors Explained
An aerial yoga hammock depends on more than fabric. Its suspension arrangement may include several components:
- Carabiners: Connectors used to join compatible equipment components. They must be appropriate for the intended loading direction and application.
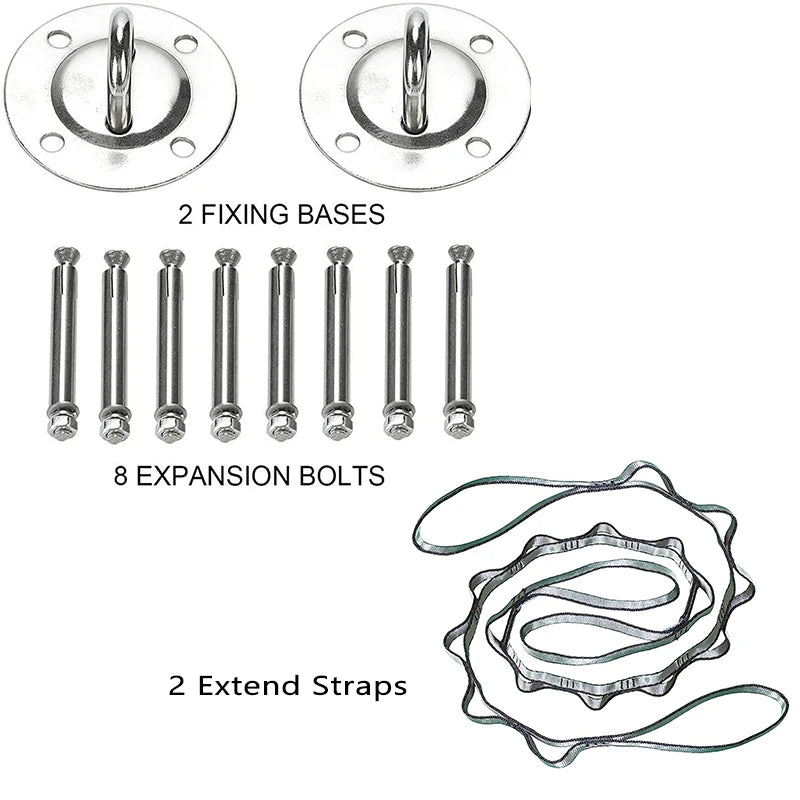
- Extension straps: Adjustable components that can help establish the required hanging height when compatible with the system.
- Ceiling anchors: Purpose-designed mounting components attached to structurally suitable building elements.
- Structural ceiling joists: Building components that may provide suitable mounting locations when professionally assessed.
- Connecting hardware: Buckles and other compatible components that join the hammock and suspension system.
Never assume that a connector's individual weight rating establishes the safety of the complete installation. The weakest component, installation quality, loading direction, dynamic movement, and building structure all matter.
Can You Install an Aerial Yoga Hammock at Home?
Yes, home aerial yoga is possible, but installation requires careful assessment. A hammock that is suitable for exercise is not automatically safe to hang from an ordinary residential ceiling.
Before installing a suspension system, consider the following:
- Have the proposed mounting location assessed for structural suitability.
- Use an approved mounting system compatible with the hammock and intended activity.
- Ensure the connectors and suspension components have appropriate documentation and ratings.
- Have installation completed or assessed by a qualified professional familiar with the intended loading requirements.
- Provide sufficient overhead and surrounding clearance for the movements you plan to perform.
- Inspect the fabric, stitching, connectors, and mounting components before every session.
Do not attach an aerial hammock to drywall anchors, ordinary ceiling hooks, decorative fixtures, or improvised mounting points. A ceiling that supports ordinary household objects may not be suitable for dynamic aerial exercise.
Also check whether the selected hammock package includes everything required. The YGYB04SET product description specifies a hammock, handles, four metal buckles, telescopic buckles, and a carry bag. Extension straps and ceiling hanging trays are sold separately. Do not assume mounting hardware is included.
How to Choose Beginner-Friendly Aerial Yoga Equipment
Beginners should prioritize suitability and installation safety rather than choosing equipment based on appearance or an advertised load capacity alone.
Consider these selection criteria:
- Fabric construction: Determine whether the material is elastic or non-elastic and whether it suits your intended exercises.
- Dimensions: Check hammock width and length against the manufacturer's recommended applications.
- Load documentation: Review the stated capacity and any restrictions on use.
- Connector compatibility: Confirm that buckles, carabiners, straps, and anchors are designed to work together.
- Installation requirements: Determine whether extension straps, mounting plates, or other components must be purchased separately.
- Inspection guidance: Look for clear manufacturer instructions covering maintenance, wear, and replacement.
- Intended activity: Make sure the equipment is appropriate for aerial yoga rather than assuming every fabric hammock supports every aerial discipline.
After understanding these requirements, you can explore available body care and health equipment alongside other fitness-related resources when planning your home practice.
For a closer look at the equipment specifications, the 210T nylon aerial yoga hammock with handles provides one example of a non-elastic hammock design. Review its mounting requirements separately before considering home installation.
How to Prepare for Your First Anti Gravity Yoga Session
What to Wear for Aerial Yoga
Choose comfortable, close-fitting clothing that allows unrestricted movement while protecting areas of skin that may come into contact with the hammock.
- Wear a fitted athletic shirt that covers the shoulders and torso.
- Choose leggings or comfortable exercise pants that cover the legs.
- Avoid clothing with zippers, exposed metal parts, or sharp decorations.
- Remove watches, necklaces, rings, and other jewelry that could catch on the fabric.
- Keep fingernails reasonably trimmed to reduce the possibility of snagging the material.
- Practice barefoot or follow the studio's footwear recommendations.
Loose clothing may shift during suspended movements, while exposed skin can experience friction when pressed against the hammock. Comfortable coverage makes it easier to focus on alignment and movement.
Preparing Your Practice Space
A suitable practice environment needs more than an installed hammock. Check the surrounding space before beginning.
- Maintain clear floor space beneath and around the hammock.
- Remove furniture, sharp objects, and other potential obstacles.
- Check overhead clearance for the movements being performed.
- Use a stable, unobstructed landing area.
- Inspect the hammock and suspension components for visible damage.
- Confirm that the mounting system has been professionally assessed.
Never test an unfamiliar installation by suddenly dropping your full weight into the hammock or attempting an inversion. Equipment checks should follow the manufacturer's instructions and be completed before exercise begins.
What Beginners Should Know Before Getting Into the Hammock
Your first aerial yoga session should focus on familiarization rather than impressive poses.
Tell your instructor about relevant health concerns, previous injuries, balance difficulties, and any discomfort that may affect your ability to participate. Follow instructions carefully and ask for modifications whenever a movement feels unfamiliar.
Allow enough time for digestion before class, stay hydrated, and avoid practicing when you feel unwell. Beginners should also learn how to enter and exit the hammock before attempting exercises that transfer significant body weight into the fabric.
When Should Beginners Avoid or Modify Aerial Yoga?
Suspended movement and inversion can affect the body differently from ordinary floor-based exercise. Certain medical conditions may make particular positions inappropriate.
Seek medical guidance before participating if you have:
- Pregnancy or a recent postpartum recovery requiring movement restrictions.
- Uncontrolled high blood pressure or significant cardiovascular concerns.
- Glaucoma or another eye condition affected by pressure changes.
- Recent surgery or an injury that has not fully recovered.
- Significant balance disorders or conditions affecting spatial orientation.
- A history of fainting or symptoms that may be aggravated by inversion.
- Neck, spine, or joint conditions that could be affected by suspended loading.
These considerations do not automatically mean every form of aerial yoga is unsuitable. Individual restrictions depend on medical circumstances, the movement being considered, and professional advice. Avoid inversions until you have received appropriate clearance and qualified instruction.
Essential Anti Gravity Yoga Techniques: Grips, Alignment, and Breathing
Basic Hammock Grip Techniques for Beginners
Grip technique varies with hammock design and the exercise being performed. Beginners should learn the appropriate hand position directly from an instructor.
For basic supported movements, keep your hands comfortably engaged with the fabric rather than squeezing as tightly as possible. Maintain a controlled grip and avoid sudden pulling or twisting.
Before transferring weight, confirm that the hammock is positioned correctly and that you understand where your hands and feet should remain throughout the movement.
Finding Correct Body Position and Alignment
Good alignment makes aerial yoga movements easier to control. Focus on the following principles:
- Spine: Maintain a comfortable, controlled spinal position rather than forcing the back into an extreme curve.
- Shoulders: Keep the shoulders stable and avoid pulling excessively through the neck.
- Hips: Maintain balanced hip positioning during supported stretches.
- Knees: Track the knees in a direction consistent with the feet during standing movements.
- Feet: Establish stable ground contact whenever the pose requires it.
Think of the hammock as a support tool rather than something that should pull your body into a deeper position than it can comfortably achieve.
Breathing and Controlled Movement in Suspended Yoga
Steady breathing helps maintain awareness during unfamiliar movements.
- Inhale naturally while preparing or lengthening the body.
- Exhale gently while moving into a comfortable stretch.
- Avoid holding your breath during effort.
- Move slowly when transferring weight between the floor and hammock.
- Pause whenever you need to regain balance or understand your positioning.
Do not force a stretch simply because the hammock makes a greater range of movement possible.
How to Enter and Exit the Hammock Safely
Mounting and dismounting are fundamental skills, not minor details. During your first sessions, ask an instructor to demonstrate the exact method for your hammock design.
Maintain stable contact with the floor or other designated support points as instructed. Check the fabric position before transferring weight, and avoid jumping into the hammock.
To exit, reverse the movement gradually with assistance when needed. Return to stable standing before releasing your grip. Never rush an exit if you feel dizzy or uncertain about your balance.
10 Beginner Anti Gravity Yoga Poses to Try First
The following beginner aerial yoga poses progress from ground-supported positions to more challenging supported movements. They are instructional starting points, not a substitute for an instructor demonstrating the correct hammock configuration.
For your first session, practice the standing and lightly supported movements before progressing to reclined positions. The final inversion-preparation exercise is not a full inversion and should only be introduced with qualified supervision.
1. Supported Mountain Pose
Difficulty: Beginner.
Hammock position: Standing with the fabric held in front of the body at a comfortable waist or chest height.
Supported Mountain Pose introduces beginners to the feel of the hammock without requiring suspension.
- Stand with your feet approximately hip-width apart.
- Hold the hammock gently with both hands.
- Lengthen your spine and distribute your weight evenly across both feet.
- Relax your shoulders and keep your knees soft.
- Take several slow, comfortable breaths.
Breathing cue: Inhale to lengthen the spine and exhale to relax unnecessary tension.
Modification: Use a lighter grip or stand without pulling against the fabric.
Common mistake: Leaning backward and allowing the hammock to support more weight than intended.
Exit: Release the fabric gradually after establishing stable standing.
2. Aerial Supported Forward Fold
Difficulty: Beginner.
Hammock position: Fabric held in front or used for light upper-body support according to instructor guidance.
This movement introduces a gentle hip hinge and can be useful for people exploring hamstring flexibility.
- Stand with your feet comfortably apart.
- Hold the hammock securely without pulling hard.
- Soften your knees and hinge forward from the hips.
- Allow your upper body to move into a comfortable forward position.
- Keep your neck relaxed and breathe naturally.
- Return to standing slowly.
Modification: Bend your knees more deeply if your hamstrings feel tight.
Common mistake: Locking the knees or forcing the torso toward the floor.
Exit: Press through your feet and return upright gradually while maintaining contact with the hammock.
3. Hammock-Assisted Chair Pose
Difficulty: Beginner.
Hammock position: Fabric held in front of the body.
Chair Pose introduces a controlled squat-like movement while the hammock provides a light reference point for balance.
- Stand with your feet hip-width apart.
- Hold the fabric with both hands.
- Bend your knees and move your hips backward.
- Keep your chest comfortably lifted.
- Maintain balanced pressure through both feet.
- Hold briefly before returning to standing.
Breathing cue: Exhale as you lower and inhale as you return upright.
Modification: Use a shallow knee bend rather than attempting a deep squat.
Common mistake: Pulling excessively on the hammock or allowing the knees to collapse inward.
Exit: Straighten your legs slowly and regain a comfortable standing position.
4. Supported Low Lunge
Difficulty: Beginner.
Hammock position: Fabric held for light hand support while both feet remain connected to the floor.
This pose introduces gentle hip movement and can complement other beginner-friendly flexibility and self-care practices.
- Stand facing the hammock.
- Hold the fabric with both hands.
- Step one foot forward into a comfortable staggered stance.
- Bend the front knee slightly while keeping the back leg comfortably extended.
- Move the hips gently forward without forcing the stretch.
- Return to standing and repeat on the opposite side.
Modification: Use a shorter stance and a smaller range of movement.
Common mistake: Allowing the front knee to move uncontrollably inward or leaning heavily on the hammock.
Exit: Push gently through the feet and step back into a stable standing position.
5. Aerial-Assisted Side Stretch
Difficulty: Beginner.
Hammock position: Standing with both hands holding the fabric in front.
The side stretch introduces lateral movement without requiring the body to leave the ground.
- Stand with your feet comfortably apart.
- Hold the hammock with both hands.
- Lengthen your spine and gently move your upper body toward one side.
- Keep your hips facing forward.
- Avoid twisting or pulling your shoulders into the stretch.
- Return to center and repeat on the opposite side.
Modification: Reduce the range of movement if your shoulders feel restricted.
Common mistake: Rotating the torso instead of creating a controlled side bend.
Exit: Return upright slowly before releasing the fabric.
6. Supported Warrior II
Difficulty: Beginner.
Hammock position: Standing with optional light fabric support.
Warrior II introduces a wider stance and helps beginners practice lower-body alignment and balance.
- Stand with your feet comfortably apart.
- Turn one foot outward and position the opposite foot slightly inward.
- Bend the front knee within a comfortable range.
- Keep your torso upright and your hips stable.
- Use the hammock lightly for support if needed.
- Return to standing and switch sides.
Modification: Shorten your stance and reduce the front knee bend.
Common mistake: Allowing the front knee to move inward or forcing an excessively wide stance.
Exit: Straighten the front leg and bring your feet together gradually.
7. Hammock-Assisted Child's Pose
Difficulty: Beginner.
Hammock position: Fabric supporting the upper body while the practitioner maintains stable ground contact.
This supported movement offers an opportunity to relax the shoulders and explore a comfortable forward-reaching position.
- Begin in a comfortable kneeling position on a suitable surface.
- Position your hands or upper body against the hammock as demonstrated by your instructor.
- Move your hips backward gradually.
- Allow your upper body to lower into a comfortable position.
- Relax your shoulders and breathe naturally.
- Return to an upright kneeling position slowly.
Modification: Place a cushion beneath your knees if needed and reduce the forward reach.
Common mistake: Forcing the shoulders or lower back into an uncomfortable position.
Exit: Move backward gradually and return to kneeling with controlled support.
8. Supported Reclined Backbend
Difficulty: Beginner to moderate.
Hammock position: Fabric positioned behind the upper torso according to instructor demonstration.
This exercise introduces a gentle chest-opening position. It should not be treated as an opportunity to force the spine into a deep backbend.
- Stand close to the hammock.
- Follow the instructor's demonstration for positioning the fabric behind the upper torso.
- Maintain stable contact with the floor.
- Transfer a small amount of weight into the fabric.
- Allow the chest to open gently while keeping the neck comfortable.
- Return upright slowly.
Modification: Reduce the movement to a small chest lift or use an ordinary standing chest-opening stretch instead.
Common mistake: Allowing excessive lumbar extension or dropping the head backward.
Exit: Return the torso to upright with instructor assistance if needed.
9. Supported Floating Rest Pose
Difficulty: Beginner to moderate.
Hammock position: Fabric supports the body in a partially reclined or seated resting position.
This movement introduces the sensation of resting with hammock support rather than relying entirely on the floor.
- Begin in a stable standing position near the hammock.
- Follow the instructor's instructions for fabric placement.
- Transfer weight gradually into the support.
- Maintain a comfortable position with controlled breathing.
- Remain still for a short period if the position feels secure.
- Return to standing with assistance as necessary.
Modification: Keep more body weight on your feet and use the hammock only as light support.
Common mistake: Releasing stable contact before confirming that the body is properly supported.
Exit: Reverse the weight transfer slowly and establish stable standing before releasing the hammock.
10. Beginner Hammock Inversion Preparation
Difficulty: Moderate; instructor-supervised only.
Hammock position: Specialized fabric placement around the hips or pelvis demonstrated by a qualified aerial yoga instructor.
Inversion preparation introduces the concept of changing body orientation while supported by the hammock. It is not a requirement for beginners, and the exercise described here should not be interpreted as instructions for attempting a full inversion independently.
- First demonstrate that you can maintain a controlled grip and stable supported positions.
- Ask the instructor to explain the intended fabric placement and support points.
- Confirm that your health circumstances allow the proposed movement.
- Follow the instructor's demonstration and spotting instructions.
- Practice only the initial supported positioning that has been approved for you.
- Return to a stable standing position with direct assistance.
Prerequisites: Basic hammock familiarity, body awareness, comfortable shoulder positioning, and instructor approval.
Modification: Practice ordinary standing balance and supported stretching instead of transferring weight into an inverted position.
Common mistake: Attempting to enter an inversion before learning the correct fabric placement and exit technique.
Exit: Follow the instructor's assisted dismount procedure. Never attempt an unfamiliar inversion or exit without supervision.
Common Mistakes to Avoid When Practicing Beginner Aerial Yoga Poses
Even relatively simple hammock exercises require attention to technique. Beginners should watch for these common mistakes:
- Gripping the fabric too tightly and creating unnecessary shoulder tension.
- Rushing between poses instead of transferring weight gradually.
- Forcing a deeper stretch than the body comfortably allows.
- Holding the breath during challenging movements.
- Allowing the knees to move out of alignment during standing poses.
- Using unverified ceiling anchors or incompatible connectors.
- Attempting inversions without appropriate instruction.
- Continuing when experiencing pain, dizziness, nausea, unusual pressure, numbness, or loss of control.
If any warning sign appears, stop the exercise and ask for assistance. Do not attempt to push through symptoms to complete a pose.
For additional movement ideas, explore lifestyle and fitness-related resources while keeping your aerial practice within your current experience level.
How to Progress From Beginner to Intermediate Anti Gravity Yoga
Stage 1: Ground-Supported Hammock Movements
The first stage focuses on familiarity rather than suspension. Practice standing positions, light fabric grips, supported forward folds, and gentle lateral stretches.
Your initial goal is to understand how the hammock moves and how much support you can comfortably use without losing balance.
Stage 2: Partially Suspended Stretches and Transitions
Once you understand basic positioning, an instructor may introduce movements that transfer more body weight into the hammock.
Examples include supported reclining, carefully controlled chest-opening positions, and gentle transitions between standing and partially supported movements.
Progress should depend on technique and comfort rather than the number of classes completed.
Stage 3: Supervised Inversions and Advanced Transitions
Inversions require greater body awareness and more specialized instruction. Practitioners should demonstrate appropriate grip control, spatial awareness, shoulder stability, and an understanding of the equipment before progressing.
Qualified instructors should determine whether a participant is ready for a particular movement and provide appropriate spotting. Advanced transitions should never be treated as mandatory milestones.
How Often Should Beginners Practice Aerial Yoga?
For many beginners, one supervised session per week is a reasonable starting point. This allows time to become familiar with the equipment and observe how the body responds.
Some people may eventually feel comfortable practicing more frequently, while others may need additional recovery time. Consider your fitness level, muscle soreness, balance, and instructor recommendations when deciding how often to participate.
Between sessions, ordinary walking, gentle mobility exercises, and comfortable mat-based yoga can provide movement variety without requiring additional suspension practice.
A 20–25 Minute Anti Gravity Yoga Routine for Beginners
This sample routine organizes the beginner movements into a manageable sequence. It is intended as a framework for a session first learned under qualified supervision. Do not attempt suspended movements at home until your equipment and installation have been professionally assessed.
Minutes 0–4: Setup, Equipment Check, and Warm-Up
- Inspect the fabric, connectors, and suspension system according to manufacturer instructions.
- Check the surrounding practice area.
- Stand comfortably and practice slow breathing.
- Perform gentle shoulder rolls and comfortable arm movements.
- Become familiar with the hammock's position without transferring significant body weight.
Minutes 4–10: Ground-Supported Beginner Poses
Introduce four basic movements:
- Supported Mountain Pose for approximately one minute.
- Aerial Supported Forward Fold for one to two minutes.
- Hammock-Assisted Chair Pose for one minute.
- Aerial-Assisted Side Stretch for both sides.
Allow time to return to stable standing between movements. Avoid rushing transitions to fit the schedule.
Minutes 10–17: Supported Mobility and Stretching
Continue with controlled lower-body and upper-body movements:
- Supported Low Lunge on both sides.
- Supported Warrior II on both sides.
- Hammock-Assisted Child's Pose.
Keep each stretch within a comfortable range. If your balance becomes uncertain, return to a simpler ground-supported position.
Minutes 17–22: Supported Rest and Body Awareness
Choose either a supported reclined backbend or a floating rest position based on instructor guidance and individual comfort.
Pay attention to your breathing, shoulder position, and weight distribution. The purpose is to develop familiarity with supported movement, not to achieve the deepest possible stretch.
Minutes 22–25: Cool-Down and Controlled Dismount
- Return to standing gradually.
- Check whether you feel dizzy, nauseated, or uncomfortable.
- Release the hammock only after establishing stable balance.
- Finish with relaxed breathing and gentle standing movements.
Allow additional time whenever necessary. The 25-minute schedule is a guide rather than a reason to rush an exercise or dismount.
How to Modify the Routine for Complete Beginners
If you are uncomfortable with suspension, begin with a ground-supported version of the routine.
- Replace supported reclined positions with ordinary standing stretches.
- Use the hammock only for light balance support.
- Reduce the range of movement in forward folds and lunges.
- Skip inversion preparation entirely.
- Spend more time learning grip and alignment techniques.
A beginner does not need to perform every pose in this article. Developing control over a smaller selection of movements is a more appropriate starting point than progressing too quickly.
Anti Gravity Yoga Benefits: What Can Beginners Realistically Expect?
Flexibility and Range of Motion
Hammock-supported movements may help practitioners explore comfortable ranges of motion by introducing different support positions.
For example, the fabric may provide assistance during a forward fold or a gentle side stretch. This can make it easier to experiment with positioning without relying entirely on balance.
However, the hammock does not automatically make a stretch safer or more effective. Flexibility develops through appropriate practice, gradual exposure, and individual adaptation.
Balance, Coordination, and Proprioception
A moving hammock creates a different balance challenge from a stationary yoga mat.
Practitioners must pay attention to body position, fabric movement, and changes in weight distribution. These demands can challenge coordination and proprioception, the body's ability to sense its position and movement.
Regular practice may help develop greater awareness of how the body moves in different positions, although results vary.
Strength and Muscular Engagement
Depending on the exercise, aerial yoga may challenge several muscle groups:
- Core muscles: Help maintain trunk control during supported movements.
- Shoulders and arms: Participate in gripping and stabilizing the upper body.
- Leg muscles: Support standing positions, lunges, and controlled transitions.
- Back muscles: Contribute to maintaining posture and controlling movement.
The amount of muscular engagement depends on the pose, the level of suspension, and the practitioner's experience. A gentle supported stretch should not be confused with a demanding full-body strength workout.
Mobility, Movement Variety, and Body Awareness
One appealing aspect of aerial yoga is the ability to explore movements that are different from conventional mat-based exercise.
The hammock changes the available support points, allowing practitioners to experiment with supported positions and controlled transitions.
This variety may help make movement practice more engaging for people who want alternatives to repetitive floor-based routines.
What Anti Gravity Yoga Cannot Guarantee
It is important to distinguish general fitness benefits from established medical outcomes.
Anti gravity yoga should not be presented as a proven treatment for back pain, spinal disorders, injuries, or chronic medical conditions. It does not guarantee spinal decompression, lymphatic drainage, injury rehabilitation, weight loss, or permanent improvements in flexibility.
Although some movements may feel comfortable or provide temporary stretching sensations, these experiences do not establish a clinical therapeutic effect.
People seeking treatment for pain or an underlying health condition should consult an appropriate healthcare professional rather than relying on aerial exercise as a substitute for medical care.
Is Anti Gravity Yoga Safe? Essential Safety Tips and Contraindications
10 Essential Aerial Yoga Safety Tips for Beginners
Safety should determine how you select equipment, learn poses, and progress through your aerial yoga practice.
- Choose qualified instruction: Learn the fundamentals from someone with relevant aerial-specific training and practical teaching experience.
- Use appropriate equipment: Confirm that the hammock is intended for the movements you plan to perform.
- Verify installation: Have the mounting structure and suspension system professionally assessed.
- Inspect before exercising: Check for fabric damage, worn stitching, damaged connectors, and other visible problems.
- Maintain adequate clearance: Remove obstacles from the practice and landing areas.
- Progress gradually: Begin with standing movements before attempting more demanding suspended positions.
- Learn proper grips: Follow instructor demonstrations for your particular hammock design.
- Control transitions: Avoid jumping, sudden drops, and uncontrolled weight transfers.
- Practice safe exits: Learn how to dismount before attempting unfamiliar movements.
- Stop when symptoms appear: Pain, dizziness, nausea, numbness, unusual pressure, or loss of control are reasons to stop and seek assistance.
Who Should Avoid Inversions or Seek Medical Guidance?
Inversions can change how pressure and blood flow are distributed throughout the body. They are not appropriate for everyone.
People with glaucoma, uncontrolled hypertension, certain cardiovascular conditions, recent surgery, acute injuries, significant balance problems, or pregnancy-related restrictions should seek individualized medical guidance before attempting suspended or inverted movements.
People with neck or spinal conditions should also discuss the intended movements with an appropriate healthcare professional. A general fitness instructor cannot determine whether an inversion is medically appropriate for every participant.
When medical guidance is needed, explain which movements are being considered, how much body weight may be supported by the hammock, and whether full inversion is involved.
How to Recognize When a Pose Is Not Right for You
Stop immediately if you experience:
- Sharp or increasing pain.
- Dizziness or a feeling that you may faint.
- Nausea or unusual pressure in the head or eyes.
- Numbness, tingling, or loss of sensation.
- Difficulty breathing.
- Unusual joint or neck discomfort.
- Loss of grip or inability to control your position.
Ask your instructor for assistance with returning to a stable position. Do not attempt to exit a complicated suspended position independently when you are experiencing symptoms.
How to Verify an Aerial Yoga Instructor's Qualifications
A general yoga teaching qualification and aerial-specific training are not interchangeable.
When choosing an instructor, ask about:
- Relevant yoga teaching qualifications.
- Specific training in aerial yoga or hammock-based movement.
- Practical experience teaching beginners.
- Knowledge of equipment inspection and installation requirements.
- Ability to demonstrate controlled mounting and dismounting.
- Experience providing appropriate modifications and spotting.
If you specifically want the branded AntiGravity® method, verify that the instructor has the relevant method-specific training. Do not assume that a general aerial yoga qualification automatically provides that credential.
Safety Considerations for Home Aerial Yoga Practice
Home practice introduces additional responsibilities because there may not be an instructor present to check your equipment or assist with transitions.
A product's stated weight capacity does not establish that a particular ceiling installation is safe. The building structure, mounting hardware, connecting components, installation quality, and dynamic forces must all be considered.
Where applicable, ask the installer about appropriate structural requirements, manufacturer documentation, and relevant building and equipment safety standards. Standards and testing requirements should be verified for the specific components rather than assumed to apply universally.
Inspect the hammock before each session and remove damaged equipment from use. Follow the manufacturer's instructions for cleaning, storage, maintenance, and replacement.
Until you have learned the basic techniques from a qualified instructor, keep home practice limited to movements you have already been taught and approved to perform independently.
Anti Gravity Yoga vs. Traditional Mat Yoga: Which Is Better for Beginners?
Key Differences in Equipment, Movement, and Support
Both aerial yoga and traditional mat yoga can be used to develop movement awareness, flexibility, and balance. However, their equipment requirements and learning experiences are different.
| Comparison | Anti Gravity / Aerial Yoga | Traditional Mat Yoga |
| Equipment | Suspension hammock and compatible mounting system | Yoga mat and optional accessories |
| Body support | Combination of fabric and floor support | Primarily floor support |
| Movement variety | Includes supported and suspended positions | Uses standing, seated, kneeling, and floor-based positions |
| Balance demands | Includes challenges created by moving fabric | Primarily based on body positioning and ground contact |
| Stretching | Can use hammock support to explore different positions | Uses body positioning and conventional yoga props |
| Installation | Requires an appropriately assessed suspension system | No overhead installation required |
| Beginner supervision | Especially important for hammock transitions and inversions | Helpful for learning alignment and modifications |
| Home practice | Requires suitable space and professionally assessed mounting | Generally easier to arrange at home |
Which Practice Is Easier for Complete Beginners?
Traditional mat yoga is generally easier to begin because it requires less equipment and does not involve overhead installation or suspension techniques.
Aerial yoga may appeal to people who enjoy experimenting with different movement patterns and supported stretching. However, learning how to grip, position, and safely exit the hammock adds another layer of instruction.
If you have never practiced yoga before, mat-based movements can provide a useful foundation before introducing aerial equipment.
Can You Combine Aerial Yoga With Regular Yoga?
Yes. Combining mat yoga and aerial yoga can provide movement variety while allowing practitioners to develop different skills.
For example, a weekly routine might include:
- One supervised aerial yoga session focusing on basic hammock techniques.
- One or two gentle mat yoga sessions.
- Walking or another comfortable low-impact activity.
- Rest days according to individual recovery needs.
Adjust the schedule based on your fitness level, comfort, and instructor recommendations. There is no requirement to practice both styles on the same day.
How to Choose Between an AntiGravity® Class, Aerial Yoga Studio, and Home Setup
When to Choose an Official AntiGravity® Class
If you are specifically interested in the AntiGravity® method, look for an instructor with the appropriate method-specific training.
A structured class can introduce the branded approach to hammock movement while providing direct instruction, supervised transitions, and opportunities to learn within an established teaching framework.
This option is particularly useful for beginners who want to understand the method rather than simply experiment with a generic aerial yoga hammock.
When a General Aerial Yoga Studio Is a Better Fit
A general aerial yoga studio may be more suitable if your main goal is to explore hammock-supported yoga without following a particular branded method.
Before booking, check whether the studio offers beginner-specific sessions, maintains its equipment, provides suitable modifications, and keeps class sizes manageable enough for appropriate instruction.
Ask whether inversions are optional and whether first-time participants can remain with ground-supported movements throughout their initial session.
When Is Home Aerial Yoga Equipment Worth Considering?
Home equipment may be worth considering when you already understand basic aerial yoga techniques and have a suitable location for a professionally assessed installation.
It may appeal to people who prefer flexible practice times, have sufficient overhead clearance, and can maintain the equipment according to manufacturer requirements.
However, buying a hammock is only one part of preparing a home practice environment. Mounting components, structural assessment, installation, clearance, and appropriate instruction must all be addressed.
Beginner Aerial Yoga Equipment Buying Checklist
Before choosing an aerial yoga hammock, review the following:
- Is the material suitable for the intended exercise?
- Is the fabric elastic or non-elastic?
- Are the dimensions clearly specified?
- Is the stated load capacity documented?
- Are the included handles and connectors clearly identified?
- Are extension straps or ceiling mounting components sold separately?
- Can the suspension system be professionally installed?
- Are inspection and maintenance instructions available?
- Is there enough room to practice safely?
- Have you learned basic aerial yoga techniques from a qualified instructor?
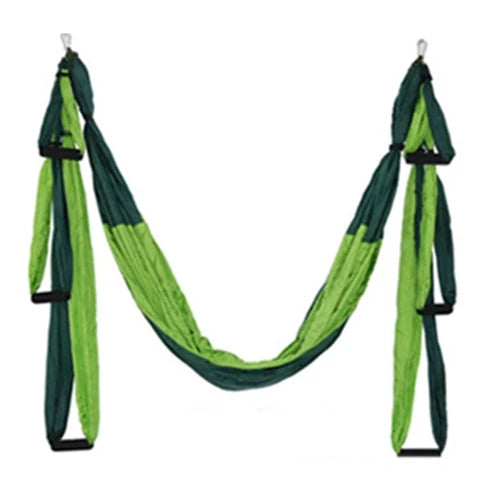
For people researching non-elastic hammock designs, the Aerial Yoga Hammock with 210T parachute nylon fabric is one option to examine. Its listed 250 × 150 cm hammock dimensions, three handle lengths, and stated 200 kg capacity provide useful starting specifications for evaluating product suitability.
Remember that extension straps and ceiling hanging trays are not included in the listed package. The product's stated capacity should not be interpreted as approval for an unverified ceiling installation.
Take time to compare equipment documentation and installation requirements before making a decision. The right setup is one that matches your intended movements and can be safely assessed, installed, and maintained.
Frequently Asked Questions About Anti Gravity Yoga
What Is Anti Gravity Yoga and How Does It Work?
Anti gravity yoga uses a suspended fabric hammock to support body weight during modified yoga poses, stretching, balance exercises, and selected inversions. The hammock provides additional support points that allow practitioners to explore different positions. Generic aerial yoga is a broad category, while AntiGravity® refers to a specific trademarked fitness method.
Is Anti Gravity Yoga Suitable for Complete Beginners?
Yes, many aerial yoga classes offer beginner-friendly movements that keep both feet on the floor. Beginners can start with supported standing poses, gentle stretches, and basic grip techniques before progressing. Qualified instruction is especially important for learning transitions, equipment positioning, and any movements involving suspension or inversion.
What Are the Best Anti Gravity Yoga Poses for Beginners?
Accessible starting movements include Supported Mountain Pose, Aerial Supported Forward Fold, Hammock-Assisted Chair Pose, Supported Low Lunge, Aerial-Assisted Side Stretch, and Supported Warrior II. These poses can be practiced with ground contact and light hammock support. More demanding reclined positions and inversion preparation should be introduced only under qualified supervision.
What Is the Difference Between AntiGravity® Yoga and Aerial Yoga?
AntiGravity® is a trademarked fitness method developed by Christopher Harrison. Aerial yoga is a broader category of hammock-supported movement practices developed and taught by different studios and instructors. Although they may share suspended movements and stretching techniques, not every aerial yoga class follows the AntiGravity® method or its instructor-training system.
Is Anti Gravity Yoga Safe, and What Should Beginners Avoid?
It can be practiced with appropriate instruction, suitable equipment, and professionally assessed installation. Beginners should avoid unsupervised inversions, improvised ceiling mounts, uncontrolled transitions, and movements that cause pain or dizziness. People with pregnancy-related restrictions, glaucoma, uncontrolled blood pressure, recent injuries, or other relevant medical concerns should seek individualized medical guidance.
How Many Times a Week Should You Practice Anti Gravity Yoga?
One supervised session per week is a reasonable starting point for many beginners. Practice frequency can increase gradually according to experience, fitness, recovery, and instructor advice. Allow enough time to recover between sessions, especially when learning unfamiliar movements or experiencing muscle soreness.
Can You Do Anti Gravity Yoga at Home Without a Studio?
Yes, but home practice requires a professionally assessed mounting location, compatible suspension components, adequate clearance, and equipment suitable for the intended movements. Beginners should first learn basic techniques with a qualified instructor. A hammock's advertised weight capacity alone does not establish that a particular ceiling installation is safe.
Does Anti Gravity Yoga Help Improve Flexibility and Balance?
Hammock-supported stretching may help practitioners explore comfortable ranges of motion, while moving fabric introduces additional balance and coordination challenges. Regular practice may support movement awareness and flexibility, but individual results vary. It does not guarantee permanent flexibility improvements or provide a proven treatment for medical conditions.
Final Thoughts: Is Anti Gravity Yoga Worth Trying?
Anti gravity yoga offers an alternative way to explore stretching, balance, mobility, and body awareness through hammock-supported movement. Its appeal comes from the opportunity to experiment with positions that are different from conventional mat-based yoga.
For beginners, the most useful approach is to build skills gradually. Start with ground-supported movements, learn proper grips and alignment, and become comfortable with controlled transitions before considering more demanding suspended positions.
Remember the distinction between the trademarked AntiGravity® method and generic aerial yoga when choosing a class or instructor. Both may offer interesting movement experiences, but their teaching structures and qualifications are not necessarily interchangeable.
If you are considering home practice, prioritize professional installation, compatible equipment, and manufacturer documentation over advertised capacity alone. A suitable hammock can provide a useful exercise option, but safe practice depends on the entire suspension system and the practitioner's ability to use it correctly.
Whether you begin with a qualified studio class or eventually establish an appropriately installed home practice, take your time learning the fundamentals. Explore relevant home fitness equipment and evaluate your options carefully as your experience develops.
The best starting point is not the most advanced inversion or deepest stretch. It is a controlled, comfortable movement that helps you understand the hammock and build confidence one session at a time.
Pillar Article: Aerial Fitness Equipment: Complete Comparison & Buying Guide for Home Training