
Lash Artist Application Equipment: What You Really Need
Building a professional lash workstation does not mean buying every tool available. The right lash artist application equipment should support precise isolation, controlled adhesive application, consistent extension placement, proper curing, and hygienic client care. Investing in the wrong equipment can increase setup costs without improving your application workflow.
Whether you are preparing your first lash extension station or upgrading an established salon, prioritize tools according to the services you perform. Precision tweezers, suitable lash trays, compatible adhesive, disposable applicators, reliable lighting, and sanitation supplies form the foundation. Environmental monitors, ergonomic furniture, and specialized UV/LED curing systems can become valuable additions when your workflow requires them.
This guide organizes professional eyelash extension equipment by application stage, compares beginner and advanced setups, and explains what to look for before purchasing specialized tools.
What Equipment Does a Lash Artist Need? Complete Essential Checklist
A lash artist generally needs five groups of equipment: lash application tools, adhesive supplies, client preparation products, workstation equipment, and hygiene supplies. The following checklist separates essential purchases from upgrades that can wait.
Essential Equipment for Professional Eyelash Extension Application
- Isolation tweezers: Separate individual natural lashes so extensions can be attached without neighboring lashes sticking together.
- Application tweezers: Pick up individual extensions or create volume fans, depending on the tweezer design and technique.
- Lash extension trays: Provide extensions in different lengths, curls, and diameters for classic, hybrid, and volume services.
- Eyelash extension adhesive: Provides the bonding material needed to attach extensions to natural lashes. Choose an adhesive appropriate for the technique and working environment.
- Under-eye pads and lash tape: Help position and protect the lower lashes during application. Select products appropriate for the client's skin and follow professional application practices.
- Adhesive palette: Provides a designated surface for dispensing small amounts of adhesive.
- Microbrushes and disposable applicators: Support controlled application of cleansing and preparation products.
- Disposable spoolies: Help separate and groom extensions during and after application.
- Lash cleanser and cleansing brushes: Help remove makeup, oils, and debris before treatment.
- Task lighting: Illuminates the lash line for accurate isolation and placement.
- Cleaning and disinfection supplies: Support appropriate workstation hygiene and reusable-tool maintenance.
Recommended Equipment for Better Application Consistency
- Digital hygrometer: Measures relative humidity, helping artists monitor environmental conditions that may affect adhesive performance.
- Digital thermometer: Tracks room temperature so adhesive can be used within its manufacturer's recommended operating range.
- Adhesive storage container: Helps maintain appropriate storage conditions when its design and instructions are suitable for the adhesive.
- Lash tile: Keeps extensions organized and accessible during application.
- Ergonomic treatment pillow: Supports comfortable client positioning during longer appointments.
- Additional isolation and volume tweezers: Provide alternative shapes and handling characteristics for different lash techniques.
- Adjustable lash lamp: Improves visibility and allows artists to position illumination around the treatment area.
Optional and Advanced Equipment for Established Lash Artists
- UV/LED lash adhesive curing equipment designed for compatible UV-curable adhesives.
- Nano mister, where permitted by the adhesive manufacturer's instructions.
- Adjustable professional treatment beds and ergonomic stools.
- Additional magnification and lighting equipment.
- Dedicated equipment storage and workstation organization systems.
- Specialized volume-fan tools and additional lash inventory.
Beginners should concentrate on mastering the essential application tools before purchasing advanced equipment. Artists expanding into specialized services can introduce upgrades according to their actual client demand.
When comparing professional tools, consider handling comfort, material quality, compatibility, and maintenance requirements. You can also explore specialized eye care devices when evaluating equipment for a broader beauty workstation.
Lash Artist Equipment Checklist by Application Workflow
Organizing equipment according to the stages of a lash appointment makes it easier to identify missing supplies and avoid unnecessary workstation clutter.
Step 1: Prepare and Clean the Natural Lashes
Before attaching extensions, the natural lashes should be appropriately prepared. Residual makeup, oils, and debris can interfere with adhesive contact and make precise application more difficult.
Prepare the following supplies:
- Professional lash cleanser.
- Suitable cleansing brushes.
- Lint-free applicators and disposable towels.
- Under-eye pads and appropriate lash tape.
- Clean disposable spoolies.
- Hand hygiene and workstation cleaning supplies.
Choose cleansing products intended for professional lash preparation and follow their usage instructions. Avoid allowing cleansing products to enter the client's eyes.
Step 2: Isolate Natural Lashes and Create Extensions
Isolation and extension pickup are two different technical tasks. A reliable pair of isolation tweezers separates natural lashes, while application tweezers help artists pick up extensions or create volume fans.
Useful equipment includes:
- Straight or curved isolation tweezers.
- Classic application tweezers.
- Boot or angled volume tweezers.
- Volume-fan tweezers.
- Lash trays with suitable curls, lengths, and diameters.
- Lash tiles and mapping accessories.
Choose lash materials according to the intended extension design and the condition of the natural lashes. Equipment selection should support controlled placement rather than encourage heavier extensions than the natural lashes can reasonably support.
Step 3: Apply Adhesive and Attach Extensions
Adhesive management directly influences application consistency. Artists should select a formula that matches their working speed, technique, and environmental conditions.
Prepare an adhesive palette, fresh adhesive supply, replacement adhesive dots, and any dispensing accessories recommended by the manufacturer. A digital hygrometer and thermometer can help identify changes in room conditions that may affect adhesive behavior.
Always follow the adhesive manufacturer's instructions for dispensing, handling, storage, and replacement.
Step 4: Complete Curing and Final Application Checks
Traditional lash adhesives generally rely on moisture in the surrounding environment to initiate and complete their curing process. UV-curable lash adhesives use a different system that requires a compatible UV/LED light source.
Depending on the adhesive system, equipment may include:
- Traditional lash adhesive and its recommended application accessories.
- A compatible UV/LED curing lamp.
- Adhesive specifically formulated for the selected curing system.
- Manufacturer-specified protective equipment.
- Suitable tools for final lash separation and inspection.
Never assume that a UV/LED lamp can cure conventional lash adhesive. The adhesive and light source must be explicitly compatible.
Step 5: Finish, Clean, and Reset the Workstation
After completing an appointment, dispose of single-use supplies and reprocess reusable equipment appropriately.
Keep separate areas for clean supplies, used tools, and waste. Prepare fresh applicators and disinfect reusable tools according to product labels, manufacturer instructions, and applicable salon regulations.
How to Choose the Best Lash Application Tools
Professional lash application tools should offer predictable handling, comfortable grip, suitable material construction, and consistent performance. Rather than choosing equipment based on appearance alone, evaluate how it behaves during repeated applications.
Eyelash Extension Tweezers: Shape, Tension, and Grip
Tweezers are among the most important purchases for lash artists because they directly influence isolation, pickup, and extension placement.
- Straight tweezers: Often preferred for isolating individual natural lashes and maintaining clear separation.
- Curved tweezers: Provide an angled working position that some artists find comfortable for isolation and pickup.
- Boot tweezers: Feature an angled tip that can help with volume-fan pickup.
- Precision tweezers: Offer narrow, carefully aligned tips for controlled handling of small extensions.
Evaluate tip alignment, closure tension, grip texture, weight, and balance. The tips should meet evenly without excessive pressure, and the tool should feel comfortable throughout a complete appointment.
Lash Isolation Tweezers vs. Volume Lash Tweezers
These tools serve different functions and should not be selected interchangeably without considering the artist's technique.
- Isolation tweezers: Designed to separate individual natural lashes and maintain clear working space.
- Volume tweezers: Designed to pick up multiple fine extensions and assist with fan creation.
- Classic application tweezers: Support pickup and placement of individual extensions.
Pros of investing in specialized tweezers:
- More controlled handling for different lash techniques.
- Greater choice of tip shapes and working angles.
- Potentially improved comfort when the tool matches the artist's hand position.
Cons to consider:
- Specialized designs may require additional practice.
- Different tweezer shapes increase inventory and maintenance needs.
- Higher cost does not automatically mean better handling.
Compare tweezer designs based on actual handling performance and the services you provide. Building a small collection of reliable tools is generally more practical than purchasing numerous unfamiliar designs.
Choosing Lash Extension Trays and Application Accessories
Lash trays should provide suitable curl, diameter, length, and fiber consistency for the intended service.
- Curl: Determines the extension's visible curve and helps shape the final appearance.
- Diameter: Influences the weight of individual extensions and should be appropriate for the natural lash.
- Length: Helps create the desired lash design while respecting natural-lash condition.
- Strip arrangement: Influences how easily extensions can be accessed and picked up.
- Mixed-length trays: Offer flexibility when creating different lash maps.
Classic services generally require individual extensions, while hybrid and volume services require additional choices in extension types and pickup tools. Keep frequently used lengths accessible to minimize unnecessary interruptions.
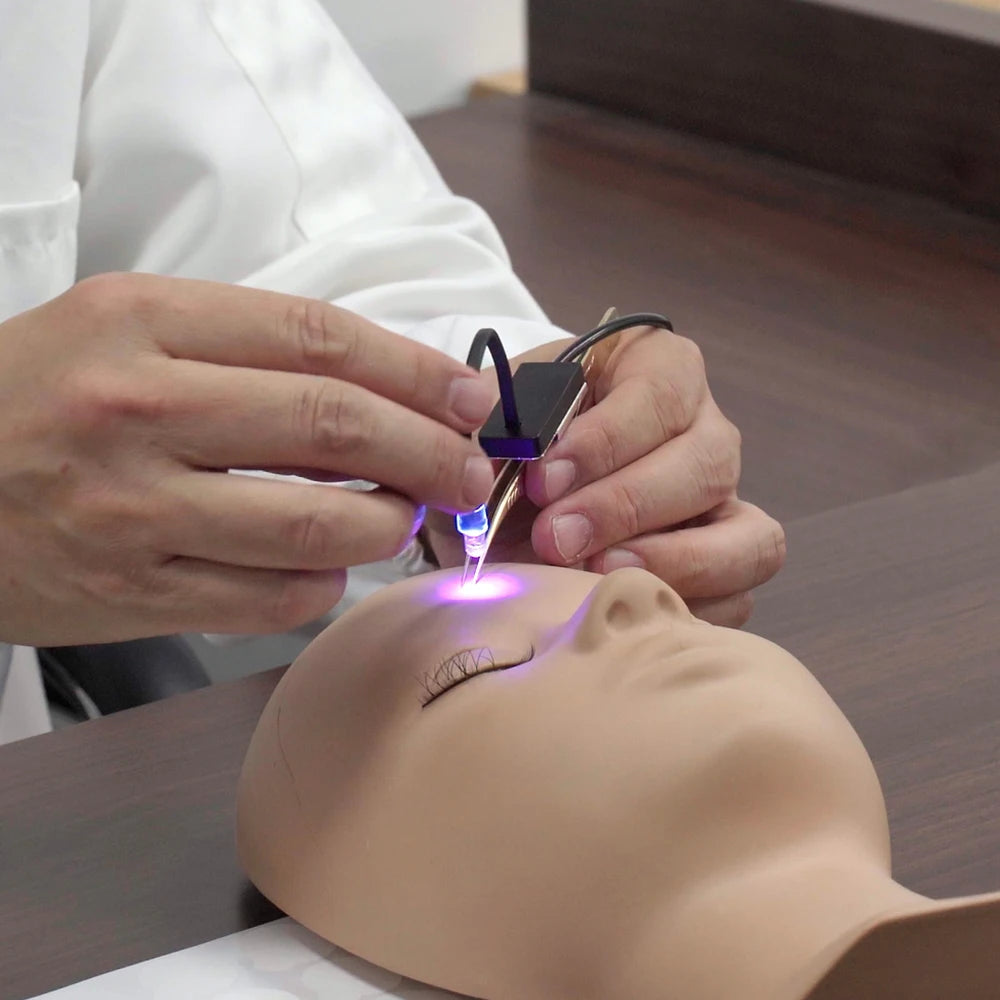
When expanding your professional tool collection, prioritize tweezer alignment and comfort before purchasing additional accessories. These factors have a more direct relationship with everyday application handling.
Traditional Lash Adhesive Equipment vs. UV/LED Lash Curing Systems
Traditional and UV/LED lash systems use different adhesive-curing approaches. Choosing between them requires evaluating the adhesive formulation, equipment compatibility, training requirements, and safety procedures.
Traditional Eyelash Extension Adhesive: Essential Equipment
Many conventional professional lash adhesives use cyanoacrylate-based formulations. Their curing process is influenced by moisture and environmental conditions, including temperature and relative humidity.
Essential supporting equipment includes:
- Traditional eyelash extension adhesive.
- Adhesive palette and replacement adhesive dots.
- Digital hygrometer and thermometer.
- Suitable adhesive storage container.
- Manufacturer-recommended cleansing and preparation products.
Traditional systems are familiar to many lash artists and can be used without a dedicated UV curing lamp. However, changes in environmental conditions may influence adhesive behavior and application consistency.
UV LED Lash Curing System: Components and Functions
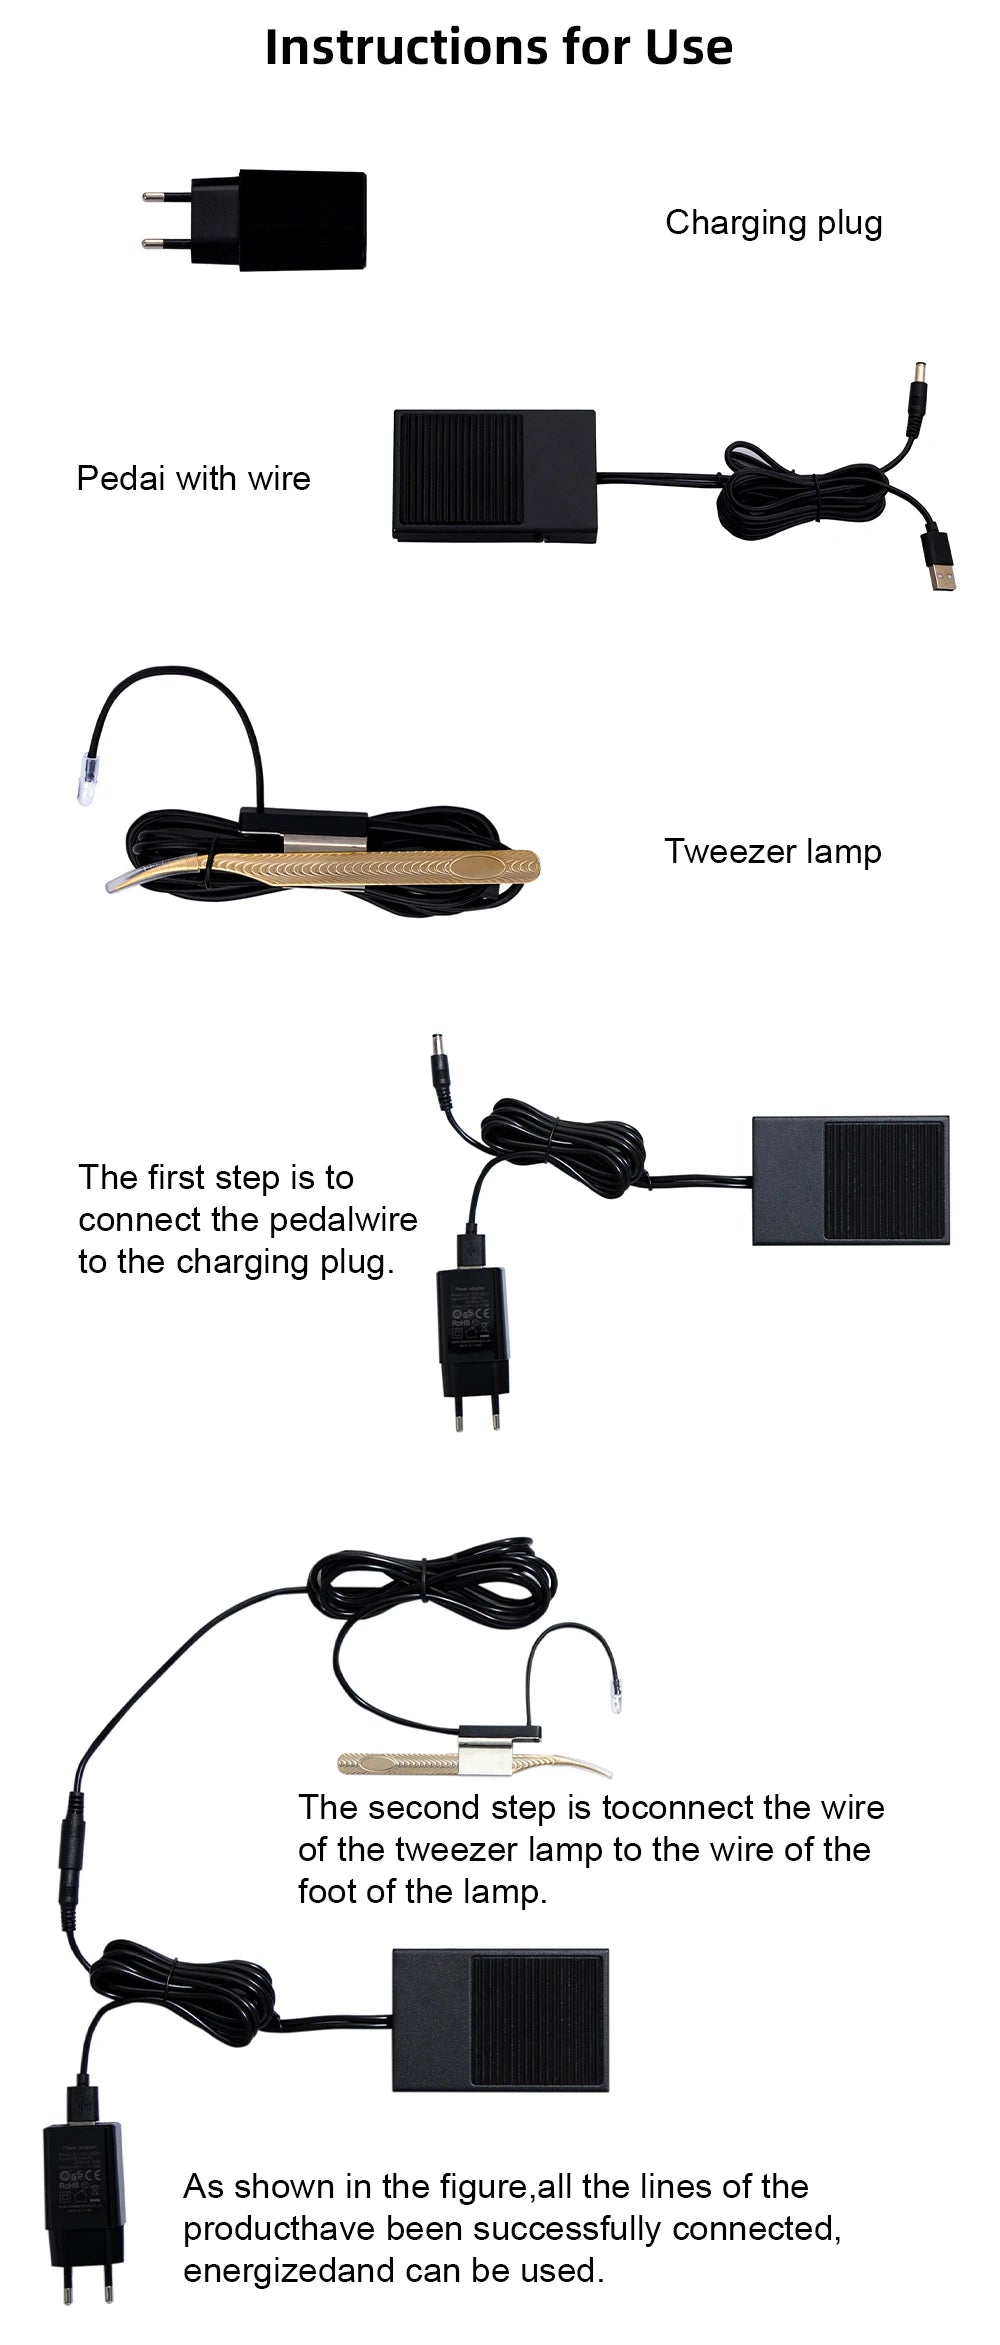
A UV/LED lash curing system is designed to activate a specially formulated UV-curable adhesive through an appropriate light source. It is a dedicated application system, not simply an accessory that makes every traditional lash glue dry faster.
Depending on the system, the equipment may include:
- UV/LED curing lamp: Supplies the specified light output for compatible adhesive curing.
- UV-curable lash adhesive: Formulated for the selected curing technology.
- Control equipment: Regulates system operation where included in the design.
- Protective equipment: Used according to the manufacturer's safety requirements.
- Precision tweezers: Support accurate extension pickup, isolation, and placement.
The curing process must follow the adhesive and equipment manufacturers' specifications. Wavelength, irradiance, exposure duration, and working distance all matter when evaluating system compatibility.
Traditional Adhesive vs. UV/LED Systems: Which Should You Buy?
Use the following comparison matrix to identify which equipment system better matches your current workflow.
- Equipment requirements: Traditional systems need compatible adhesive and dispensing accessories. UV/LED systems additionally require a dedicated compatible curing light.
- Adhesive compatibility: Traditional adhesives must be used according to their own curing instructions. UV/LED adhesives must be explicitly formulated for the selected light system.
- Curing workflow: Traditional adhesive curing depends on environmental conditions. UV/LED curing follows the specified light exposure procedure.
- Environmental monitoring: Temperature and humidity monitoring are important for traditional adhesive management. UV/LED systems still require compliance with adhesive storage and application instructions.
- Investment priorities: Traditional users should prioritize adhesive quality and environmental monitoring. UV/LED users must also account for the cost and compatibility of the dedicated curing system.
- Training requirements: Both approaches require appropriate lash application training. UV/LED systems additionally require training in equipment operation and light-exposure precautions.
- Safety considerations: Both systems require careful adhesive handling and client protection. UV/LED systems introduce additional light-exposure considerations.
Traditional adhesive advantages:
- Familiar workflow for many established lash artists.
- No dedicated UV/LED lamp required.
- Multiple adhesive formulations are available for different techniques.
Traditional adhesive limitations:
- Environmental conditions can influence curing behavior.
- Application consistency requires appropriate humidity and temperature management.
- Artists must work within the adhesive's specified performance characteristics.
UV/LED system advantages:
- Designed around a dedicated light-activated curing process.
- Can support a more controlled curing workflow when the complete system is compatible and correctly operated.
- Combines specialized curing equipment with precision application tools in some kits.
UV/LED system limitations:
- Requires compatible UV-curable adhesive.
- Involves additional equipment and training considerations.
- Improper light exposure or incompatible components may create safety and performance risks.
UV/LED Lash Equipment Compatibility and Safety Precautions
Compatibility should be checked before purchasing a UV/LED lash curing kit. A lamp's general UV/LED designation does not establish that it can safely or effectively cure a particular adhesive.
Check the following information:
- Wavelength compatibility: Confirm that the lamp's specified wavelength matches the adhesive manufacturer's requirements.
- Light output: Verify that the equipment provides the required output for the adhesive system.
- Exposure distance: Follow the specified working distance rather than estimating it.
- Exposure duration: Use only the manufacturer's recommended exposure procedure.
- Eye protection: Follow the system's protective-equipment instructions and prevent unintended exposure to the client and technician.
- Client suitability: Review relevant product warnings and client considerations before treatment.
- Equipment condition: Inspect the lamp, electrical connections, and operating components before use.
Do not assume that UV/LED curing is universally safer, appropriate for every client, or suitable for every adhesive. Follow applicable professional regulations and manufacturer instructions.
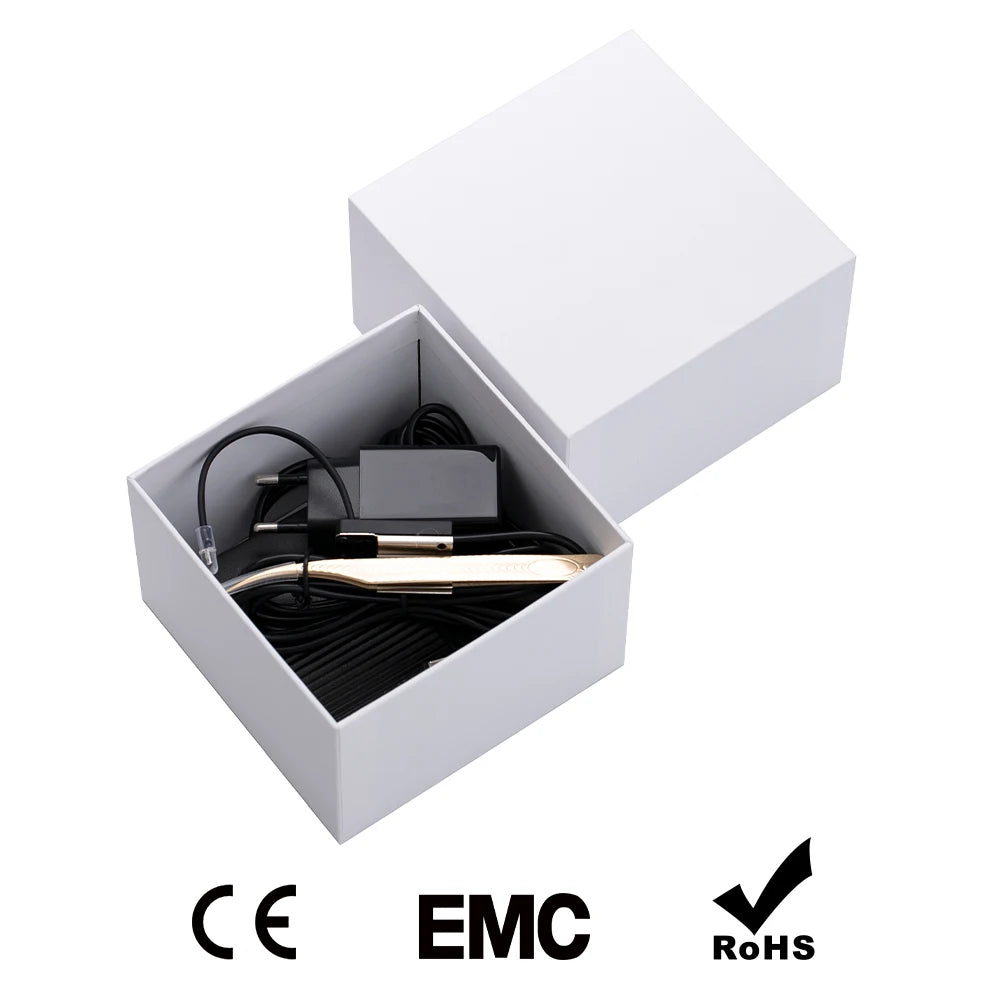
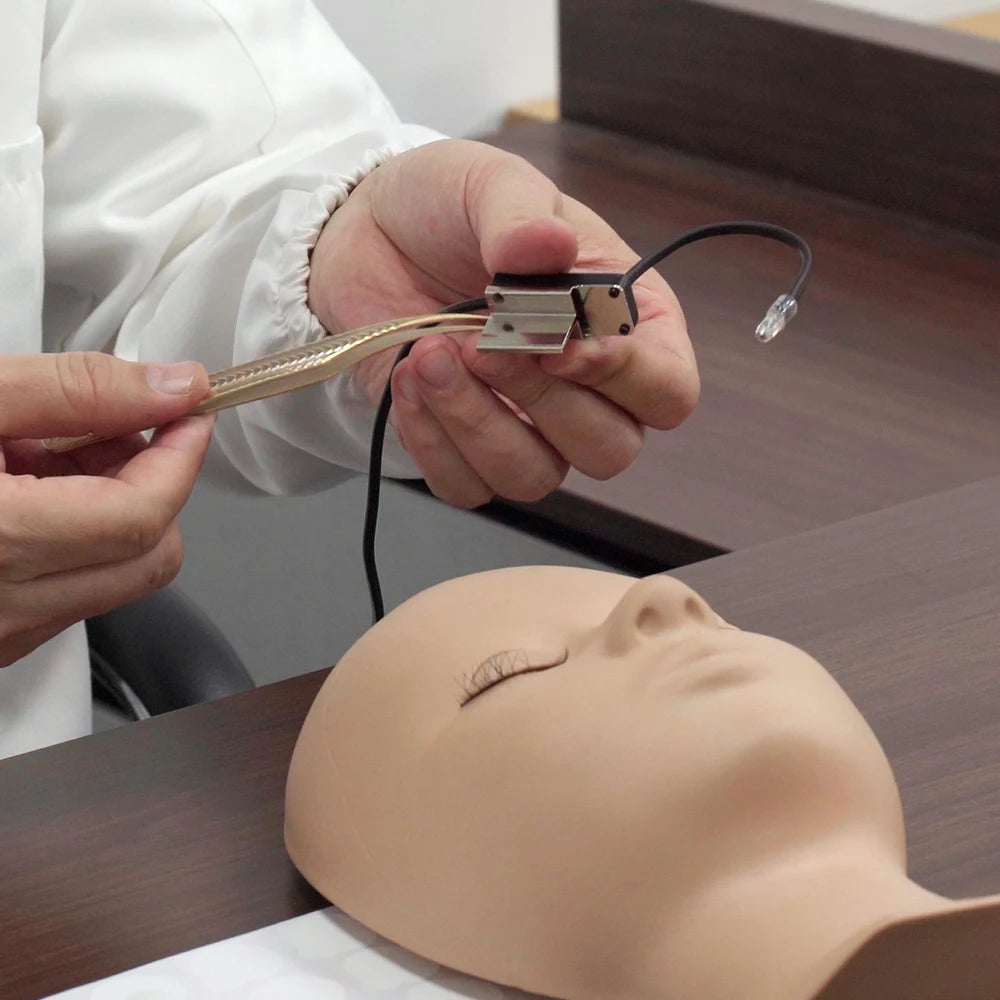
For artists considering a dedicated curing setup, the Professional UV LED Eyelash Glue Curing Light Kit is one option to evaluate.
The product listing identifies it as the Pinky Leem TL02 model and describes a UV LED curing system combined with precision tweezers. It lists plastic construction, a weight of 0.5 kg, and one kit per quantity. Its intended use is professional eyelash extension application.
Before using this kit, confirm the adhesive compatibility, wavelength, light output, exposure distance, and operating requirements with the product and adhesive manufacturers. The listing does not establish compatibility with every UV-curable adhesive or provide detailed technical curing specifications.
Compare the UV LED lash curing kit with precision tweezers against the technical requirements of the adhesive you intend to use rather than purchasing solely on the basis of its advertised curing technology.
How to Choose Lash Adhesive, Storage, and Environmental-Control Equipment
Adhesive performance depends on more than the adhesive bottle itself. Proper storage, environmental monitoring, and product compatibility all contribute to a consistent application process.
Choosing Eyelash Extension Adhesive for Your Workflow
Evaluate these factors before selecting an adhesive:
- Drying speed: Match the adhesive's stated working characteristics to your application experience and speed.
- Viscosity: Consider whether the consistency supports your preferred pickup and attachment technique.
- Ingredient information: Review the complete available ingredient and safety information.
- Environmental requirements: Check the manufacturer's temperature and humidity recommendations.
- Technique compatibility: Verify that the product is intended for classic, hybrid, volume, or the specific UV/LED system you use.
- Sensitivity considerations: Review product warnings and client suitability. No adhesive should be described as risk-free or guaranteed to prevent reactions.
Lash Adhesive Storage Containers and Replacement Practices
Adhesive storage requirements vary between formulations. Some products specify airtight storage, particular temperature ranges, or moisture-control requirements.
To maintain proper adhesive management:
- Follow the original manufacturer's storage instructions.
- Record the date each adhesive bottle is opened.
- Check expiration dates and recommended replacement intervals.
- Keep adhesive containers properly closed between uses.
- Avoid exposing adhesive to unapproved heat, sunlight, or moisture conditions.
- Replace products according to manufacturer guidance rather than relying on appearance alone.
Digital Hygrometer and Thermometer: Why Monitoring Matters
A digital hygrometer measures relative humidity, while a thermometer tracks temperature. These devices help artists understand whether the treatment room falls within the adhesive manufacturer's recommended operating conditions.
Position monitoring equipment where it can provide a representative reading of the application environment. Avoid placing it directly beside a humidifier, air-conditioning outlet, or another source of localized temperature or humidity changes.
Do Lash Artists Need a Nano Mister?
A nano mister produces a fine water mist and is sometimes included in professional lash equipment discussions. However, it should not be treated as a universal adhesive-curing solution.
Its suitability depends on the adhesive formulation and manufacturer instructions. Introducing additional moisture at the wrong time or in an inappropriate amount may interfere with the intended application process. Artists should not use a nano mister unless the adhesive manufacturer specifically supports its use.
Lash Workstation Furniture, Lighting, and Organization
A professional workstation should support stable client positioning, clear visibility, ergonomic working posture, and easy access to clean application supplies.
Choosing an Ergonomic Lash Treatment Bed
A treatment bed is an important investment for artists who perform extended appointments. Compare the following characteristics:
- Adjustable versus fixed height.
- Stable construction and adequate weight support.
- Comfortable cushioning.
- Suitable client positioning.
- Easy-to-clean upholstery.
- Compatibility with the artist's preferred working posture.
An adjustable bed can offer more flexibility for different clients and treatment positions, while a fixed bed may be sufficient for a smaller workstation with consistent requirements.
LED Lash Extension Lamp: Features Worth Paying For
Task lighting helps artists identify individual natural lashes and maintain accurate extension placement. When comparing LED lash lamps, prioritize:
- Adjustable brightness.
- Suitable color temperature.
- Flexible positioning.
- Reduced shadows around the treatment area.
- Stable mounting and positioning.
- Comfortable illumination for prolonged close-up work.
A general LED task lamp should not be confused with a UV/LED curing lamp. They serve different functions and should be purchased according to their intended applications.
How to Organize a Professional Lash Workstation
Divide the workstation into clearly defined areas:
- Preparation area: Keep cleanser, cleansing brushes, under-eye pads, and fresh disposable applicators together.
- Application area: Arrange lash trays, tweezers, lash tiles, and mapping supplies within comfortable reach.
- Adhesive area: Keep adhesive, palette, replacement dots, and environmental monitoring equipment accessible.
- Lighting area: Position task lighting so the artist can see the lash line without obstructing the application process.
- Sanitation area: Separate clean reusable tools from used equipment and disposable waste.
Use labeled storage containers to prevent clean and used equipment from becoming mixed. Frequently used tools should be accessible without requiring the artist to repeatedly change posture.
Temperature, Humidity, and Lighting Placement
Place environmental monitors away from direct airflow and localized moisture sources. Position task lighting to reduce shadows while keeping electrical cords and equipment away from treatment materials.
Consistent workstation conditions make it easier to identify changes that may influence adhesive behavior. Avoid making environmental adjustments without considering the adhesive manufacturer's recommended operating range.
Artists upgrading their broader beauty workstation can also review skin and beauty care equipment when evaluating complementary tools and devices.
Beginner vs. Professional Lash Artist Equipment: What Should You Buy?
The most effective purchasing strategy is to build a functional starter setup first, then invest in specialized equipment as your services and technical skills expand.
Beginner Lash Artist Starter Equipment
A beginner setup should include:
- One reliable pair of isolation tweezers.
- Suitable classic application tweezers.
- Basic lash extension trays.
- A compatible professional adhesive.
- Under-eye pads and lash tape.
- Microbrushes and disposable spoolies.
- Lash cleanser and preparation supplies.
- A suitable task lamp.
- A stable treatment surface.
- Basic cleaning and disinfection supplies.
Beginners should avoid purchasing a large collection of specialized tweezers or several adhesive systems before understanding their working preferences.
Professional Lash Artist Equipment Setup
Experienced artists may benefit from additional equipment based on their appointment volume and service menu.
- Multiple isolation and volume tweezer designs.
- Expanded lash trays for different techniques.
- Digital temperature and humidity monitoring.
- Dedicated adhesive storage.
- Adjustable treatment furniture.
- Advanced task lighting.
- Dedicated UV/LED curing equipment when offering compatible UV-curable adhesive services.
- Organized reusable-tool storage and sanitation systems.
Equipment Comparison: Beginner vs. Professional Setup
- Tweezers: Beginners need reliable isolation and application tools. Professionals may add specialized volume and alternative tip designs.
- Lash inventory: Beginners can start with a limited selection of suitable curls and lengths. Professionals may maintain broader inventories for different client requests.
- Adhesive management: Beginners need one suitable adhesive system. Professionals may use multiple formulations for different workflows, with separate compatibility checks.
- Environmental monitoring: Basic monitoring is recommended from the beginning. Established artists may introduce additional environmental-control equipment.
- Lighting: A reliable task lamp is essential. Professionals may upgrade to more adjustable lighting configurations.
- Furniture: A stable treatment surface is necessary. Adjustable ergonomic furniture can improve flexibility during frequent appointments.
- Curing equipment: A traditional adhesive setup does not require a UV lamp. Artists offering UV/LED services need the complete compatible curing system and appropriate training.
- Sanitation: Both setups require proper hygiene. Higher appointment volumes may require more extensive storage, cleaning, and inventory-management systems.
For a practical purchasing roadmap, divide your budget into three stages:
- Stage 1 – Essential startup: Purchase the tools, lash trays, adhesive, disposables, lighting, treatment surface, and sanitation supplies needed for your intended services.
- Stage 2 – Workflow improvements: Add environmental monitors, improved storage, ergonomic furniture, and specialized tweezers based on actual application challenges.
- Stage 3 – Advanced investments: Consider dedicated UV/LED systems, additional service-specific inventory, and upgraded workstation equipment when client demand justifies the investment.
Compare total ownership costs rather than the initial purchase price alone. Include consumables, replacement supplies, maintenance, warranties, compatible adhesive purchases, and training expenses.
For a dedicated UV/LED upgrade, review the Professional UV LED Eyelash Glue Curing Light Kit alongside the specifications of your intended adhesive. Its listed kit configuration includes a UV LED curing light system and precision tweezers, making compatibility verification an important purchasing step.
Equipment Recommendations for Classic, Hybrid, Volume, and UV/LED Lash Services
Different lash techniques require different combinations of tools. Build your equipment inventory around the treatments you are trained and prepared to perform.
Classic Lash Extension Equipment
Classic application involves attaching individual extensions to appropriate natural lashes.
Recommended equipment includes:
- Precision isolation tweezers.
- Classic application tweezers.
- Classic lash extension trays.
- Compatible traditional lash adhesive or an approved alternative system.
- Adhesive palette and disposable applicators.
- Under-eye pads and lash tape.
Hybrid Lash Extension Equipment
Hybrid services combine classic extensions with volume fans. Artists therefore need a more flexible selection of application tools and lash materials.
- Classic and volume lash trays.
- Isolation tweezers.
- Suitable volume-fan tweezers.
- Lash mapping supplies.
- Lash tiles.
- Compatible adhesive and environmental monitoring equipment.
Volume Lash Extension Equipment
Volume applications require tools that support consistent fan creation and controlled placement.
- Specialized volume tweezers.
- Appropriate fine-diameter extensions.
- Multiple curl and length options.
- Lash tiles and fan-creation accessories.
- Reliable isolation tweezers.
- Compatible adhesive and application supplies.
Artists should select extension diameters and fan weights appropriate for the natural lashes. Additional inventory should not encourage excessive extension weight.
UV/LED Lash Extension Equipment
UV/LED services require a dedicated compatible system rather than a conventional adhesive setup with an added light.
The equipment checklist includes:
- A UV/LED curing lamp with verified technical specifications.
- UV-curable adhesive explicitly compatible with the lamp.
- Compatible precision tweezers and isolation tools.
- Manufacturer-specified protective equipment.
- Training in the curing system's operating procedure.
- Appropriate storage and maintenance supplies.
Before offering UV/LED services, verify that the equipment and adhesive are intended to work together and that all relevant safety instructions can be followed.
Lash Equipment Hygiene, Cleaning, Disinfection, and Maintenance
Professional lash equipment must be maintained to reduce contamination risks and support consistent service quality. Cleaning and disinfection are separate steps, and neither should be replaced by simply wiping tools with a dry cloth.
Single-Use Lash Supplies vs. Reusable Equipment
Disposable and reusable equipment should be managed differently.
- Single-use supplies: Microbrushes, disposable spoolies, and other designated single-use applicators should be discarded after the appropriate use.
- Reusable tools: Tweezers and other reusable implements require cleaning and appropriate disinfection between clients.
- Workstation surfaces: Treatment beds, work surfaces, and frequently touched equipment should be cleaned and disinfected using suitable products.
Never reuse disposable supplies simply because they appear clean.
How to Clean and Disinfect Lash Application Tools
- Remove visible adhesive residue and other debris using an appropriate cleaning method.
- Clean reusable tools according to their material and manufacturer instructions.
- Apply an appropriate disinfectant suitable for the tool and intended professional use.
- Respect the disinfectant manufacturer's specified contact time.
- Rinse or dry equipment when required by the product instructions.
- Store reprocessed tools in a clean, protected area.
Follow applicable local salon requirements and product labeling. Disinfection procedures should not be improvised, particularly when equipment comes into contact with the eye area.
Lash Equipment Maintenance and Replacement Schedule
There is no universal replacement interval for every lash tool. Inspect equipment regularly and replace it according to condition, manufacturer guidance, and applicable hygiene requirements.
- Tweezers: Inspect tip alignment, closure tension, corrosion, and damage.
- Adhesive: Track opening dates, expiration dates, and storage conditions.
- UV/LED lamps: Check functionality, light output where measurable, electrical connections, and manufacturer-recommended maintenance.
- Treatment beds: Inspect stability, adjustment mechanisms, and upholstery condition.
- Task lamps: Check brightness consistency, mounting stability, and electrical components.
- Environmental monitors: Verify readings and replace batteries or recalibrate when recommended.
Common Lash Equipment Purchasing Mistakes to Avoid
- Buying a UV/LED lamp without verifying adhesive compatibility.
- Choosing tweezers based only on appearance or price.
- Purchasing excessive lash inventory before identifying service requirements.
- Ignoring humidity and temperature when using traditional adhesives.
- Using a nano mister without checking adhesive instructions.
- Overlooking cleaning, disinfection, and disposable replacement costs.
- Investing in advanced equipment before mastering essential application techniques.
- Assuming that a professional equipment label guarantees regulatory compliance or client suitability.
Printable Lash Artist Workstation Readiness Checklist
Use this practical checklist before, during, and after appointments to maintain an organized lash workstation.
Before the Client Arrives
- Confirm reusable tweezers and implements have been appropriately reprocessed.
- Prepare fresh disposable applicators and spoolies.
- Clean and prepare the treatment surface.
- Arrange the required lash trays and mapping supplies.
- Check that task lighting works correctly.
- Prepare adhesive and confirm its expiration and opening date.
- Check environmental conditions when required by the adhesive manufacturer.
Before Starting Lash Application
- Review the client's suitability and relevant product warnings.
- Confirm that all preparation supplies are ready.
- Inspect tweezer tips and handling condition.
- Check adhesive condition and storage history.
- Verify that the selected adhesive matches the intended technique.
- For UV/LED services, verify lamp and adhesive compatibility.
- Complete the required equipment and light-exposure safety checks.
After Every Appointment
- Discard all designated single-use supplies.
- Clean and disinfect reusable equipment appropriately.
- Clean and disinfect treatment surfaces as required.
- Separate used equipment from clean supplies.
- Record adhesive opening dates and monitor product condition.
- Inspect lamps, electrical connections, and treatment furniture.
- Restock essential disposable supplies.
- Reset the workstation for the next appointment.
Build a Lash Workstation That Supports Your Professional Services
The best lash artist application equipment is not necessarily the largest or most expensive collection. It is the combination of tools that supports accurate isolation, appropriate adhesive handling, controlled extension placement, safe curing, and consistent hygiene.
Start with reliable tweezers, suitable lash trays, compatible adhesive, essential preparation supplies, task lighting, and a stable treatment surface. Introduce environmental monitoring and ergonomic upgrades as your workflow develops. If you plan to offer UV/LED lash services, invest in a dedicated compatible curing system and understand its technical and safety requirements before using it with clients.
For artists evaluating a specialized curing setup, the Professional UV LED Eyelash Glue Curing Light Kit offers a listed combination of UV LED curing equipment and precision tweezers. Review the complete specifications and confirm adhesive compatibility before making it part of your workstation.
Explore more professional beauty equipment and practical product options through the Beauty & Self-Care collection of guides. Build your equipment setup gradually, prioritize quality and sanitation, and choose each upgrade according to the lash services you actually provide.
Pillar Article: Eyelash Adhesive Curing Lamp: Professional UV LED Buying Guide