
Eyelash Extension Application: A Professional Step-by-Step Workflow
Professional eyelash extension application requires more than attaching artificial lashes to natural eyelashes. Lash artists must balance precise isolation, controlled adhesive placement, consistent styling, client comfort, and reliable retention while maintaining an efficient appointment workflow. Whether you are a beginner learning classic extensions or an experienced technician refining your application speed, the most effective approach is to prioritize quality before speed. A repeatable process helps reduce corrective work, improve attachment consistency, and protect natural lash integrity. Understanding conventional adhesive behavior and UV/LED-assisted curing systems can also help professionals make informed equipment decisions based on compatibility, training, and safety.
What Is Professional Eyelash Extension Application?
Professional eyelash extension application is the process of attaching an individual synthetic extension or a lightweight volume fan to an appropriate natural eyelash using a specialized adhesive. The objective is to create a customized lash appearance while maintaining natural lash health and client comfort.
How Eyelash Extension Application Works
The technician assesses the client's natural lashes, selects suitable extensions, prepares the lash line, isolates an individual natural lash, and applies a controlled amount of adhesive to the extension base. The extension is then attached in the appropriate position and direction. This sequence is repeated systematically until the desired coverage is achieved.
Correct application depends on the interaction between extension weight, natural lash condition, adhesive formulation, placement technique, and the surrounding environment. A visually attractive set is not necessarily a professionally sound application if neighboring lashes are stuck together or extensions create unnecessary tension.
The Three Priorities of the Quality Before Speed Method
- Accurate isolation: Separate one eligible natural lash from neighboring lashes before attaching an extension.
- Controlled adhesive attachment: Use an appropriate adhesive amount and create a clean attachment without excessive buildup or skin contact.
- Consistent placement: Maintain intentional direction, suitable spacing, and balanced styling throughout the lash line.
These three priorities form the foundation of a repeatable professional workflow. Speed should improve through familiarity and organization rather than through skipped inspections or rushed attachment.
What Makes a Professional Application Different?
A professional application includes client consultation, customized lash mapping, appropriate extension selection, hygiene procedures, and systematic quality control. The technician considers natural lash density, length, direction, condition, and the client's desired appearance before selecting a technique.
Professional results also require recognizing when an application should be postponed. Visible eye irritation, suspected infection, damaged skin around the eyes, or a relevant history of adhesive reactions warrants careful assessment and appropriate referral rather than proceeding automatically.
Professional Eyelash Extension Application Tools and Materials Checklist
Preparing the workstation before the appointment helps minimize unnecessary movements and supports consistent application. A professional lash station should contain tools for preparation, isolation, extension handling, adhesive management, curing when applicable, and hygiene.
Essential Lash Application Tools
- Isolation tweezers for separating individual natural lashes.
- Pickup or volume tweezers for handling extensions and fans.
- Lash trays containing suitable lengths, curls, and diameters.
- Under-eye pads and appropriate protective tape.
- Professional lash cleanser and a suitable cleansing brush.
- Disposable applicators, microbrushes, and lint-free materials.
- Adhesive dispensing surface and organized adhesive supplies.
- Appropriate lighting for detailed lash inspection.
- Compatible UV/LED curing equipment when using a UV-curable adhesive system.
Choosing the Right Eyelash Extension Adhesive
Conventional professional eyelash extension adhesives commonly use cyanoacrylate chemistry. Their working behavior is influenced by formulation, viscosity, temperature, moisture, and the amount of adhesive used.
When evaluating an adhesive, consider its intended application method, manufacturer-defined working time, storage requirements, safety documentation, and suitability for your professional environment. Adhesive selection should also account for client sensitivities and technician exposure.
Do not assume that every adhesive is compatible with every curing device. Conventional lash glue and UV-curable adhesive systems can have different curing mechanisms.
Additional Equipment for Conventional and UV/LED Applications
Conventional applications require appropriate adhesive handling, suitable lighting, ventilation, and professional tools. UV/LED-assisted applications require a curing system specifically compatible with the adhesive being used.
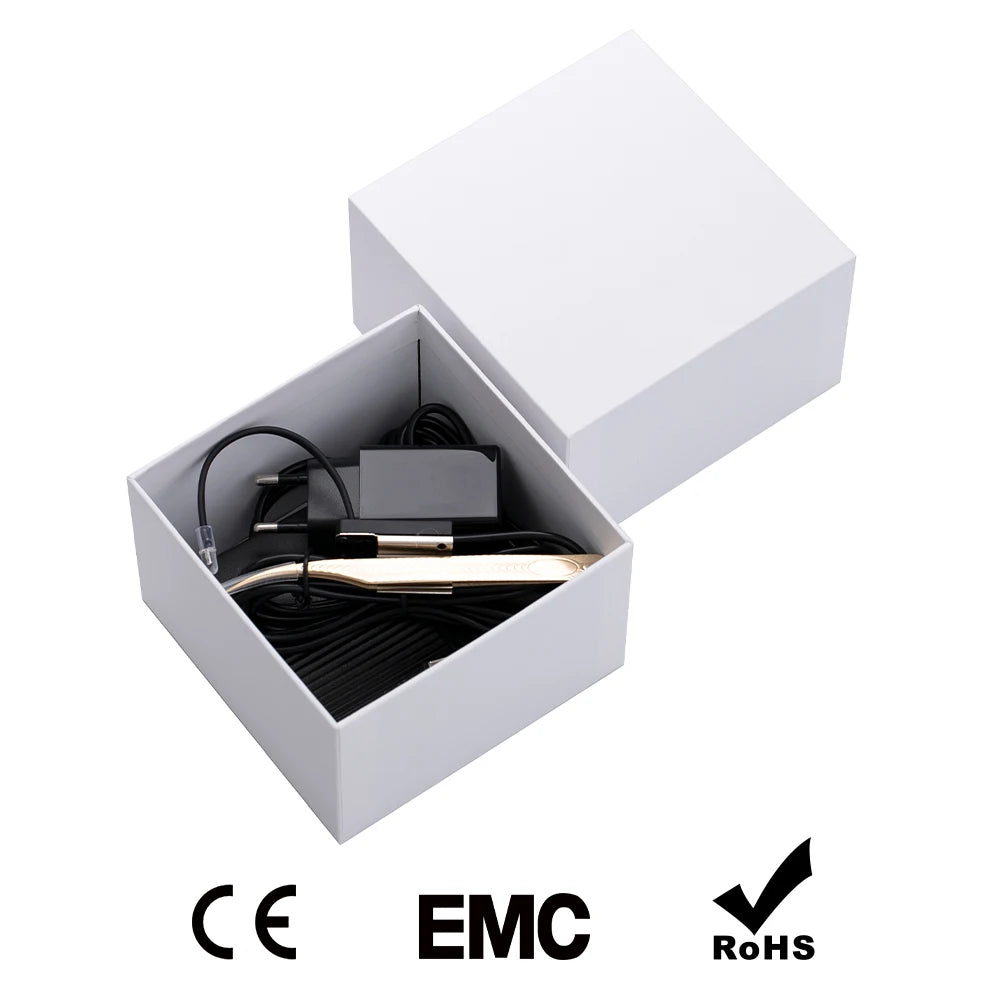
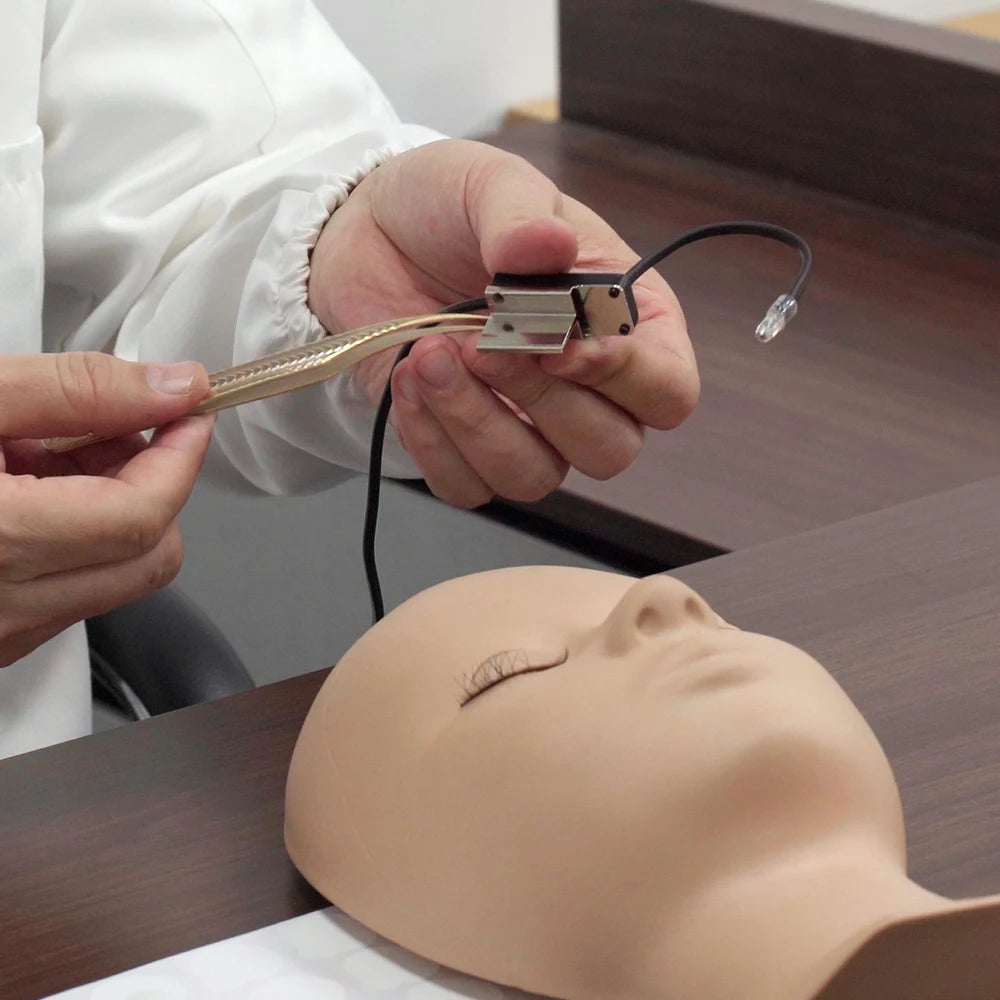
The Professional UV LED Eyelash Glue Curing Light Kit is designed for professional lash extension applications. Its listed features include UV LED technology and precision tweezers intended to support controlled placement and adhesive curing.
Pre-Service Workstation Checklist
- Clean the workstation and prepare the required disinfected reusable tools.
- Wash hands before beginning the service.
- Arrange single-client disposable materials.
- Prepare the selected lash trays in application order.
- Check the adhesive condition and manufacturer storage instructions.
- Confirm that lighting and visibility are adequate.
- For UV/LED applications, verify adhesive compatibility and the curing equipment instructions.
- Ensure that protective measures for eye and skin exposure are available and appropriate.
Technicians evaluating their equipment can also explore the Skin and Beauty Care Devices collection for additional beauty equipment.
Client Consultation and Natural Lash Assessment Before Application
Consultation helps determine whether the planned lash application is suitable and how it should be customized. The technician should discuss the client's desired appearance, previous lash experiences, relevant sensitivities, lifestyle, and expectations.
Assess Natural Lash Length, Density, Direction, and Condition
Natural lash characteristics influence extension length, diameter, curl, weight, and styling. Fine or weakened natural lashes may not support the same extension specifications as stronger lashes. Excessive weight can create unnecessary mechanical stress and discomfort.
Each natural lash should be evaluated individually. Not every lash is an appropriate attachment candidate, especially lashes that are immature, unusually fine, damaged, or unsuitable for the selected extension weight.
Understand the Natural Eyelash Growth Cycle
Natural eyelashes undergo anagen, catagen, and telogen phases. These stages represent growth, transition, and resting or shedding phases. Because natural lashes continually renew themselves, extensions will eventually shed with their attached natural lashes.
Retention therefore depends on more than adhesive performance. Natural lash growth, attachment quality, extension weight, application conditions, and client aftercare all contribute to how long extensions remain in place.
When to Postpone or Decline an Application
Visible irritation, suspected eye infection, damaged periocular skin, or concerning symptoms should be taken seriously. A technician should not apply extensions over an active eye-area problem or attempt to diagnose a medical condition. Appropriate medical assessment may be necessary before the service can proceed.
How to Prepare Natural Lashes Before Eyelash Extension Application
Consistent preparation helps remove contaminants and establishes a suitable foundation for adhesive attachment.
Step 1: Cleanse the Natural Lashes
Use an appropriate professional lash cleanser to remove makeup, oils, debris, and residue. The cleansing product should be suitable for the lash application process and used according to its instructions.
Step 2: Rinse and Dry Thoroughly
Remove cleanser residue and address excess moisture before adhesive application. Follow the adhesive manufacturer's preparation recommendations, since different formulations may have different requirements.
Step 3: Position Under-Eye Pads and Protective Tape
Place under-eye pads and tape to separate lower lashes while maintaining client comfort. Keep all protective materials away from the ocular surface and waterline. Reposition any material that causes discomfort or interferes with visibility.
Step 4: Separate and Inspect the Natural Lashes
Inspect the lash line for crossed, downward-growing, short, or unusually fine lashes. Identify natural lash direction and establish clear visibility before beginning the application.
Preparation Quality-Control Checkpoint
- Natural lashes are clean and adequately dry.
- Lower lashes are properly separated.
- Under-eye pads and tape are comfortable.
- The lash line is visible and accessible.
- The client is positioned comfortably and safely.
Lash Mapping and Styling: Choosing the Right Extension Design
Lash mapping divides the lash line into sections and assigns extension lengths and styling characteristics to each zone. It helps technicians plan transitions and maintain a consistent appearance.
Common Lash Mapping Styles
- Natural mapping: Follows a subtle progression intended to create an understated appearance.
- Doll-eye mapping: Places the longest extensions toward the central region to emphasize an open-eye appearance.
- Cat-eye mapping: Gradually increases length toward the outer region for an elongated visual effect.
- Squirrel mapping: Places a longer section toward the outer-middle region before transitioning to shorter lengths at the outer corner.
- Open-eye mapping: Uses a central emphasis to create a visually more open appearance.
These styles are starting concepts rather than universal prescriptions. Mapping should be adapted to eye anatomy, natural lash direction, lash strength, and client preference.
How to Select Extension Length, Curl, and Diameter
Length affects the visual appearance and mechanical load. Curl influences the shape and direction of the extension. Diameter affects extension weight and overall density.
Technicians should select extension specifications that are appropriate for each natural lash. A more dramatic appearance should not take priority over the structural suitability of the natural lashes.
How to Apply Eyelash Extensions Step by Step: The Professional Workflow
A repeatable eyelash extension application workflow combines preparation, isolation, controlled adhesive pickup, precise attachment, and systematic inspection.
Step 1: Organize the Lash Tray and Application Station
Arrange the selected lash lengths, curls, and diameters in the order they will be used. Position tweezers, adhesive, and other tools within comfortable reach. An organized workstation reduces unnecessary reaching and tool switching.
Step 2: Isolate One Natural Eyelash
Use isolation tweezers to separate one eligible natural lash from its neighbors. Confirm that the lash is completely isolated before attaching an extension. This is one of the most important steps in preventing stickies.
Step 3: Pick Up the Extension Correctly
Grip the extension with the appropriate pickup tweezers. Avoid damaging the extension or deforming the base. For volume applications, maintain the intended fan structure and attachment area.
Step 4: Dip the Extension Base Into Adhesive
Pick up a controlled amount of adhesive sufficient for the intended attachment. Excess adhesive can create buildup, while insufficient adhesive may contribute to poor attachment. Exact quantities depend on the adhesive formulation and professional training.
Step 5: Attach the Extension to the Natural Lash
Position the extension against the appropriate natural lash with consistent direction and suitable attachment contact. Maintain separation from the eyelid and surrounding skin. The attachment should be clean rather than bulky or irregular.
Step 6: Release the Extension Without Disturbing Placement
Release the extension gently after positioning it correctly. Avoid pulling, twisting, or unnecessary movement that could disturb the adhesive bond.
Step 7: Inspect Isolation, Direction, and Attachment
Check that the extension is attached to the intended natural lash and that neighboring lashes remain separated. Confirm consistent direction and identify any irregularities before proceeding.
Step 8: Repeat the Application Sequence Systematically
Continue through the lash line using a predictable section-by-section process. Maintain balanced coverage, controlled adhesive handling, and consistent placement.
Step 9: Complete the Final Lash Line Inspection
Inspect for stickies, excessive adhesive, inconsistent direction, poor attachment, uncomfortable placement, and incomplete coverage. Correct application defects using appropriate professional techniques before completing the service.
The Complete Application Sequence at a Glance
- Consult and assess the client.
- Cleanse and dry natural lashes.
- Position protective pads and isolate lower lashes.
- Map the lash design.
- Isolate one eligible natural lash.
- Pick up the extension.
- Dip the extension base into adhesive.
- Attach the extension with controlled placement.
- Release and inspect.
- Repeat systematically and complete final quality control.
Classic vs. Hybrid vs. Volume Eyelash Extension Application
Classic, hybrid, and volume techniques differ in extension configuration, appearance, and technical requirements. The appropriate method depends on client goals, natural lash condition, and technician training.
Classic Eyelash Extensions: One-to-One Application
Classic application uses one extension attached to one appropriate natural lash. It emphasizes individual placement, precise isolation, and suitable extension weight. Classic technique is a useful foundation for developing consistent application fundamentals.
Hybrid Eyelash Extensions: Combining Classic and Volume
Hybrid application combines classic extensions and volume fans. This creates a mixture of texture and density. Consistent mapping and controlled attachment are important for maintaining a balanced appearance.
Volume Eyelash Extensions: Applying Lightweight Fans
Volume application uses handmade or premade fans containing multiple lightweight extensions. The fan base must be controlled carefully, and the overall weight must remain appropriate for the natural lash.
Classic, Hybrid, and Volume Application Comparison
| Technique | Attachment structure | Appearance | Skill considerations |
| Classic | One extension to one natural lash | Defined, individual lash appearance | Isolation and attachment accuracy |
| Hybrid | Combination of classic extensions and volume fans | Textured, variable density | Mapping and consistency across configurations |
| Volume | Lightweight fan to an appropriate natural lash | More concentrated density | Fan control and weight management |
Beginners should establish proficiency in isolation, adhesive control, and classic attachment before progressing to more complex techniques. Formal training and supervised practice are important for professional development.
Conventional vs. UV/LED Eyelash Extension Adhesive Application
Conventional and UV/LED-assisted lash application systems differ in adhesive chemistry, equipment requirements, and curing processes. The distinction is important when evaluating professional curing equipment.
How Conventional Eyelash Extension Adhesive Works
Conventional cyanoacrylate eyelash extension adhesive polymerizes through a moisture-influenced chemical reaction. Humidity, temperature, formulation, and adhesive handling can influence its working behavior.
Technicians must follow the adhesive manufacturer's instructions rather than assume a universal curing time or environmental setting. Apparent surface dryness does not automatically establish that all aspects of the adhesive bond have reached the manufacturer's specified condition.
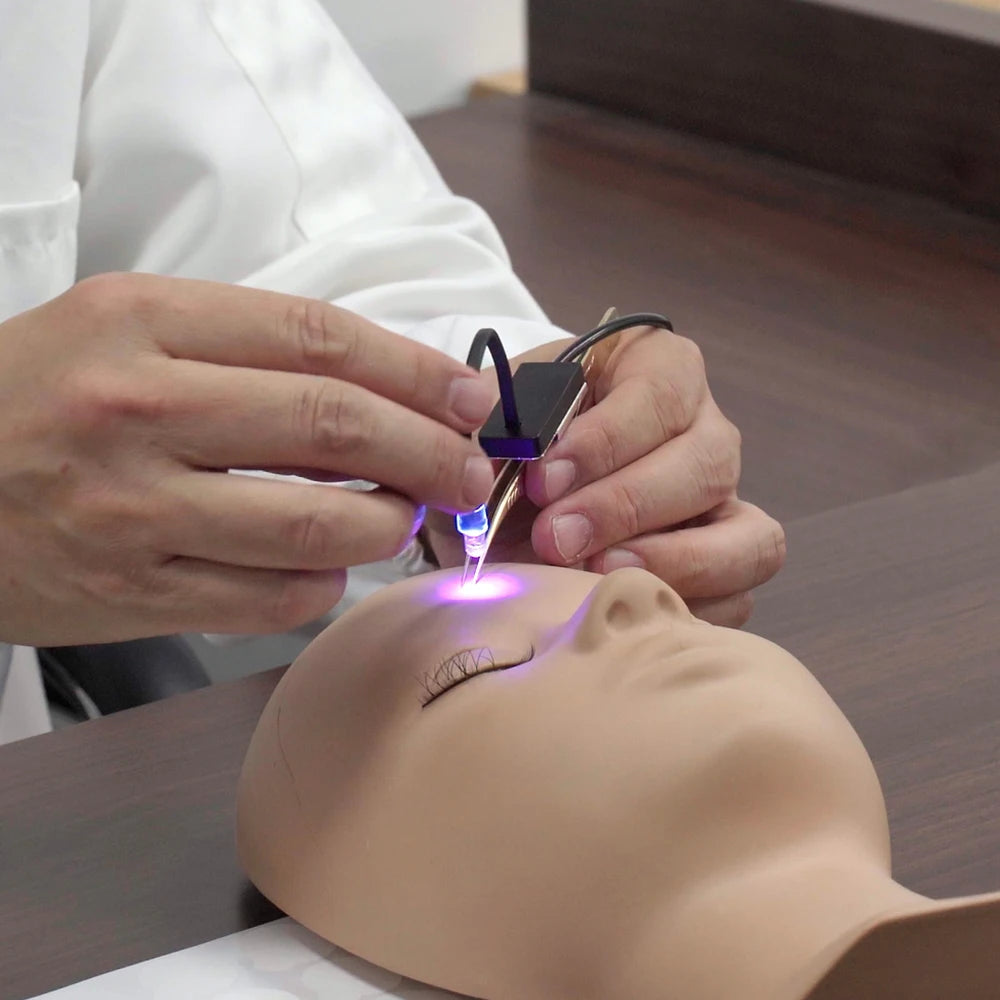
How UV/LED Lash Curing Systems Work
Compatible UV/LED-assisted lash systems use a specified light source to initiate or support curing according to the adhesive system's design. The adhesive must be formulated for the selected light source and its wavelength characteristics.
Wavelength compatibility, light intensity, working distance, positioning, and exposure duration influence whether the system is being used as intended. These specifications must be obtained from the equipment and adhesive manufacturers.
Conventional vs. UV/LED Application Workflow
| Evaluation criterion | Conventional adhesive system | Compatible UV/LED system |
| Curing mechanism | Moisture-influenced cyanoacrylate polymerization | Specified light-assisted curing mechanism |
| Equipment requirements | Professional adhesive tools and appropriate workstation conditions | Compatible curing lamp and adhesive system |
| Compatibility | Depends on adhesive formulation and instructions | Requires matching adhesive and equipment specifications |
| Workflow considerations | Adhesive working behavior and environmental monitoring | Lamp positioning, exposure, and curing instructions |
| Safety considerations | Fume exposure, skin contact, and eye-area precautions | Adhesive exposure plus UV/LED light safety requirements |
UV/LED Lash Application Safety Considerations
UV/LED curing equipment should never be treated as inherently risk-free. Eye and skin exposure risks depend on the light source, wavelength, intensity, exposure duration, positioning, and equipment design.
- Follow the adhesive and equipment manufacturer's instructions.
- Confirm wavelength compatibility before using a curing system.
- Use specified protective measures for the technician and client.
- Avoid directing light toward the ocular surface.
- Do not use unsupported adhesive substitutions.
- Maintain appropriate ventilation and adhesive handling practices.
- Stop the procedure if concerning irritation or exposure occurs.
- Consult the product safety documentation and relevant professional requirements.
UV/LED systems should not be used to claim guaranteed retention, elimination of allergic reactions, or universal superiority over conventional adhesive application.
Evaluating the Professional UV LED Eyelash Glue Curing Light Kit
For technicians considering UV LED curing equipment, product evaluation should focus on actual listed specifications, included tools, compatibility documentation, and the intended professional workflow.
The Professional UV LED Eyelash Glue Curing Light Kit is a lash application kit intended for professional eyelash extension procedures. Its listed features include a UV LED curing light system and precision tweezers.
Listed Product Specifications
- Product title: Professional UV LED Eyelash Glue Curing Light Kit
- Brand: Pinky Leem, as identified in the product listing
- Model: TL02
- Material: Plastic
- Item type: Makeup Tool Kit
- Listed product weight: 0.5 kg
- Quantity: 1 kit
- Technology: UV LED
- Included accessory identified by product title: Precision tweezers
Potential Advantages
- Combines a UV LED curing system with precision tweezers in one professional kit.
- Designed to support controlled eyelash extension placement and adhesive curing.
- Provides a dedicated equipment option for technicians using compatible UV-curable adhesives.
- Offers a practical way to evaluate a combined lash application tool kit.
Important Limitations
- The listing does not establish universal adhesive compatibility.
- Specific wavelength, light intensity, curing time, and working distance should be verified with the manufacturer.
- The listed product description does not establish independent safety testing or certification.
- The presence of a UV LED lamp does not mean conventional lash adhesives can be used with it.
- Equipment alone does not replace technician training or accurate isolation.
Before purchasing, review the product details and obtain the compatibility information needed for your adhesive system. The kit may be relevant to technicians who are already trained in UV/LED-assisted lash application and can confirm that the equipment meets their professional requirements.
How to Improve Eyelash Extension Application Speed Without Sacrificing Quality
Improving eyelash extension application speed is primarily a matter of reducing unnecessary movements and making the application sequence more predictable. Rushing isolation, adhesive pickup, or inspection can increase corrective work and undermine quality.
Beginner Workflow: Build Accuracy Before Increasing Speed
Beginners should practice the core skills in a structured sequence: tweezer control, single-lash isolation, extension pickup, adhesive dipping, attachment, and inspection. Work on consistent technique before attempting to shorten appointment duration.
Experienced Technician Workflow: Reduce Unnecessary Movements
Experienced technicians can refine workflow by arranging lash trays in application order, keeping tools within comfortable reach, using predictable section sequencing, and maintaining consistent hand positioning.
Adhesive replenishment and tool switching should be organized without compromising product instructions or quality checks.
Five Habits That Improve Application Efficiency
- Organize the workstation: Prepare the tools and lash trays before the appointment.
- Use consistent isolation positioning: Maintain a comfortable and repeatable tweezer approach.
- Plan the lash map: Reduce unnecessary design changes during application.
- Control adhesive handling: Follow consistent pickup and replenishment practices.
- Work systematically: Complete sections with predictable application and inspection steps.
Speed vs. Quality: What Technicians Should Never Rush
| Workflow activity | Efficiency improvement | Essential quality requirement |
| Tool organization | Arrange supplies within reach | Maintain hygiene and appropriate tool processing |
| Lash mapping | Prepare the design before application | Customize to natural lashes and client anatomy |
| Isolation | Practice repeatable tweezer positioning | Completely separate the intended natural lash |
| Adhesive handling | Use an organized dispensing process | Maintain controlled adhesive pickup and compatibility |
| Final inspection | Use a systematic inspection sequence | Identify stickies, poor placement, and discomfort |
How to Measure Application Improvement
Appointment duration is only one performance indicator. Technicians should also monitor correction frequency, stickies, attachment quality, client comfort, retention feedback, and consistency of coverage.
A professional workflow becomes more efficient when fewer defects require correction. Technicians evaluating equipment can review the Body Care and Health Devices collection as part of their broader equipment research.
For technicians considering a dedicated curing setup, the UV LED eyelash glue curing light kit is one equipment option to assess against adhesive compatibility, manufacturer documentation, and training requirements.
Common Eyelash Extension Application Mistakes: Causes and Corrections
Application defects often result from inconsistent isolation, uncontrolled adhesive use, unsuitable extension selection, or insufficient inspection.
Poor Isolation and Stuck-Together Natural Lashes
Stickies commonly occur when neighboring natural lashes are not fully separated before attachment. Premature attachment and inadequate inspection can also contribute.
Technicians should verify isolation before attaching each extension and perform systematic separation checks throughout the service. Any connected lashes should be corrected using appropriate professional techniques before they create pulling or discomfort.
Extensions Falling Off Too Quickly
Premature detachment can have multiple causes, including natural lash shedding, poor attachment, contamination, excessive or insufficient adhesive, environmental conditions, incompatible adhesive handling, or aftercare issues.
Retention concerns should be investigated systematically rather than attributed automatically to the adhesive or curing equipment.
Extensions Pointing in Different Directions
Inconsistent direction may result from pickup angle, natural lash direction, mapping errors, attachment positioning, or release technique. Review these factors and correct the application process.
Excessive Adhesive and Visible Attachment Buildup
Repeated dipping or uncontrolled adhesive pickup may create visible buildup. Use a controlled amount appropriate for the product and attachment technique. Avoid adding unnecessary adhesive to compensate for poor placement.
Uncomfortable or Too-Heavy Extensions
Excessive extension weight, unsuitable length selection, poor attachment, and contact with surrounding skin can contribute to discomfort. The application should be stopped and professionally corrected or removed when necessary.
Application Troubleshooting Matrix
| Observed problem | Possible cause | Recommended correction | Prevention checkpoint |
| Stickies | Incomplete isolation | Correct connected lashes using appropriate professional methods | Verify separation before attachment |
| Premature detachment | Attachment, adhesive, contamination, or environmental issues | Review the complete application process | Check adhesive instructions and attachment quality |
| Uneven direction | Pickup angle or placement inconsistency | Correct alignment and attachment technique | Inspect direction during application |
| Adhesive buildup | Excessive adhesive pickup | Refine adhesive control | Check attachment cleanliness |
| Uneven coverage | Inconsistent section sequencing | Review the lash map and coverage distribution | Inspect each section systematically |
| Discomfort | Excessive weight, skin contact, or poor placement | Stop and assess for correction or removal | Confirm suitable extension selection and placement |
How to Improve Eyelash Extension Retention and Protect Natural Lashes
Retention depends on a combination of natural lash characteristics, application technique, adhesive behavior, extension weight, and client maintenance. No single curing method can guarantee a fixed retention period.
The Main Factors That Influence Eyelash Extension Retention
- Natural eyelash growth and shedding.
- Correct isolation and attachment.
- Suitable extension weight and configuration.
- Adhesive compatibility and handling.
- Environmental conditions where relevant.
- Natural lash cleanliness and preparation.
- Client aftercare and maintenance.
How Correct Isolation Protects Natural Lash Integrity
Each extension should be attached to an appropriate individual natural lash. Connected extensions can create mechanical stress as neighboring natural lashes grow and shed at different rates. Consistent isolation helps reduce this unnecessary tension.
How to Prevent Excessive Weight and Mechanical Stress
Select appropriate extension lengths, diameters, curls, and fan configurations according to the natural lash condition and professional training. Avoid creating an appearance that requires excessive weight or unsuitable attachment.
Professional Retention Inspection and Maintenance
Review attachment consistency, client feedback, natural shedding, and maintenance needs. Refill timing should reflect individual retention patterns and desired fullness rather than a guaranteed interval.
Professional Lash Hygiene, Disinfection, and Eye-Area Safety
Professional hygiene protects both clients and technicians. Sanitation and disinfection practices should follow product labels, professional training, and applicable local licensing requirements.
Hand Hygiene and Clean Workstation Procedures
Wash hands before and after client services. Clean workstation surfaces, maintain organized storage, and separate clean tools from used materials.
Disinfecting Reusable Lash Tools Correctly
Reusable tools should be cleaned before disinfection. Follow the disinfectant label, including required contact time, and store processed tools appropriately.
Single-Client Disposable Supplies
Under-eye pads, disposable applicators, microbrushes, and other single-use supplies should not be reused between clients.
Adhesive Handling, Ventilation, and Exposure Prevention
Follow adhesive safety data sheets and manufacturer handling instructions. Avoid unnecessary exposure to adhesive fumes, maintain appropriate ventilation, and store products securely.
Eye Safety, Irritation, and Adverse Reactions
Prevent adhesive and curing light exposure to the ocular surface and surrounding skin. Stop the service if significant irritation, pain, swelling, or other concerning symptoms occur. Seek appropriate medical assessment when warranted. Technicians should not diagnose eye conditions or promise that a particular adhesive or curing system eliminates allergic reactions.
Eyelash Extension Aftercare: Instructions to Give Every Client
Aftercare helps clients maintain their extensions while minimizing unnecessary mechanical stress. Recommendations should remain consistent with the specific adhesive and professional aftercare instructions.
How to Clean Eyelash Extensions Properly
Clients should use a suitable lash-compatible cleanser and clean gently. Rinse carefully and dry without rubbing or pulling. Appropriate cleansing helps maintain lash hygiene.
Daily Habits That Help Protect Lash Extensions
- Avoid pulling, picking, or rubbing extensions.
- Minimize unnecessary mechanical friction.
- Follow the technician's product-specific aftercare guidance.
- Use appropriate lash-compatible maintenance products.
- Avoid attempting to remove extensions by pulling them off.
When to Schedule Lash Maintenance
Maintenance timing depends on natural lash shedding, desired fullness, and individual retention. A technician can assess the lash line and recommend an appropriate refill or removal plan.
When to Seek Professional Removal or Medical Advice
Clients should not pull extensions off themselves. Professional removal helps avoid unnecessary mechanical stress. Significant irritation, pain, swelling, or visual symptoms warrant appropriate medical assessment.
For additional beauty and self-care information, readers can explore the Beauty & Self-Care Blog.
Frequently Asked Questions About Eyelash Extension Application
How do you apply eyelash extensions step by step?
Begin with consultation and natural lash assessment. Cleanse and dry the lashes, position protective pads, and map the design. Isolate one natural lash, pick up an extension, dip its base into controlled adhesive, attach it correctly, release, and inspect. Repeat systematically and complete a final quality-control inspection.
How can beginners improve eyelash extension application speed without compromising quality?
Beginners should first master isolation, controlled adhesive pickup, and consistent placement. Organize tools, practice structured application sequences, and reduce unnecessary movements. Do not rush isolation, adhesive control, eye-area safety, or final inspections.
What is the difference between classic, hybrid, and volume eyelash extension application?
Classic application attaches one extension to one natural lash. Hybrid application combines classic extensions with volume fans. Volume application attaches lightweight fans to appropriate individual natural lashes. Each technique requires suitable extension weight and consistent isolation.
How much adhesive should you use when applying eyelash extensions?
Use a controlled amount sufficient for the intended attachment without excessive buildup. Exact quantities and working behavior depend on the adhesive formulation, application method, and manufacturer instructions.
How can lash technicians improve eyelash extension retention and prevent common application mistakes?
Prioritize accurate isolation, appropriate extension weight, clean natural lashes, controlled adhesive application, correct placement, and final inspection. Consider environmental conditions and client aftercare when investigating retention concerns.
How long does professional eyelash extension application take?
Service duration varies according to the selected technique, desired coverage, natural lash density, technician experience, and consultation requirements. There is no universal appointment duration for every client or application.
Can you apply eyelash extensions to every natural lash?
No. Suitability depends on the natural lash's development, condition, size, and ability to support the selected extension. Some lashes may be too fine, immature, damaged, or otherwise unsuitable for attachment.
Do UV/LED eyelash extension adhesives cure faster than conventional adhesives?
Compatible UV/LED systems use a specified light-assisted curing mechanism, while conventional cyanoacrylate adhesives polymerize through moisture-influenced chemistry. Actual performance depends on product specifications, compatibility, and correct use. Universal curing-time claims should be avoided.
Why do eyelash extensions stick together during application?
Stickies commonly result from incomplete isolation, premature attachment, or inadequate separation checks. Technicians should isolate each natural lash carefully and inspect the attachment throughout the service.
What should clients avoid after eyelash extension application?
Clients should avoid pulling, rubbing, or picking at extensions and should follow the specific aftercare instructions provided by their technician. They should not attempt to remove extensions by pulling them off.
Final Thoughts: Build a Consistent Professional Lash Application Workflow
Professional eyelash extension application is best approached as a repeatable quality-controlled process rather than a speed-based task. Consultation, natural lash assessment, preparation, mapping, isolation, adhesive control, precise placement, hygiene, and final inspection all contribute to professional results.
The Five Principles of Consistent Eyelash Extension Application
- Client-first assessment: Customize the service to individual needs and natural lash characteristics.
- Natural lash protection: Select suitable extension specifications and avoid excessive mechanical stress.
- Precise isolation: Attach extensions to appropriate individual natural lashes.
- Controlled adhesive attachment: Maintain suitable adhesive handling and product compatibility.
- Systematic quality inspection: Identify stickies, poor placement, discomfort, and inconsistencies before finishing.
Your Next Step Toward Better Application Results
Technicians should improve one workflow stage at a time. Refine isolation, organize the workstation, maintain professional training, and establish a consistent inspection process before focusing on shorter appointment durations.
For professionals exploring UV/LED-assisted application equipment, the Professional UV LED Eyelash Glue Curing Light Kit provides a dedicated equipment option featuring UV LED technology and precision tweezers. Evaluate its specifications, adhesive compatibility, safety documentation, and suitability for your training and professional workflow before use.
Better application results come from combining appropriate tools with careful technique. Prioritizing quality before speed supports a more consistent, precise, and responsible professional lash application process.
Related Articles:
- UV LED Lash Kit Tweezers: 2026 Complete Kit Comparison
- UV LED Lash Adhesive Curing: How It Works and Best Practices
- UV Lash System Comparison: How to Choose the Right Professional Kit in 2026
- UV Lash Glue Curing Kit Comparison: Best Options for Professional Lash Artists
- Adhesive UV Light Comparison: Choose the Right Curing System
- Adhesive UV Light Buying Guide: Wavelengths, Power & Best Uses
- UV Adhesive Curing Light Kit: Compare Professional Lash Systems
- Why Is My Eyelash Adhesive Curing Slowly? Causes & Fixes
- Lash Artist Application Equipment: Complete Buying Guide
- Eyelash Extension Tweezers Compared: Best Types for Every Lash Technique
- Eyelash Extension Application: A Professional Step-by-Step Workflow for Better Results