
Why Is My Eyelash Adhesive Curing Slowly? Causes & Fixes
If your eyelash extension adhesive takes too long to set, the most common causes are low relative humidity, unsuitable room temperature, aging adhesive, improper storage, or inconsistent application technique. Conventional lash adhesives rely on moisture-triggered cyanoacrylate polymerization, so environmental conditions directly influence their performance. Understanding these factors can help lash technicians identify the problem and restore a consistent application workflow without compromising bond quality or safety.
Slow eyelash adhesive curing can make extension placement frustrating. Extensions may move before the adhesive sets, neighboring natural lashes may become stuck together, and inconsistent bonding can make it difficult to maintain an efficient appointment schedule.
Fortunately, slow curing is often a diagnosable problem. Before replacing your adhesive or changing your application technique, evaluate your workspace conditions, check the adhesive's freshness, and compare your observations with the manufacturer's instructions.
Why Is My Eyelash Adhesive Curing Slowly? The Most Common Causes
Eyelash adhesive commonly cures slowly when environmental moisture is insufficient for its specific formulation, the working temperature is outside its recommended range, or the product has deteriorated. Application problems, including oversized adhesive droplets and insufficient contact between the extension and natural lash, can also contribute to apparent setting difficulties.
Low Relative Humidity
Low relative humidity is one of the most common environmental reasons conventional eyelash extension adhesive takes longer to cure. Many professional lash adhesives contain cyanoacrylate, a compound that reacts with moisture to initiate polymerization.
When the surrounding air contains insufficient moisture for the formulation, this reaction may proceed more slowly. Consequently, extensions can take longer to stabilize, making precise placement more difficult.
Dry winter weather, indoor heating, and climate-controlled workspaces can contribute to low humidity. However, there is no single ideal humidity percentage for every lash adhesive. Always check the operating range specified by the manufacturer.
Incorrect Ambient Temperature
Temperature also influences adhesive behavior. Cooler environments can slow the curing process of certain cyanoacrylate formulations, while excessive heat may change viscosity, evaporation behavior, and application characteristics.
A room that feels comfortable to the technician may still fall outside the adhesive's recommended operating conditions. Measuring the actual temperature near the lash workstation is more reliable than estimating it by touch.
Maintaining stable conditions within the manufacturer's recommended range is preferable to attempting to accelerate curing with direct heat.
Old, Contaminated, or Improperly Stored Adhesive
Adhesive deterioration can cause inconsistent performance even when humidity and temperature appear appropriate. Cyanoacrylate products are sensitive to moisture exposure, and improper storage can affect their usable life.
Several warning signs deserve attention:
- Expired or aging adhesive: Performance may become unpredictable as the product approaches or exceeds its recommended usable period.
- Moisture contamination: Exposure to humidity inside the bottle can initiate unwanted chemical changes.
- Oxidation and deterioration: Repeated exposure to air may contribute to changes in product performance.
- Viscosity changes: Adhesive that becomes unusually thick, stringy, or otherwise different from its normal consistency may be compromised.
- Incorrect storage: Temperature fluctuations, loose bottle caps, and unsuitable storage conditions can shorten product usability.
Check the manufacturer's instructions for unopened shelf life and opened-bottle replacement recommendations. Do not continue using adhesive that shows signs of deterioration simply because the bottle has not reached its printed expiration date.
Excessive Adhesive Quantity and Application Technique
Environmental conditions are not always responsible for slow-looking attachment. Application technique can also influence how quickly an extension becomes stable.
Picking up too much adhesive may create a larger droplet that takes longer to behave consistently during placement. Inconsistent contact between the extension and natural lash can also produce an unstable attachment.
Other contributing factors include:
- Using inconsistent adhesive quantities between extensions.
- Failing to maintain clean isolation of individual natural lashes.
- Allowing adhesive droplets to remain exposed beyond the recommended replacement interval.
- Using an unsuitable extension attachment angle.
- Moving an extension before the adhesive has developed sufficient initial stability.
Consistent isolation, controlled adhesive pickup, and appropriate extension-to-natural-lash contact are essential parts of professional application.
Slow Lash Adhesive Curing: Symptom-to-Cause Troubleshooting Table
Observing how the adhesive behaves during application can help narrow down the cause. Rather than immediately changing products, match the symptom to a possible explanation and verify it through measurements and product inspection.
Match Your Adhesive Symptoms to the Likely Problem
| Observed symptom | Possible cause | How to verify it | Recommended fix |
| Extensions take too long to stabilize. | Low humidity or unsuitable temperature. | Check room measurements using a hygrometer and thermometer. | Adjust environmental conditions within the adhesive's recommended range. |
| Natural lashes stick together. | Slow initial setting, excessive adhesive, or inadequate isolation. | Review adhesive quantity, placement, and isolation technique. | Improve isolation and use controlled adhesive pickup. |
| Adhesive behaves inconsistently between extensions. | Changing room conditions or aging adhesive droplets. | Compare environmental readings and observe drop replacement practices. | Maintain stable conditions and refresh drops according to instructions. |
| Adhesive appears stringy or unusually thick. | Possible deterioration or contamination. | Inspect the bottle, consistency, storage history, and expiration information. | Discontinue questionable adhesive and replace it when necessary. |
| Extensions move during placement. | Insufficient initial attachment stability or poor contact. | Review attachment angle, adhesive pickup, and placement technique. | Improve contact and follow the manufacturer's application procedure. |
| Performance changes throughout the day. | Fluctuating humidity, temperature, or adhesive drop age. | Record room conditions and adhesive replacement times. | Monitor the environment and maintain consistent product handling. |
Identify Whether the Problem Is Environmental or Product-Related
One useful diagnostic approach is to change only one variable at a time. If the adhesive performs poorly throughout the room despite consistent technique, investigate humidity and temperature first.
If environmental readings remain stable but performance changes after opening a new bottle or during extended appointments, investigate adhesive freshness, storage, and droplet replacement.
When the problem occurs only with particular extensions or placements, review adhesive quantity, isolation, and attachment contact. This approach helps distinguish environmental problems from product-related and technique-related issues.
How Does Eyelash Adhesive Curing Work?
Understanding the chemistry behind lash adhesive makes troubleshooting easier. Conventional moisture-curing eyelash extension adhesives commonly use cyanoacrylate chemistry, which undergoes polymerization when exposed to suitable initiating conditions.
What Is Cyanoacrylate Polymerization?
Cyanoacrylate is a family of fast-setting adhesive compounds used in various bonding applications, including many conventional eyelash extension adhesives.
Polymerization is the chemical process through which smaller molecules, called monomers, react to form larger molecular chains. In cyanoacrylate adhesives, moisture can initiate anionic polymerization, allowing the liquid adhesive to develop into a solid polymer bond.
In practical terms, environmental moisture influences how quickly the adhesive begins setting. This is why lash technicians need to understand the relationship between their adhesive formulation and the conditions inside the salon.
How Relative Humidity Influences Curing Speed
Relative humidity describes the amount of water vapor in the air compared with the maximum amount the air can hold at a particular temperature.
For moisture-curing cyanoacrylate adhesives, environmental moisture influences polymerization speed. When humidity is below the formulation's recommended range, initial setting may become slower.
However, increasing humidity indefinitely is not a solution. Excessive moisture can also produce undesirable application behavior, depending on the adhesive formulation and conditions. The objective is to maintain the manufacturer's recommended operating range rather than maximize humidity.
For additional professional beauty and self-care resources, explore the Beauty & Self-Care Blog.
Initial Bond Formation vs. Complete Curing
One important distinction is that an extension appearing attached does not necessarily mean the adhesive has completed its curing process. Initial bond formation, handling stability, and complete curing are different stages.
| Curing stage | What happens | Practical meaning |
| Initial bond formation | The adhesive begins polymerizing and forms an initial attachment. | The extension starts holding in position. |
| Handling stability | The bond develops sufficient stability for the intended application workflow. | The attachment becomes less susceptible to movement. |
| Complete curing | Polymerization progresses beyond the initial setting stage. | The adhesive reaches its specified curing condition according to manufacturer guidance. |
Technicians should not assume that a bond is fully cured simply because an extension no longer moves. Follow the manufacturer's instructions regarding curing time, aftercare, and exposure to moisture.
How to Check Humidity and Temperature Before Applying Lash Extensions
Measuring environmental conditions before an appointment provides a more reliable starting point than guessing why adhesive performance has changed. A hygrometer and thermometer can help identify conditions that may be affecting conventional lash adhesive.
Step 1: Measure Relative Humidity with a Hygrometer
A hygrometer measures relative humidity. Place a reliable digital hygrometer near the actual application area so that its readings reflect the conditions experienced by the adhesive.
Avoid relying exclusively on measurements from another room. Air circulation, heating, air conditioning, and room layout can create differences between locations.
Allow the instrument to stabilize according to its instructions before recording the reading.
Step 2: Check Ambient Temperature
Use a thermometer to measure the temperature near the workstation. Record the reading before starting an appointment and compare it with the adhesive manufacturer's recommended operating conditions.
Do not assume that adjusting humidity alone will resolve slow curing if the room temperature is also outside the recommended range.
Step 3: Compare Measurements with Your Adhesive Specifications
Different adhesive formulations can have different humidity and temperature requirements. There is no universal humidity or temperature setting that guarantees optimal performance for every lash adhesive.
Check the product label, technical data sheet, and manufacturer application instructions. These documents should guide decisions about environmental adjustments and product handling.
Technicians who work with different adhesive formulations should avoid applying one product's recommended conditions to another product without verification.
Step 4: Record Environmental Conditions and Observe Performance
Maintaining a simple salon log can reveal patterns that are difficult to recognize during individual appointments.
Record the following information:
- Date and appointment time.
- Relative humidity near the application area.
- Ambient room temperature.
- Adhesive brand, batch, and opening date.
- Frequency of adhesive drop replacement.
- Observed initial setting and attachment behavior.
After several appointments, compare the observations. This can help identify whether particular environmental conditions or adhesive handling practices repeatedly coincide with slow setting.
How to Fix Slow Eyelash Adhesive Curing: 6 Practical Solutions
Once you have identified the likely cause, make controlled adjustments rather than changing several factors simultaneously. These six practical solutions address the most common environmental, product-related, and application problems.
1. Adjust Room Humidity Within the Adhesive's Recommended Range
If measurements reveal that relative humidity is too low for your adhesive, consider controlled humidification. A suitable humidifier may help maintain more consistent moisture levels in the workspace.
Use the hygrometer to monitor changes and avoid directing excessive moisture toward the client's face or adhesive application area. Do not exceed the manufacturer's recommended humidity range in an attempt to force faster polymerization.
2. Maintain the Recommended Working Temperature
Keep the salon environment within the adhesive manufacturer's specified temperature range. Avoid sudden temperature changes caused by direct heating or strong cooling airflow.
Consistent room conditions can make adhesive behavior more predictable and help technicians maintain a repeatable application process.
3. Replace Old or Compromised Adhesive
If adhesive has become unusually thick, stringy, contaminated, or inconsistent, discontinue its use and check the manufacturer's replacement recommendations.
Pay attention to both the printed expiration date and the recommended period after opening. A product can deteriorate before its printed expiration date if it has been exposed to unsuitable conditions.
When a new bottle also performs abnormally, retain the batch information and contact the manufacturer or supplier for guidance.
4. Improve Adhesive Storage Conditions
Correct storage is essential for preserving adhesive performance. Follow the product's specific storage instructions rather than assuming all lash adhesives require identical conditions.
General handling considerations include:
- Keep the bottle tightly closed when not in use.
- Protect the adhesive from unnecessary moisture exposure.
- Maintain the recommended storage temperature.
- Use the manufacturer's specified storage container when required.
- Follow instructions regarding upright or other bottle positioning.
- Avoid repeated temperature fluctuations.
If refrigeration is recommended, follow the manufacturer's instructions for returning the bottle to room temperature before opening. Opening a cold bottle can introduce condensation and moisture contamination.
5. Use the Correct Adhesive Amount and Application Technique
Consistent adhesive pickup can reduce placement difficulties. Use a controlled droplet size and avoid collecting excessive adhesive on each extension.
Maintain clean isolation so that neighboring natural lashes do not become unintentionally connected. Ensure the extension makes appropriate contact with the natural lash rather than relying on an unstable surface attachment.
Professional application precision also depends on suitable tools. Exploring dedicated eye care devices can help technicians understand the broader range of equipment used in eye-area care, although equipment selection should always be based on the specific requirements of professional lash procedures.
6. Refresh Adhesive Drops and Follow Product Instructions
Exposed adhesive droplets can change during an appointment as they interact with surrounding air and moisture. Their performance may become less predictable as they remain on the work surface.
Replace droplets at the interval recommended by the manufacturer. Use an appropriate adhesive palette or dispensing surface, and avoid transferring contaminated material back into the bottle.
Following consistent drop replacement practices can help reduce variations in adhesive behavior throughout an appointment.
For further guidance on selecting professional equipment and maintaining a suitable beauty workspace, browse the Body Care and Health Devices collection.
Real-World Lash Salon Scenarios: Why Your Adhesive May Cure Slowly
Environmental troubleshooting becomes easier when applied to familiar salon situations. The following examples demonstrate how technicians can investigate common curing problems without immediately switching adhesive formulations.
Scenario 1: Lash Adhesive Cures Slowly During Dry Winter Weather
A technician notices that extensions take longer to stabilize during winter appointments. Indoor heating is running throughout the day, and the room feels noticeably dry.
Low relative humidity may be contributing to the problem. The technician should measure humidity, compare it with the adhesive specifications, and introduce controlled humidification if necessary.
The goal is to restore suitable conditions rather than expose the adhesive to excessive moisture.
Scenario 2: Air-Conditioned Salon with Inconsistent Curing
A salon uses air conditioning throughout the day. Adhesive performance changes depending on the workstation and appointment time.
Air conditioning can influence both temperature and relative humidity. A hygrometer and thermometer positioned near the actual application area can reveal whether the environment is changing throughout the day.
Technicians should adjust the workspace according to product-specific recommendations rather than relying on the building's central thermostat alone.
Scenario 3: Adhesive Performs Differently Throughout the Day
Extensions attach consistently during the first appointment but become harder to position during later sessions.
Possible explanations include changing room conditions, adhesive droplets that have remained exposed too long, or inconsistent application habits.
Recording environmental readings and adhesive drop replacement times can help isolate the cause. Maintaining consistent dispensing and application practices is equally important.
Scenario 4: A New Bottle of Adhesive Still Cures Slowly
A newly opened adhesive bottle does not perform as expected. Although the product is within its printed expiration date, its curing behavior is inconsistent.
Consider environmental conditions, transportation and storage history, product compatibility, and possible manufacturing or batch-related issues.
Check the batch information and manufacturer instructions. If the adhesive continues to perform abnormally despite suitable environmental conditions and correct technique, contact the supplier or manufacturer rather than attempting unapproved chemical or environmental adjustments.
Conventional Lash Adhesive vs. UV LED Lash Adhesive Curing
Conventional moisture-curing lash adhesives and UV LED lash adhesive systems use different curing mechanisms. Although both are used in professional eyelash extension applications, they are not interchangeable technologies.
Conventional cyanoacrylate adhesives rely on moisture-triggered polymerization. Compatible UV LED adhesives use light-activated formulations designed to respond to specified light exposure.
This distinction matters when evaluating alternative professional workflows. A UV LED lamp cannot automatically solve slow curing in a conventional moisture-curing adhesive because the two systems may rely on different chemical formulations.
How Conventional Moisture-Curing Lash Adhesives Work
Conventional lash adhesives commonly use cyanoacrylate chemistry. Moisture initiates polymerization, and environmental factors such as humidity and temperature can influence setting behavior.
These products do not require a dedicated UV LED curing lamp. Instead, technicians must understand the adhesive's environmental requirements, application characteristics, storage conditions, and recommended handling procedures.
How UV LED Lash Adhesive Curing Works
UV LED lash adhesive systems use compatible light-activated formulations containing photoinitiating components. When exposed to the specified light conditions, these components initiate chemical reactions that help the adhesive form a polymer bond.
The curing process depends on the compatibility of the adhesive formulation and the equipment. Wavelength, light intensity, exposure duration, positioning, and other operating parameters must follow the system manufacturer's specifications.
UV LED technology should not be treated as a universal solution for every lash adhesive. Conventional moisture-curing cyanoacrylate products should not be exposed to an unrelated curing lamp in an attempt to accelerate polymerization.
Conventional vs. UV LED Lash Adhesive Systems
| Comparison factor | Conventional adhesive | UV LED adhesive |
| Curing mechanism | Moisture-triggered cyanoacrylate polymerization. | Light-activated curing using compatible photoinitiated formulations. |
| Environmental influence | Relative humidity and temperature can influence performance. | Depends on formulation and specified light exposure, alongside applicable environmental requirements. |
| Equipment | No dedicated curing lamp required. | Requires a compatible UV LED curing system. |
| Training | Requires knowledge of environmental conditions and adhesive handling. | Requires system-specific training and correct light positioning and operation. |
| Safety considerations | Requires appropriate adhesive handling, ventilation, and exposure precautions. | Requires adhesive safety precautions plus appropriate eye and skin exposure controls. |
Can a UV LED System Fix Slow Conventional Lash Glue?
No. A UV LED curing lamp should not be assumed to cure conventional moisture-curing lash glue. The curing mechanisms are different, and using incompatible equipment can result in inadequate bonding or unpredictable performance.
Only use an adhesive and curing light that the respective manufacturers explicitly identify as compatible. Verify the required wavelength, exposure parameters, application procedure, and safety documentation before using a UV LED system.
When Should Lash Technicians Consider a UV LED System?
A UV LED system may be worth evaluating when a technician wants to explore an alternative professional application workflow and is prepared to follow its specific equipment and adhesive requirements.
Before switching, evaluate:
- Whether the adhesive is specifically formulated for the selected UV LED system.
- Whether the lamp meets the adhesive manufacturer's technical requirements.
- Whether the required wavelength and exposure parameters are documented.
- Whether appropriate professional training is available.
- Whether eye and skin exposure controls can be maintained.
- Whether the equipment and adhesive have suitable safety documentation.
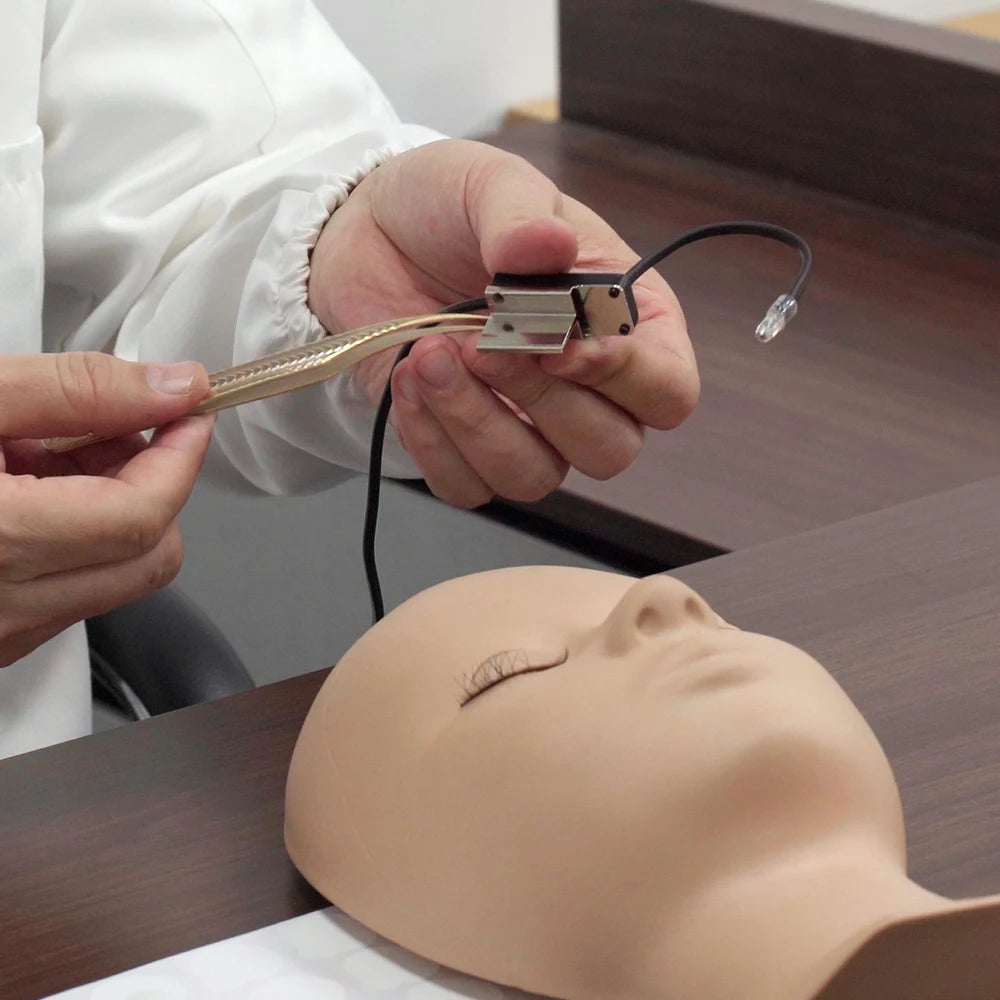
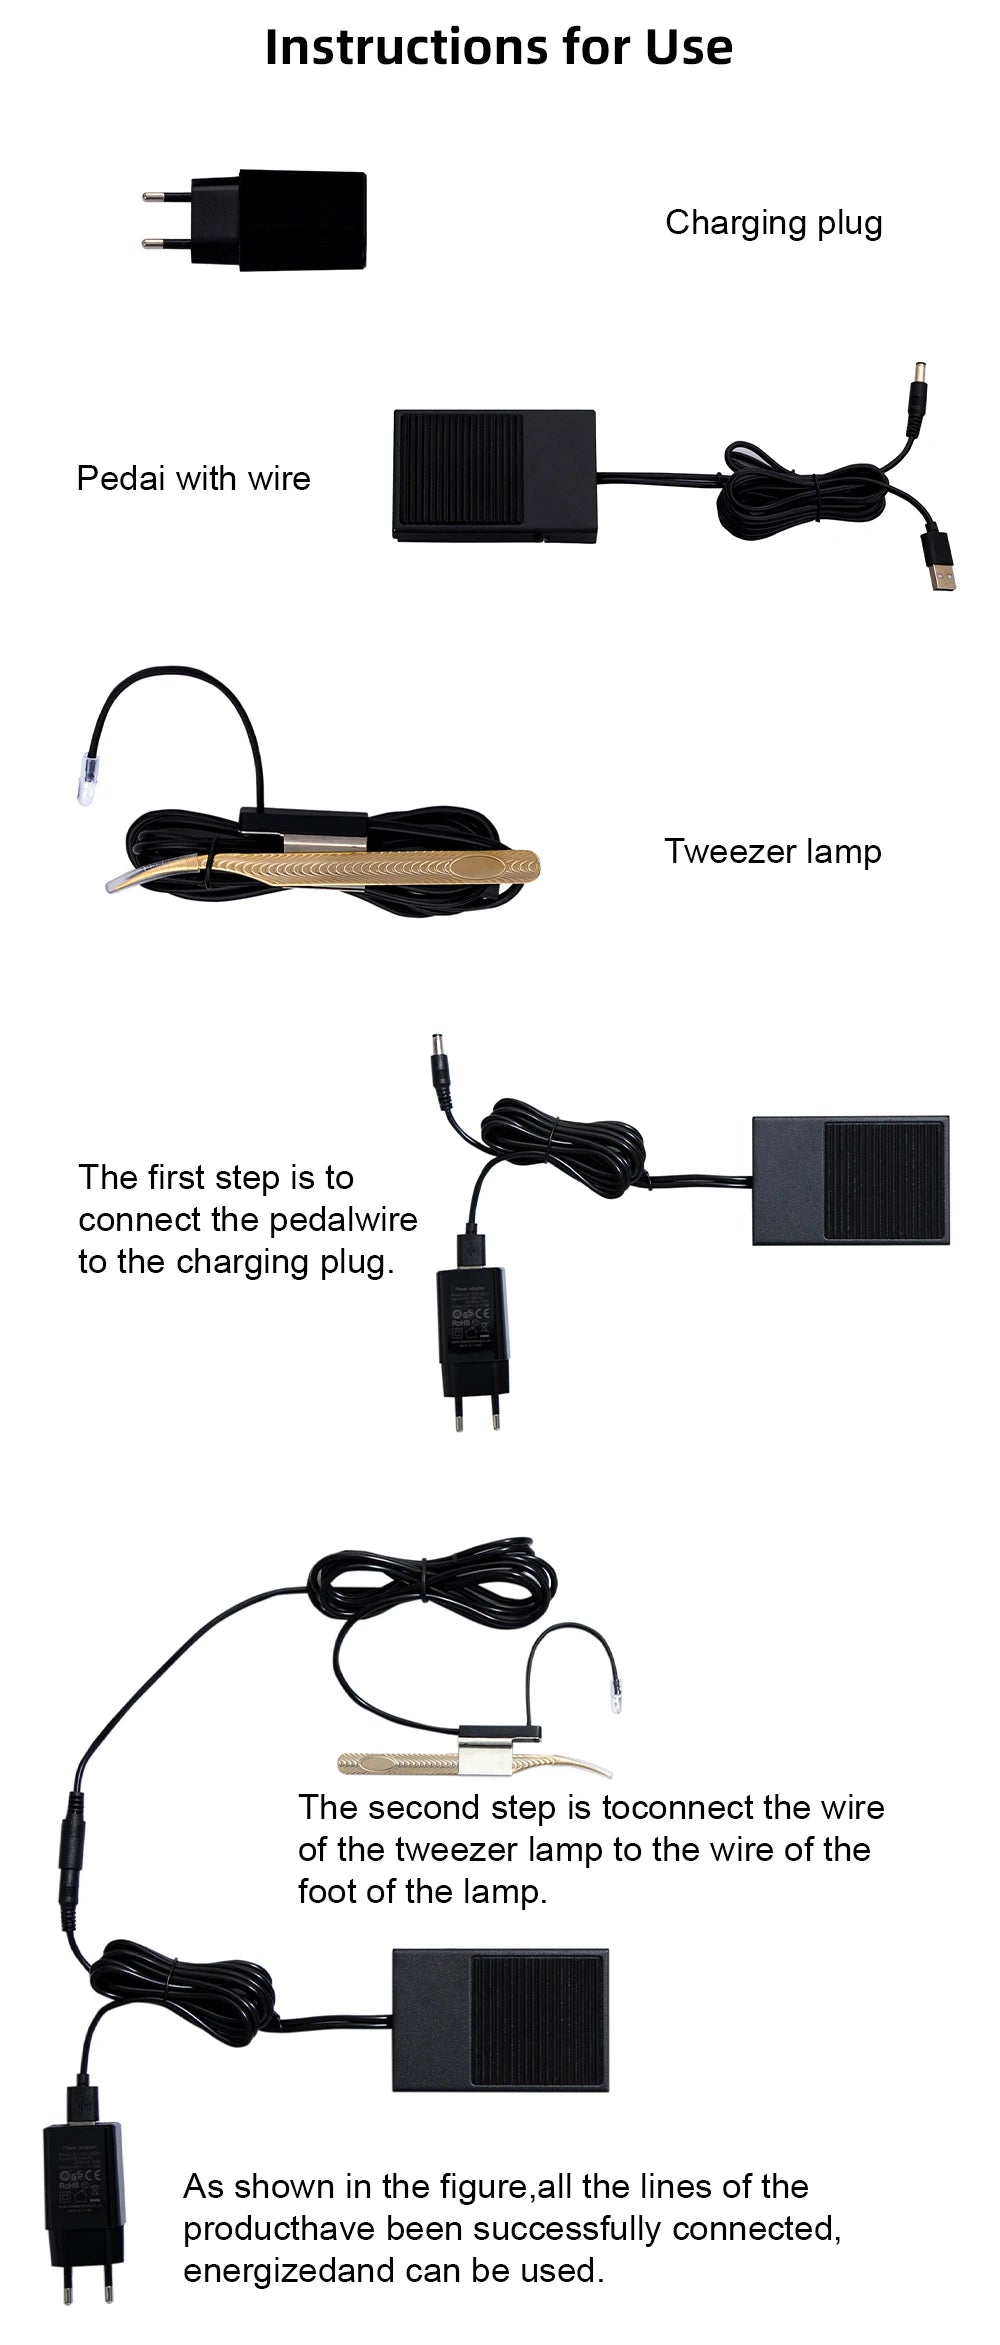
For technicians researching this approach, the Professional UV LED Eyelash Glue Curing Light Kit is one equipment option to examine as part of a broader evaluation of light-activated lash application systems. Its product listing identifies a UV LED curing light and precision tweezers. However, compatibility with a particular adhesive formulation must be independently verified before use.
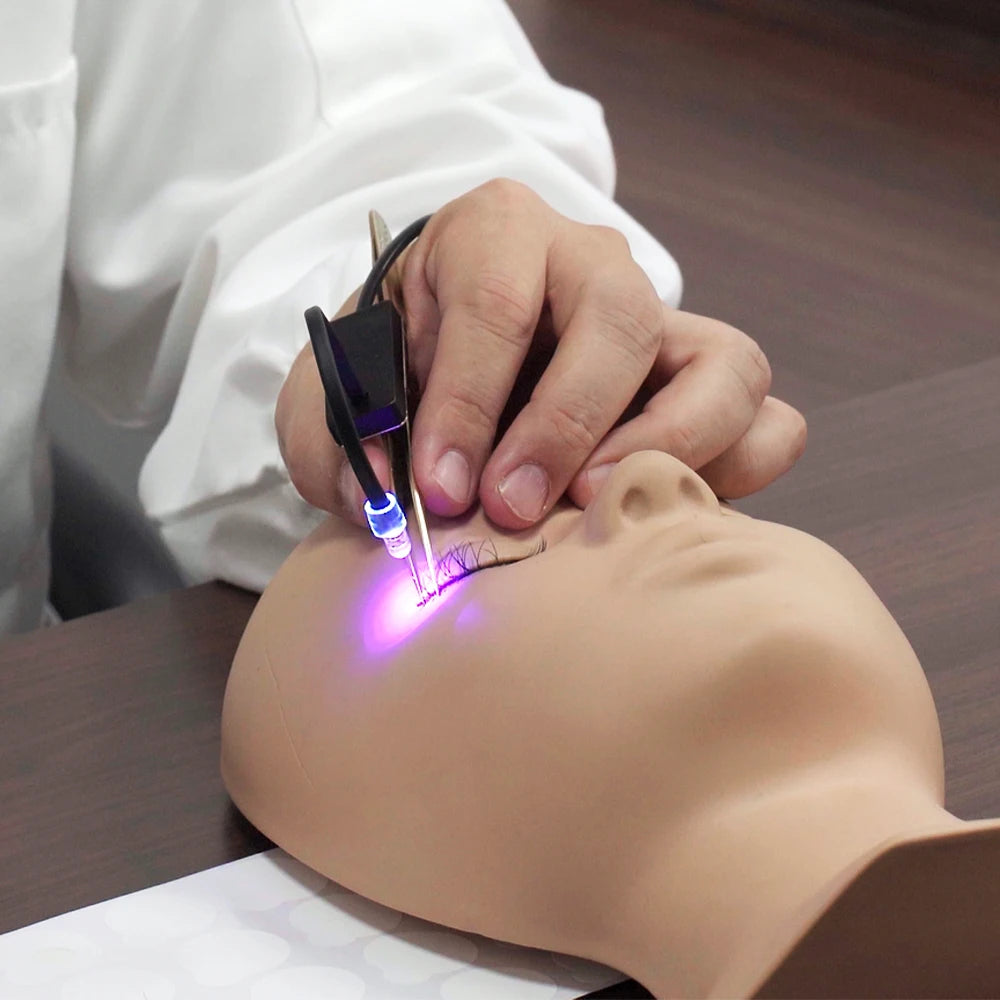
The listed kit is identified as model TL02 and includes a UV LED curing system with precision tweezers. Its listed construction material is plastic, and its product weight is 0.5 kg. These specifications describe the product listing rather than establishing universal adhesive compatibility or specific curing performance.
Interested technicians can review the UV LED eyelash glue curing light kit specifications and confirm the appropriate adhesive and operating requirements with the manufacturer before incorporating it into their professional setup.
Common Mistakes When Trying to Speed Up Lash Adhesive Curing
When extensions take too long to stabilize, technicians may be tempted to accelerate the curing process through improvised methods. However, faster setting is not automatically better, and uncontrolled adjustments can create additional application and safety problems.
Assuming Faster Curing Always Means Better Retention
Adhesive curing speed is only one factor involved in extension retention. Bond quality also depends on adhesive compatibility, correct preparation, appropriate attachment, natural lash condition, and application technique.
An adhesive that sets quickly but is applied incorrectly may still produce an unstable attachment. Focus on consistent application and manufacturer-recommended conditions rather than pursuing the fastest possible setting time.
Adding Excessive Moisture to Force Faster Curing
Increasing humidity beyond the recommended range is not a reliable solution. Excessive moisture can influence polymerization behavior and create undesirable application results.
Use a hygrometer and controlled environmental adjustments instead of directing water or concentrated moisture toward freshly applied extensions.
Using Excessive Heat or Unapproved Curing Methods
Hair dryers, uncontrolled heating devices, and improvised curing lamps should not be used to force adhesive setting.
Excessive heat can change adhesive behavior and introduce unnecessary exposure risks. Likewise, a curing lamp should never be used with a formulation that has not been designed for that system.
Ignoring Adhesive Compatibility and Manufacturer Instructions
Different adhesive products can have different chemical compositions, operating conditions, and handling requirements. Assuming that two products behave identically can lead to avoidable application problems.
Always review the technical data sheet, product instructions, and safety data sheet. When information is unclear, contact the manufacturer before changing the curing procedure.
Professional Safety Guidelines for Eyelash Adhesive Use
Professional lash application involves working near sensitive eye tissue. Adhesive selection, workstation preparation, ventilation, and appropriate equipment operation should all be treated as essential safety considerations.
Follow Adhesive Safety Data Sheets and Technical Documentation
Review the safety data sheet and technical documentation for every adhesive used in the salon. These documents provide important information about product composition, handling, storage, ventilation, and exposure precautions.
Do not rely exclusively on generalized lash application advice when the manufacturer's instructions specify different requirements.
Minimize Eye and Skin Exposure
Keep adhesive away from the client's eyes, eyelids, and surrounding skin. Use appropriate positioning and professional application techniques to reduce accidental contact.
Maintain suitable ventilation according to the adhesive's safety documentation, and follow the manufacturer's recommendations for managing fumes and potential exposure.
Apply UV LED Exposure Controls When Using Light-Curing Systems
UV LED equipment requires additional attention to light exposure. Never assume that a device is safe simply because it is marketed for eyelash extension applications.
Use compatible equipment, follow the specified wavelength and exposure parameters, and apply the protective measures required by the manufacturer. Avoid directing light toward the client's eyes or exposing skin unnecessarily.
Technicians should receive appropriate training before operating a UV LED curing system and should understand the relevant equipment and adhesive safety documentation.
Recognize When to Stop Application
Stop the procedure if unexpected irritation, accidental exposure, abnormal adhesive behavior, or equipment malfunction occurs.
Follow the product's emergency instructions and seek appropriate medical guidance when an exposure causes concerning symptoms. Do not continue an appointment simply to avoid disrupting the schedule.
Final Troubleshooting Checklist: Get Your Lash Adhesive Back on Track
Before changing your adhesive or purchasing additional equipment, work through this seven-point diagnostic checklist. It provides a repeatable process for identifying the most likely cause of slow eyelash adhesive curing.
The 7-Point Adhesive Curing Diagnostic Checklist
- Measure humidity: Use a reliable hygrometer near the lash application area and record the relative humidity.
- Measure temperature: Check the actual room temperature near the workstation rather than estimating it.
- Compare both measurements with product specifications: Confirm that humidity and temperature fall within the adhesive manufacturer's recommended operating ranges.
- Inspect adhesive freshness: Check the expiration date, opening date, consistency, and any visible signs of deterioration.
- Verify storage: Review whether the adhesive has been protected from moisture, temperature fluctuations, and unsuitable storage conditions.
- Assess application technique: Check adhesive quantity, droplet condition, isolation, attachment angle, and extension-to-natural-lash contact.
- Review manufacturer curing instructions: Confirm the recommended application process, environmental conditions, curing requirements, and safety precautions.
Conclusion: Restore Consistent Eyelash Adhesive Curing Through Better Diagnosis
Slow eyelash adhesive curing is usually a manageable problem when technicians identify the underlying cause instead of making random adjustments. Low relative humidity, unsuitable temperature, deteriorated adhesive, improper storage, and inconsistent application technique are all factors worth investigating.
Start by measuring humidity and temperature with reliable instruments. Compare the readings with the adhesive manufacturer's specifications, inspect product freshness, and review application and storage practices. Make controlled changes and observe how the adhesive responds.
If you are considering an alternative curing workflow, remember that conventional moisture-curing adhesives and UV LED systems require different formulations and procedures. A UV LED lamp is not a substitute for correcting environmental problems with conventional lash glue.
Professional technicians can explore additional eye care education and resources to develop a better understanding of professional equipment and application practices. Those interested in light-activated technology can also review the Professional UV LED Eyelash Glue Curing Light Kit as an educational starting point, while verifying adhesive compatibility, equipment specifications, training requirements, and exposure precautions before use.
Ultimately, consistent lash application comes from understanding your adhesive, controlling your working environment, maintaining proper technique, and following manufacturer-specific safety guidance. Rather than forcing faster curing, focus on creating the conditions that allow your chosen adhesive system to perform as intended.
Pillar Article: Eyelash Adhesive Curing Lamp: Professional UV LED Buying Guide