
What Are Drill Nail Bits and Why Are They Essential for Perfect Manicures?
Drill nail bits are precision tools used with an electric manicure nail drill machine to shape, smooth, and clean natural or acrylic nails. Each bit serves a unique purpose—from removing gel polish to refining cuticles—making them essential for achieving salon-quality results at home or professionally.
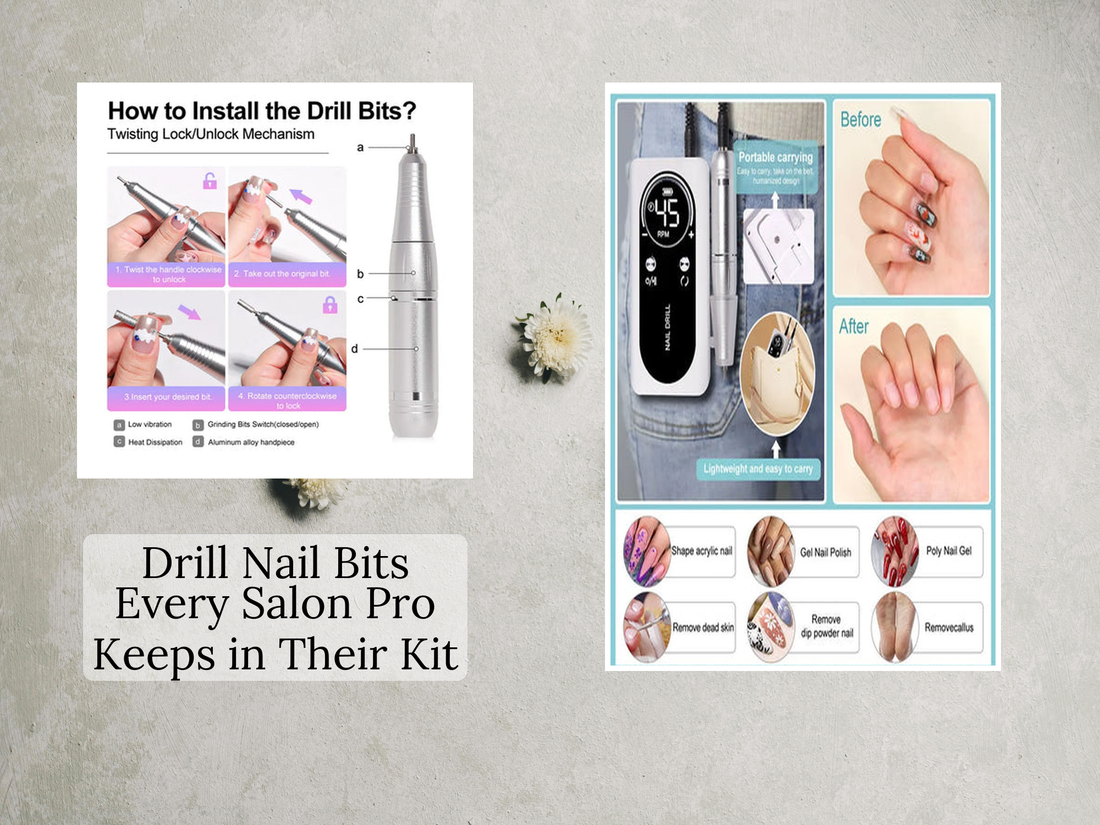
Drill Nail Bits Every Salon Pro Keeps in Their Kit
Drill nail bits are the secret weapons every salon pro swears by, from precise shaping with nail drill sanding bands to mastering speed with your manicure nail drill machine. Knowing the right nail drill rpm guide can save time and prevent damage, while the right nail file electric drill attachments make finishing effortless. Curious which bits will revolutionize your workflow and become your go-to essentials for flawless nails every time?
⏱ 7 min read
💡 Drill nail bits for salon perfection — discover pro tools that redefine precision.
Why Drill Nail Bits Matter for Every Manicurist
Every precise, professional manicure starts with the right tools. Drill nail bits give you total control over shaping, buffing, and refining nails, whether you’re prepping natural nails or removing acrylics.
Without the proper bits, even the best manicure nail drill machine can cause heat, lifting, or uneven surfaces. The right bit not only enhances results but also protects your clients’ nail health—saving you time and effort during every session.
Types of Drill Nail Bits and Their Uses
Each drill nail bit is designed for a specific function, from smoothing to cleaning. Here’s a breakdown of the essential bits every pro should have:
- Barrel Bit: Ideal for shortening acrylics and refining surface shape.
- Cone Bit: Reaches tight cuticle areas and sidewalls easily.
- Flame Bit: Perfect for cleaning under the nails and detailed cuticle work.
- Needle Bit: Used for precision detailing and delicate nail art prep.
- Safety Bit: Rounded top design that prevents cuts or overfiling—perfect for beginners.
💡 Precision meets performance — master your technique with the right nail drill bits.
Nail Drill Sanding Bands: The Foundation of Every Smooth Finish
Nail drill sanding bands are the first step in shaping and surface prep. They fit snugly over mandrel bits and are perfect for removing old gel polish or refining natural nails.
Key Benefits of Sanding Bands:
- Gentle enough for natural nails when used at the right RPM.
- Excellent for smoothing rough acrylic surfaces.
- Cost-effective and disposable for hygienic use.
- Available in various grits (coarse, medium, fine) for custom results.
💡 Tip: Always start with a medium grit for controlled shaping, then finish with a fine grit for a smooth polish-ready base.
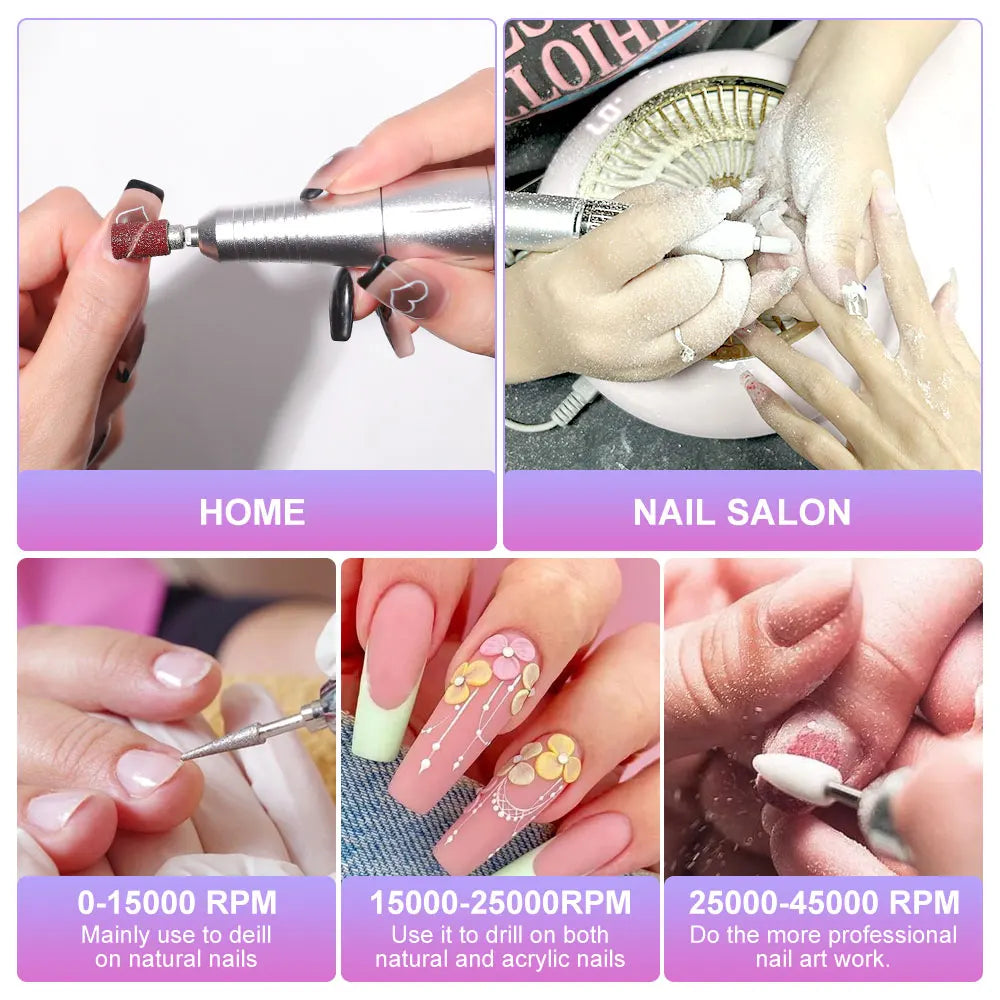
How to Use a Nail Drill RPM Guide for Perfect Results
Mastering speed control is vital. The nail drill rpm guide helps ensure you’re working safely and efficiently. Too fast, and you risk friction burns; too slow, and you’ll struggle with precision.
Suggested RPM Settings:
| Task | Recommended RPM |
|---|---|
| Cuticle cleaning | 5,000–8,000 RPM |
| Gel polish removal | 10,000–15,000 RPM |
| Acrylic shaping | 15,000–25,000 RPM |
| Buffing & finishing | 5,000–10,000 RPM |
Adjust the speed based on your client’s comfort and the material you’re working on. Always test your KentDO Rechargeable Nail Drill Machine on a low setting first before increasing power.
Understanding Bit Materials: Carbide, Diamond, Ceramic
Different drill nail bits are made from materials that serve unique purposes. Choosing the right one ensures durability and precision.
- Carbide Bits: Best for acrylic removal. Durable and efficient but requires steady control.
- Diamond Bits: Perfect for natural nails and cuticle care. Gently exfoliates without heat buildup.
- Ceramic Bits: Heat-resistant and ideal for sensitive clients. Excellent for detailed shaping and smoothing.
Each type complements specific electric nail drill needs—so keeping a mix in your kit ensures versatility for every client.
Expert Tips for Maintaining and Cleaning Your Drill Bits
Proper maintenance extends the life of your tools and ensures hygienic results.
- After each use, brush off debris with a small nail bit cleaning brush.
- Soak bits in a professional disinfectant solution (avoid soaking sanding bands).
- Allow them to air-dry completely before storing.
- Replace worn or rusted bits immediately to maintain smooth performance.
Regular care keeps your beauty tools performing like new and prevents cross-contamination during manicures.
Product Highlight: KentDO Rechargeable Nail Drill Machine
The KentDO Rechargeable Nail Drill Machine is a salon-grade solution built for power and precision. Lightweight, cordless, and ergonomic—it’s ideal for both professionals and at-home users who demand seamless control.
| Pros | Cons |
|---|---|
| ✔ Cordless design for easy mobility | ❌ Requires charging after long sessions |
| ✔ Adjustable RPM up to 30,000 | ❌ Slight learning curve for beginners |
| ✔ Compatible with all standard drill nail bits | ❌ Premium price point |
💡 Pair your KentDO machine with premium drill nail bits for flawless salon-level finishes.
FAQ: Drill Nail Bits
Which drill nail bit should beginners start with?
Beginners should start with a safety bit or a medium-grit sanding band. These are gentle on natural nails and reduce the risk of overfiling.
How often should I replace my nail drill bits?
Replace your bits every 2–3 months if used regularly, or immediately if they show rust or reduced performance.
Can I use the same bits on natural and acrylic nails?
Yes, but choose the right material—diamond or ceramic bits are safer for natural nails, while carbide bits work best on acrylics or gels.
Do I need a professional drill machine for these bits?
For consistent results, yes. The KentDO Rechargeable Nail Drill Machine ensures proper RPM control and compatibility with all professional-grade bits.
✨ Ready to elevate your nail game? Explore the full range of nail care devices and transform every manicure into a flawless masterpiece.
Pillar Article: Nail Drill Bits Explained for Beginners: Stop Using the Wrong Bit
Other Related Articles:
Explore More:


