

TENS Pads Placement Chart: Where to Place TENS Pads for Safe & Effective Pain Relief
A TENS pads placement chart is a visual guide showing where to position electrode pads on different areas of the body to help relieve pain safely and effectively. Instead of placing pads directly on the painful spot, most charts recommend positioning electrodes around the affected area so the electrical current passes through surrounding muscles and nerve pathways.
Correct placement is essential for improving comfort, ensuring consistent stimulation, and avoiding ineffective treatment. Whether you are managing lower back pain, neck stiffness, shoulder tension, or sciatica, following a structured TENS unit placement guide helps you achieve more predictable results.
⏱ 5 min read
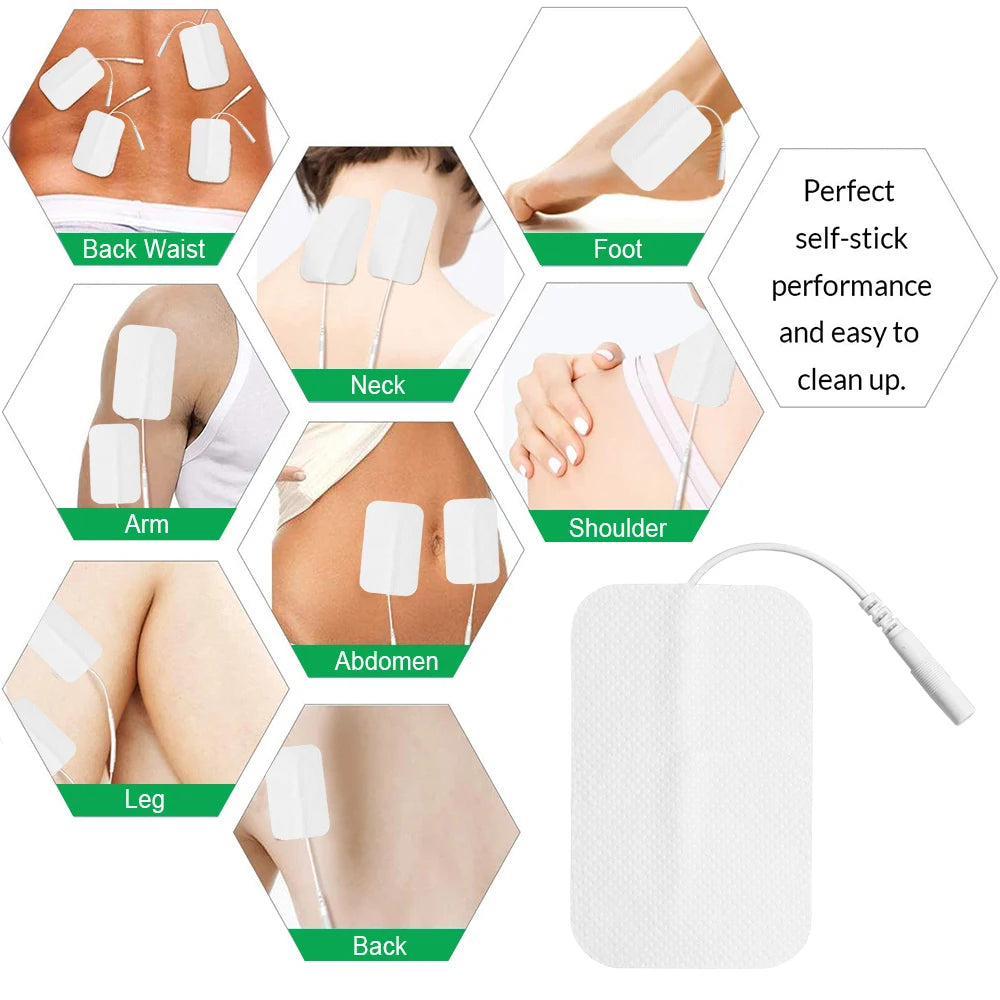
TENS pads placement chart for safe home use and muscle recovery guidance
What Is a TENS Pads Placement Chart and Why Proper Electrode Placement Matters
A TENS pads placement chart is a visual guide showing where to position electrode pads on different parts of the body to help relieve pain safely and effectively. Instead of placing pads directly over the painful spot, most charts recommend positioning electrodes around the affected area so the electrical current passes through muscles or sensory nerves associated with the pain.
Using a proper TENS unit placement guide improves comfort, helps deliver consistent stimulation, reduces ineffective treatments, and lowers the chance of skin irritation caused by poor electrode positioning. Whether you're treating lower back pain, neck stiffness, shoulder tension, or knee discomfort, following a reliable placement chart provides better and more predictable results.
TENS Unit Placement Guide: Rules to Follow Before Applying Pads
Before applying electrodes, it is important to understand the basic principles that make TENS therapy effective. Correct placement is more important than simply increasing intensity.
Place Pads Around—Not Directly Over—the Pain
Electrodes work best when positioned around the painful area so electrical current travels through affected tissues.
Follow Muscle Fibers and Nerve Pathways
Aligning pads with muscle direction or along nerve pathways improves comfort and stimulation quality.
Keep Proper Spacing Between Electrodes
Maintain approximately 1–2 inches (2.5–5 cm) between pads for optimal current distribution.
Areas to Avoid for Safety
- Front of the neck
- Directly over the spine
- Eyes and face
- Broken or irritated skin
- Areas with reduced sensation
- Across the chest (current path through heart)
TENS Pads Placement Chart by Body Area
Below are common electrode placements used in home TENS therapy. Adjustments may be needed based on individual anatomy and pain location.
Lower Back Pain (Lumbar)
Place electrodes on both sides of the lumbar muscles without placing them directly on the spine.
Upper Back
Position pads around the shoulder blade muscles to surround tight or strained areas.
Neck
Place electrodes on the back or sides of the neck muscles only. Never place pads on the front of the neck.
Shoulders
Surround the shoulder muscles while avoiding bone structures.
Sciatica
Place electrodes near the lower back and buttock or along the sciatic nerve pathway depending on symptom location.
Knee
Position pads above and below the knee joint or on both sides of the joint.
Tennis Elbow
Place electrodes on forearm muscles around the painful tendon area.
Hip
Surround hip muscles while avoiding direct placement on bone.
Ankle and Foot (Plantar Fasciitis)
Place pads around the heel, arch, or calf depending on pain distribution.
Why TENS Electrode Placement Works
TENS therapy works by influencing how pain signals are processed by the nervous system and how muscles respond to electrical stimulation.
Pain Gate Theory
Stimulation of sensory nerves can reduce pain signal transmission to the brain.
Muscle Stimulation
Some settings cause mild muscle contractions that may reduce stiffness and improve circulation.
Importance of Current Path
The electrical current flows between electrodes, so proper positioning ensures targeted tissues are included in the stimulation path.
Step-by-Step: How to Use TENS Unit Pads Correctly
- Clean and dry the skin thoroughly.
- Inspect electrode pads for cleanliness and adhesion.
- Apply pads according to the placement chart.
- Connect lead wires securely.
- Turn the unit on at the lowest intensity.
- Increase stimulation until a strong but comfortable sensation is felt.
- Maintain treatment for the recommended duration.
- Remove pads gently and store them on the protective backing.
Common TENS Electrode Placement Mistakes to Avoid
- Placing electrodes directly on joints instead of surrounding muscles
- Positioning pads too close together
- Applying pads over the spine
- Crossing current through the chest
- Using worn or dried-out electrodes
- Skipping skin preparation
- Relying on intensity instead of correct placement
Best Adhesive TENS Pads for Home Use
High-quality adhesive electrodes improve comfort, consistency, and signal delivery during each session.
Carbon vs. Cloth Electrodes
Carbon electrodes offer more even current distribution, while cloth-based options provide flexibility and comfort.
Choose the Right Pad Size
Smaller pads concentrate stimulation, while larger pads distribute it over a wider area.
Improve Adhesion
- Clean skin before use
- Store pads on original backing
- Seal in a pouch after use
Explore options in best adhesive tens pads for home use for consistent performance.
How Long Do TENS Electrode Pads Last?
Most reusable electrode pads last approximately 20–40 sessions depending on usage, skin preparation, and storage conditions.
Average Lifespan
Proper care significantly extends adhesive and conductivity performance.
Signs You Need Replacement Pads
- Poor adhesion
- Uneven stimulation
- Cracked or dry surface
- Reduced conductivity
Storage Tips
- Always replace protective film
- Store in a sealed bag
- Avoid heat and sunlight exposure
TENS Pad Placement Diagram Tips
Placement diagrams show current flow paths rather than exact anatomical points. Small adjustments are often required for individual comfort.
Understanding Placement Illustrations
Look for diagrams that show surrounding muscle groups rather than direct pain-point placement.
Left vs Right Side Positioning
Place pads on the side where symptoms are present unless otherwise directed.
Mirror-Image Placement
For symmetrical pain, matching electrode placement on both sides may improve balance and comfort.
Safety Precautions and Contraindications
TENS therapy is generally safe, but certain conditions require medical guidance.
When Not to Use TENS
- Broken skin
- While driving
- In water
- Near eyes or face
Medical Conditions Requiring Professional Advice
- Pacemakers or implanted devices
- Heart rhythm disorders
- Epilepsy
- Unexplained pain conditions
Pregnancy Considerations
Consult a healthcare provider before using TENS during pregnancy, especially around the abdomen or lower back.
Frequently Asked Questions
Can I place TENS pads directly on my spine?
No. Pads should be placed on either side of the spine, not directly on it.
Where should I place TENS pads for lower back pain?
Place pads on the lumbar muscles surrounding the painful area.
How long should one treatment last?
Typically 20–30 minutes per session depending on device guidance.
Can I use TENS every day?
Yes, if used according to manufacturer instructions or medical advice.
Can I sleep while wearing a TENS unit?
Most devices are not designed for overnight use unless specified.
How far apart should the pads be?
Keep approximately 1–2 inches between electrodes unless otherwise instructed.
Can TENS pads touch each other?
No, pads should not touch during use.
How often should electrode pads be replaced?
Replace when adhesion weakens or stimulation becomes inconsistent.
Pillar Article: tens machine for muscle recovery: how to use it step by step
Other Related Articles:
- muscle stimulator tens machine: how to set up safely at home
- what helps muscles recover faster: how to use TENS correctly
- electrical stimulation pad placement: simple guide for beginners
Explore More:













