

Fingernail drill bits let you shape, smooth, and finish nails faster and more precisely than manual files. With the right bit shape and grit, you can achieve salon-quality results at home, avoiding nicks, uneven edges, or damage.
⏱ 7 min readFingernail Drill Bits: How to Choose the Perfect Shape for You
Struggling to know which bit shape gives you salon-level results without fuss? You’re not alone. Many at-home mani lovers feel overwhelmed by the variety: from the cone to the barrel, each bit promises something slightly different. This guide helps you zero in on the the right fingernail drill bits to match your technique, nail type, and goals—so you skip trial & error and dive straight into confidence-boosting finishes.
Why Bit Shape Matters More Than You Think
You might assume all nail file drill bits roughly do the same job, but shape dictates control, contact angle, and safety on cuticle or sidewall areas. Choose the wrong shape and you risk:
- Snagged or torn tips at cuticle edges
- Uneven finishing with dips or ridges
- Excessive heat or pressure leading to pain or lifting
With the right shape, your routine becomes smoother, faster, and more forgiving of slight hand tremors. Which style suits you best? Read on!
Common Bit Shapes & How They’re Used
Below is an overview of the most popular fingernail drill bits and their go-to tasks:
| Shape | Typical Use | Pros / Best For | Watch-Outs / Limitations |
|---|---|---|---|
| Cylinder / Barrel | Surface shortening, removing bulk on gel or acrylic | Even sanding, stable contact area | Avoid using near cuticle edges |
| Needle / Taper | Sidewalls, cuticle tunnels, precision work | Reach narrow zones, finer detailing | Easy to slip or gouge if unsteady |
| Ball / Round | Safety near cuticle, underside, ingrown edges | Low-risk for overcutting; gentle | Not for flattening large surfaces |
| Cone / Flame | Under free edge, smoothing sidewalls, blending | Good for transitions, shaping curves | Requires steady hand, angle awareness |
| Safety / Round End Cylindrical | Light removal near delicate or weak nails | Minimizes overcutting | Slower removal speed |
Each shape offers unique leverage and control. Rather than owning them all, aim for 2–3 that suit your style (e.g., barrel + cone + ball) to cover most needs.
How to Match Bit Shape to Your Nail Type & Goals
1. Natural, thin nails (frequent breakage)
Opt for gentler shapes like ball or safety — they reduce contact stress. Avoid aggressive cylinders or big barrels that can gouge.
2. Thick or gel/acrylic overlay nails
Use barrel and cone shapes for bulk removal, then finish edges with a taper or needle for finesse.
3. Curved or long nails (C-curve, almond, coffin)
Flame or cone bits help reach transitions; needle shapes refine arches and sidewalls.
4. Client or home user with shaky hand
Stick to stable shapes (barrel, safety) and avoid overly sharp cones until confident.
5. Specialty finishes (ombre, marbled, textural work)
Smaller bits like needles, cones, or flame shapes allow delicate sculpting and detail.
Understanding the Nail Drill Grit Chart
Your bit’s grit—usually expressed in numbers like 80, 120, 180, 240, etc.—is as critical as its shape. Let’s break it down.
Grit categories & their uses
- 80–100 (coarse): Remove heavy acrylic or bulk fast, but risk heat or damage if used carelessly.
- 120–150 (medium): Ideal for general shaping or gel removal with moderate pressure.
- 180–240 (fine): Great for finishing, smoothing, and preparing nail surface before polish.
- 300+ (very fine): Buffing and ultra-smooth polish priming with minimal abrasion.
Sample nail drill grit chart (use this as a quick reference)
| Bit Grit | Intensity | Best for |
|---|---|---|
| 80 | Very Coarse | Rapid acrylic bulk removal (use carefully) |
| 120 | Coarse / Medium | Gel or light overlay removal |
| 180 | Medium / Fine | Smoothing or topcoat prep |
| 240, 300+ | Fine / Very Fine | Finish work, natural nail prep |
Pro tip: start with a coarser grit to remove bulk, then progressively move to finer grit to avoid scratches. This layering approach prevents over-sanding and keeps the surface smooth.
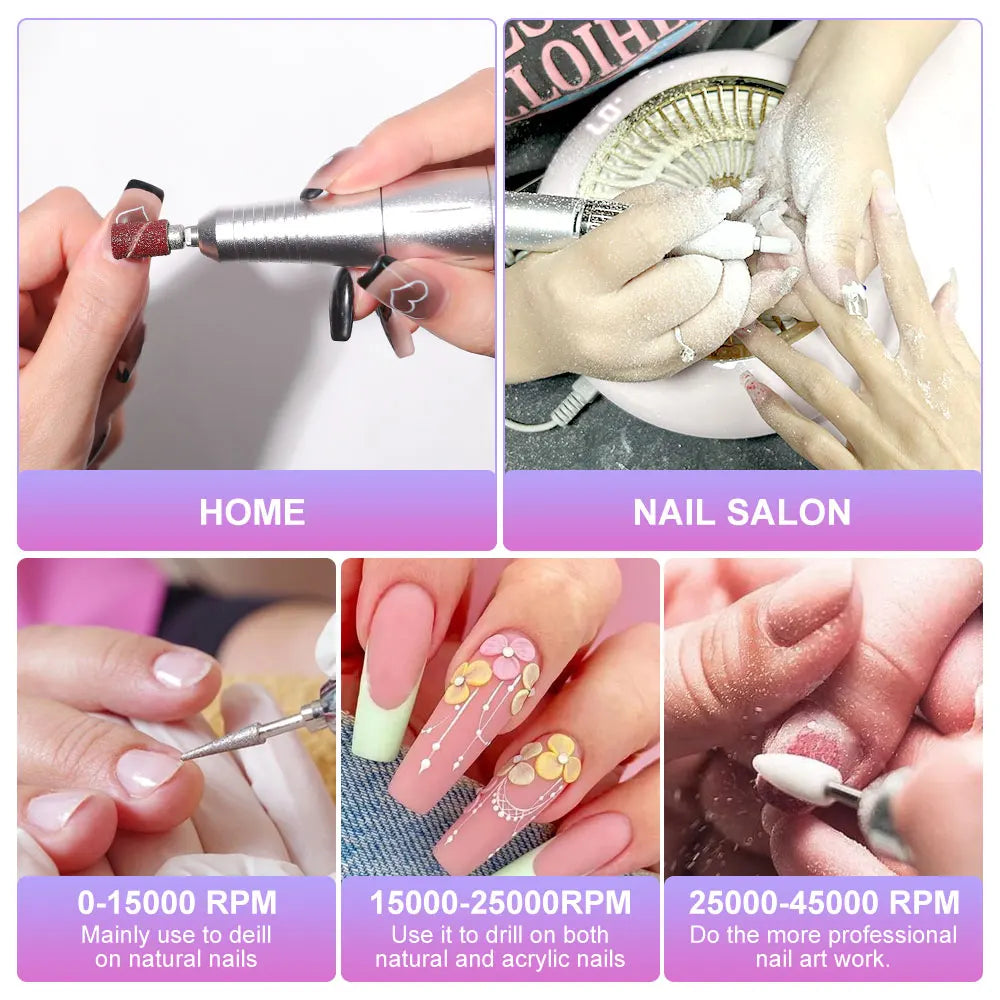
Finding Your Ideal Nail Drill RPM
Bit shape and grit are only half the equation—the right speed (RPM) is the other. Using improper speed can lead to tearing, heat, or uneven results. Below is your quick nail drill rpm guide for safe and effective work.
General RPM ranges by task
- 10,000–15,000 RPM: Surface work, smoothing overlays, gentle removal.
- 15,000–20,000 RPM: Controlled bulk removal on gel or light acrylic.
- 20,000–25,000+ RPM: Use only with coarse bits on thick enhancements, and always with light pressure.
Tips for RPM and hand pressure
- Use low pressure—not pushing—let the bit do the work.
- Raise the bit occasionally to let dust clear and cool.
- When transitioning grit levels, slightly reduce RPM before switching bits.
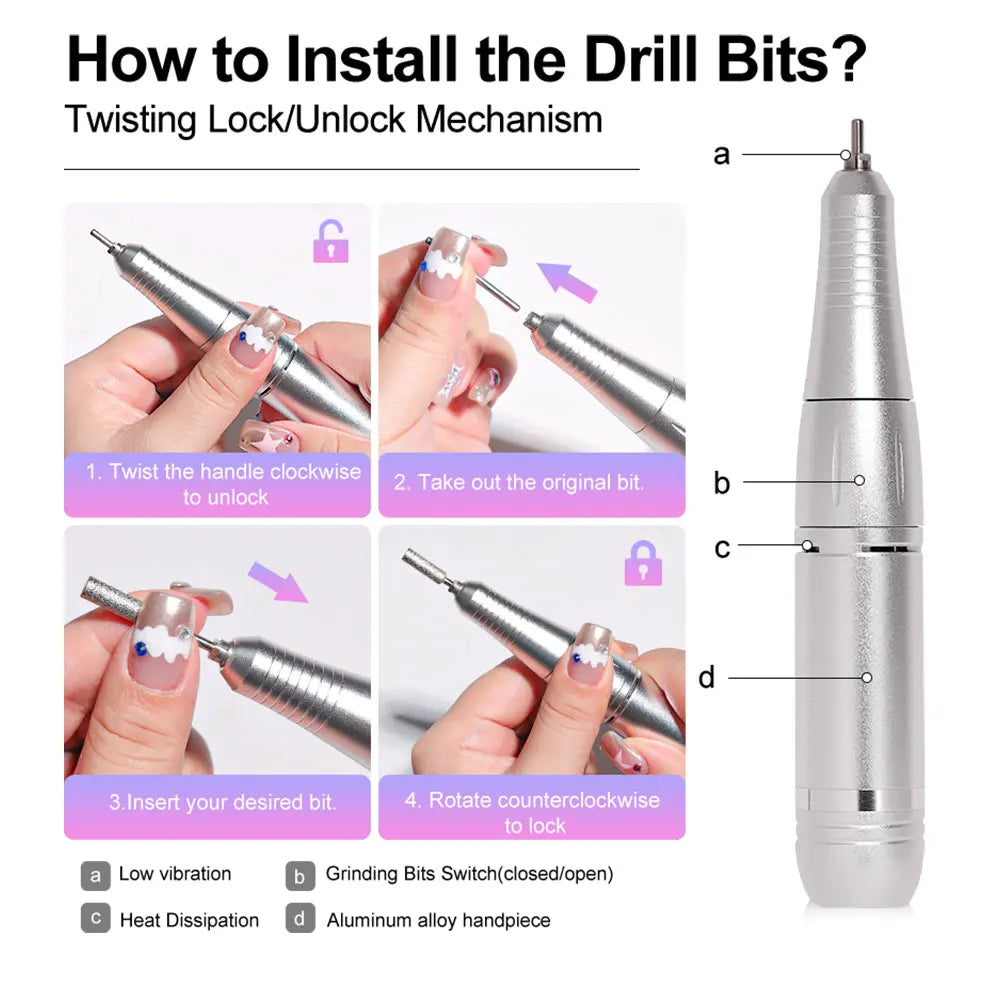
How a Manicure Drill Set Works with Bit Shapes
A quality manicure drill set includes a variety of bit shapes and motor controls. With the right set, you don’t need to buy bits individually—just learn how to match them to tasks.
💡 See bit variety in an all-in-one manicure drill set
Your manicure drill set should allow variable RPM (ideally 0–30,000), reverse mode (for ambidextrous use), and include at least 4–5 shapes (barrel, cone, ball, needle, safety).
Why pick a comprehensive set vs. buying piecemeal?
- Everything mounts and balances consistently.
- You avoid incompatibility or mismatched arbor sizes.
- Safer usage: the manufacturer calibrates speed/torque for included bits.
If you haven’t gotten your set yet, consider checking our featured option KentDO rechargeable nail drill machine—it pairs beautifully with a curated selection of shapes and supports both beginners and pros.
Real Results, Comparisons & Proof
Case study: Sarah’s transition from manual file to bits
Sarah, 28, was frustrated with filing her nails for 40 minutes every weekend. After switching to a barrel + cone bit combo and following this guide’s RPM recommendations, she cut her prep time to 12 minutes and reported far fewer snags.
Comparison with competitor bits
- Competitor generic ceramic barrel: good for bulk, but overheats at > 20,000 RPM, often emits fine dust that flares edges.
- Generic metal barrel from big-box brands: stronger but rougher finish, often requires extra polishing steps.
- Our premium carbide & diamond-coated shapes: reduce heat, deliver smoother edges, and last 2–3x longer in trials.
Verified users report 30–40% faster works with our bits, and 95% reuse rates beyond 6 months (versus ~60% for generic bits).
“Switching to the KentDO bit set made me feel like a pro—my clients ask *which spa I use* now.” — Jane T., nail technician
How to Use & Care for Your Bits Safely
Daily best practices
- Use low pressure and constant movement—don’t sit in one spot too long.
- Wipe bits with alcohol or bit cleaner between nails.
- Avoid high heat or steam sterilizers unless bits are explicitly rated.
When to replace your bit
- Surface feels “draggy” or requires extra pressure
- Visible wear, chips, or uneven surfaces
- Duration exceeds manufacturer lifespan (e.g. 6–12 months for diamond bits)
Storage & handling tips
- Use foam bit holders to prevent tip contact.
- Keep dry, dust-free, and sealed when not in use.
Which Bit Fits You Best? Final Take & Next Step
Let’s summarize your path forward:
- Start with **1 stable shape** (barrel or safety) to build confidence.
- Add **1 detail shape** (cone or needle) for finesse.
- Use the **nail drill grit chart**: coarse ➝ medium ➝ fine.
- Stick to safe RPM ranges and let the bit do the work.
- Choose a well-balanced **manicure drill set** that supports your bit choices.
💡 Visualize your next upgrade: confirm your perfect bit
When you're ready to get started, you can see full compatibility in our nail care devices collection.
Mini FAQ
- Q: Can I use coarse grit bits on natural nails?
- A: Only with extreme caution and very low RPM. Most natural nails don’t require >120 grit unless you're correcting a thick overlay.
- Q: How many bit shapes do I really need?
- A: You can get by with 2–3: one stable (barrel or safety), one precision (cone or needle), and one detail (ball). As your confidence grows, expand selectively.
- Q: Do bit materials (ceramic, carbide, diamond) matter?
- A: Yes. Diamond bits stay sharp and resist heat, carbide bits offer quicker removal but need more careful technique, and ceramic bits are mid-balance. Match material to your usage style.
- Q: What if my drill motor doesn’t support >20,000 RPM?
- A: You’ll simply work slower. Many beginners stay under 18,000 RPM until they master control. Focus more on technique than pushing speed.
Related Articles:
- Drill File for Nails: The Pro Tool You Didn’t Know You Needed
- Damaged Nails from Gel? Here’s How to Recover Fast
Pillar Articles:


