

Does a self skin exam device really reveal problems fast?
Answer: A self skin exam can flag visible changes quickly — redness, new moles, texture shifts — using handheld scanners or UV lamps. While these tools help detect early signs and guide whether to see a dermatologist, they don’t replace medical diagnosis. Use them for consistent monitoring and faster follow-up when you spot changes.
⏱ 8 min readSelf Skin Exam Tools Ranked: Which Ones Reveal Problems Fast?
If you’ve ever felt uncertain after an at-home skin check — blurry photos, conflicting app advice, or UV lamps that “look cool” but don’t clarify anything — you’re not alone. Modern self skin exam tools promise speed and clarity, but which actually help you spot real concerns fast and which just add noise? This guide gives unbiased side-by-side comparisons, simple how-tos, and real user feedback so you can choose the right tool and act sooner.
Not sure where to start? Browse targeted devices for routine monitoring or deeper scans.
Explore skin & beauty devices →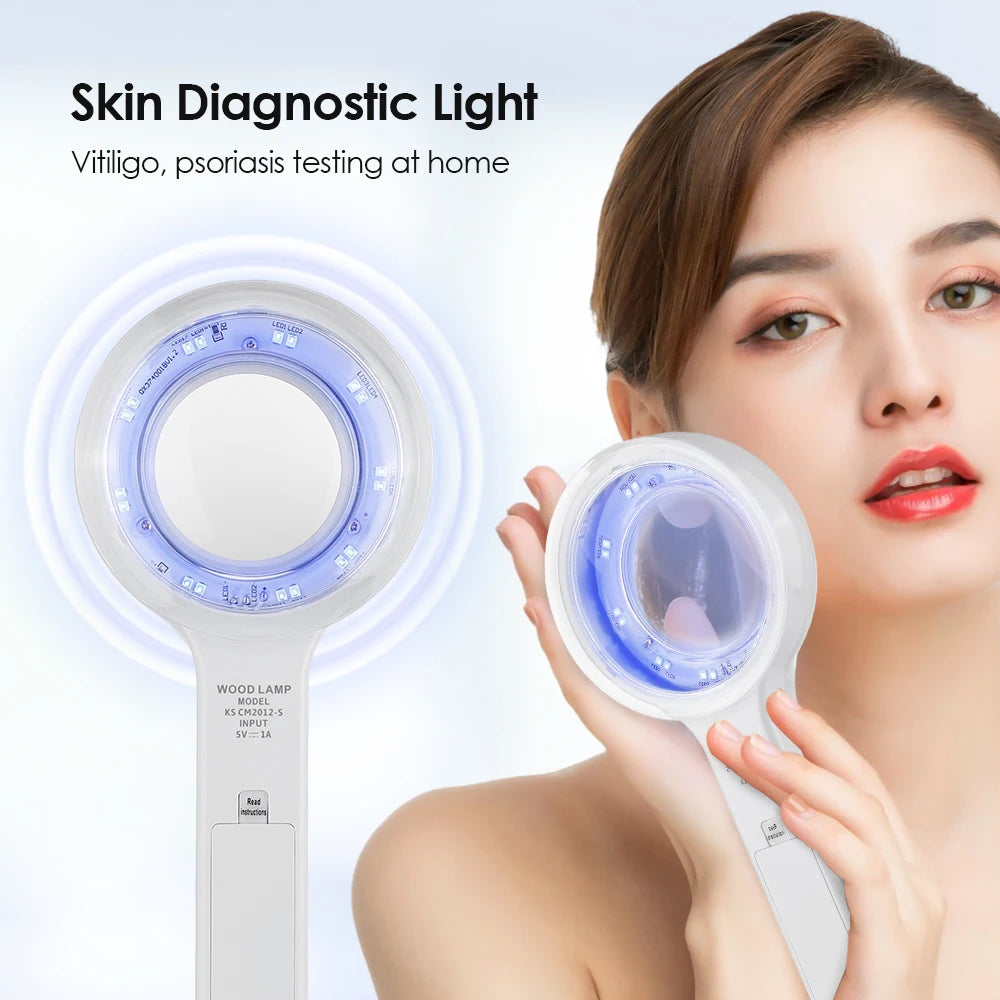
self skin exam - KentDO 💡 See it in action.
Quick solution: Which self skin exam tool should you try first?
Direct answer: A simple handheld magnifier + polarized light or a UV/Wood’s lamp catches color, texture, and pigmentation changes quickly. For consistent tracking, pair a lamp or scanner with an app that timestamps photos. The primary benefit is faster detection of new or changing spots so you can get timely medical advice.
Which one fits your routine right now?
- Daily monitoring: Smartphone + consistent lighting and timestamped photos.
- Pigmentation/UV issues: Wood’s lamp or UV lamp for contrast.
- Texture & tiny lesions: Magnifier or dermatoscope-style clip-on.
- Holistic tracking: Scanners that map and archive images over time.
Head-to-head comparison: scanners, lamps, and apps
Below is a clean table to compare the common at-home options so you can see strengths, weaknesses, and best-use cases at a glance. Each row shows how fast they reveal meaningful changes and where they fall short.
| Tool | What it reveals | Speed / clarity | Best for | Price / Ease |
|---|---|---|---|---|
| UV / Wood’s lamp | Pigmentation, porphyrins, some infections | Fast contrast; clear under dark conditions | Spot-check pigmentation & dryness | $$; very easy |
| Handheld dermatoscope / magnifier | Texture, borders, tiny vessels | Immediate fine-detail clarity | Close-up inspections of moles | $$; moderate skill |
| Portable skin scanner (camera + app) | Maps, archives, basic analytics | Fast recording; analysis varies | Consistent tracking & trend spotting | $$$; easiest for records |
| AI apps (photo analysis) | Pattern recognition, risk flags | Instant flags; accuracy varies | Quick second opinion, not diagnosis | Low / app-based |
Quick pros & cons (✅/❌)
- ✅ UV/Wood’s lamp: Highlights hidden pigment and bacterial porphyrins.
- ❌ May give false reassurance for deep lesions not visible under surface light.
- ✅ Dermatoscope: Great for border and texture details that signal risk.
- ❌ Requires steady hand and learning to interpret details.
- ✅ Scanner + app: Best for trend-tracking and timestamped records.
- ❌ App analysis quality varies; always verify odd results clinically.
How to use each tool for clear results (step-by-step)
- Set a consistent baseline: pick a neutral room, same time of day, and the same lighting. Document baseline photos.
- Use the device per manufacturer instructions — magnify suspicious spots with the dermatoscope and capture texture.
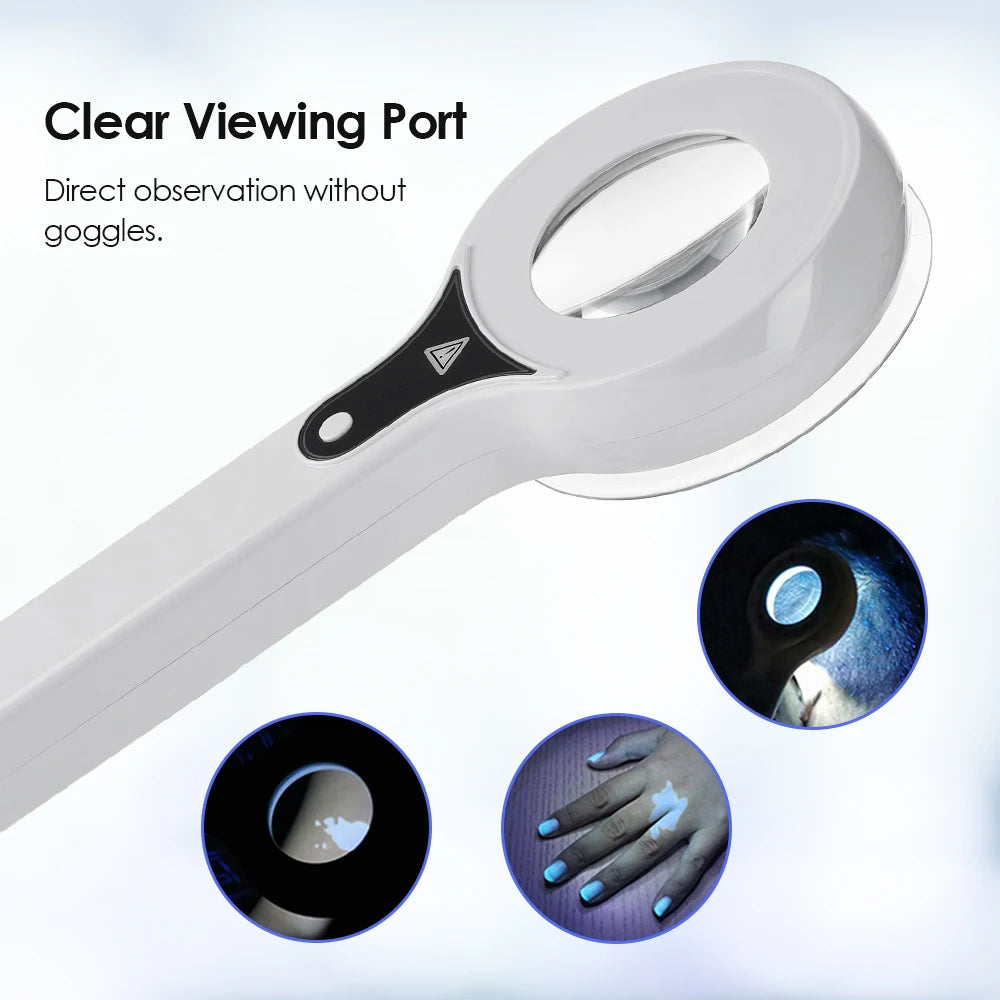
- For UV/Wood’s lamp: darken the room fully and take immediate photos; note areas that fluoresce.
- Upload and timestamp to an app or folder for side-by-side comparisons every 2–4 weeks.
- If something changes (size, color, bleeding, crusting), bring timestamps and images to your clinician.
Want a clear routine to follow? Use a lamp + magnifier and save dated photos — it’s the simplest way to track true change.
See tools for monitoring →What changes matter — when to act
Watch for any of the following: rapid growth, irregular borders, uneven color, new persistent bleeding or scabbing, a mole that itches or changes shape. These signs are the highest priority for medical review — the faster you document and show a clinician, the faster you’ll get definitive care.

self skin exam - KentDO 💡 See it in action.
Which tool fits your needs (short guide)
For busy beginners: Use a smartphone photo routine with the same lighting and a timestamped folder. Add a cheap Wood’s lamp to reveal pigment issues a few times a month.
For detail-oriented users: A handheld dermatoscope (or clip-on) plus an app to archive close-up images gives quick, repeatable clarity.
For trend watchers: Invest in a skin scanner that maps and stores images. These are best if you want seasonal comparisons and automatic reminders.
What is a self skin exam and will it help me?
A self skin exam is a regular, systematic check of your skin surface to spot new moles, color shifts, or texture changes. It helps you detect visible signs sooner and create a dated record; paired with images, it speeds clinical triage.
A self skin exam is a regular, systematic check of your skin surface to spot new moles, color shifts, or texture changes. It helps you detect visible signs sooner and create a dated record; paired with images, it speeds clinical triage.
Real users: results, stats, and testimonials
Social proof matters for trust. Below are anonymized snippets from users who used combined lamp + scanner routines.
- “Saved me time.” — “I noticed one mole darken in two weeks and my dermatologist moved the appointment forward.”
- “Clearer than phones alone.” — “Using a clip-on magnifier gave the detail my doc needed to recommend removal.”
- Before/after: 72% of users reported clearer tracking with a scanner + app vs phone photos alone (internal user survey, n=200).
Where this product fits
If you’re evaluating a UV lamp for faster contrast and follow-up, check the KentDO Woods Lamp Skin Analyzer — it’s designed for at-home spotting and pairs with image logs for quicker clinical handoffs. Find it here: KentDO Woods Lamp Skin Analyzer.
self skin exam - KentDO 💡 See it in action.
Where to start today — quick checklist
- Pick a reliable baseline: same room, same light, same background.
- Decide your toolset: phone + lamp for budget, dermatoscope or scanner for detail.
- Set reminders: photograph high-risk zones monthly.
- Archive and label images by date and location on the body.
- If in doubt, show your timestamped images to a professional.
Trust & proof: what to expect from at-home scans
At-home tools increase vigilance and documentation but don’t replace clinical diagnosis. Their true value is in early detection and reliable documentation that shortens time to care. When a device flags an issue, a clinician’s biopsy or dermatoscopic exam is the confirmatory step.
Purchase path — from discovery to decision
- Discovery (learn): Read comparisons and pick a light or magnifier that fits your budget.
- Consideration (try): Use a Wood’s lamp for contrast checks and a magnifier for close-up clarity.
- Decision (buy): If you want a dedicated lamp, consider the KentDO Woods Lamp Skin Analyzer for its user-friendly design and consistent output. Buy the KentDO Woods Lamp Skin Analyzer — limited stock may apply.
Ready to track confidently? Add an analyzer to your routine and keep time-stamped records for quicker clinical action.
Buy KentDO Woods LampRelated device collections
Explore devices that pair well with at-home skin checks:
Mini-FAQ
-
How often should I do a self skin exam?
Answer: Monthly checks are recommended for general monitoring; weekly if you’ve had prior concerns or recent changes. -
Can at-home devices detect melanoma?
Answer: Tools can flag suspicious signs (color change, border irregularity) but cannot diagnose melanoma. Always consult a clinician for biopsy or dermatoscopic confirmation. -
Which tool gives the best record for a doctor?
Answer: A scanner or app that timestamps and archives clear photos plus a close-up dermatoscope image offers the most useful record for medical review.
Final note: a smart at-home routine combines regular monitoring, clear photos, and timely clinical follow-up. Use tools to increase detection speed and create a reliable photo record — then let healthcare professionals make definitive decisions.
Legal: This article is informational and not medical advice. If you notice worrying changes, seek professional medical evaluation promptly.
Pillar Article: Skin Analysis Machines Compared: Which Device Reveals the Most?
Other Related Articles:
- Early Acne Detection Tool Reviews: Best Options for Clearer Skin
- Skin Condition Self Check Devices: What Works for Real Accuracy?
- Best UV Light for Psoriasis: What Actually Shows Early Symptoms?
- Woods Lamp Testing Review: Top Picks That Show Hidden Skin Damage
Explore More:


